In this tutorial, I will talk about photography, some techniques that also apply to the real world and some tricks to make your photos look better. Of course, I explain here how I take pictures, your mileage may vary but maybe some of these tips will help you while others may sound like no-brainers, but I'm going to explain everything.
You might be thinking "well, anyone can take a picture in SL, all you have to do is press Ctrl+Shift+S, save it and it's done". Yes, but there are so many things to know to take good pictures, that I think a tutorial might still help.
Focusing the camera
In order to take a picture you must first know how to move your camera, of course, and how to focus on something, as by default your camera is behind your avatar and is not focused on anything. It's said to be "locked to the avatar".
To unlock your camera and focus it on something or someone, simply hold Alt and left-click on the subject of your attention. You can dolly back and forth and orbit around it left and right while you hold the Alt key down. Please note that in order to take good closeups you need to activate the "Disable Camera Constraints" option in the Advanced menu (press Ctrl+Alt+D if you don't see it) otherwise your camera won't go closer than a certain distance. That works only for moving the mouse with the Alt key down, it doesn't change the behavior when moving the camera with the arrow keys or dolly back and forth with the mouse wheel.
While holding down the Alt key, you can also hold the Ctrl key to orbit left and right and up and down around your subject, and if you also hold the Shift key you can pan your camera left and right and up and down instead of orbiting.
When you focus your camera on something other than your avatar, the latter will look at the point of your focus if nothing animates your eyes. It can be a blessing or a curse as you may not want that. Fortunately, most mesh heads come with a HUD that lets you control your eyes, and if you don't have one you can buy such a HUD. More on that later.
Another blessing and curse of focusing on an object is the Depth of Field, if you activated it. It may or may not work well for what you intend to do, so feel free to turn it on and off at will.
Zoom level
This is the very first thing to think about when taking a picture. The default zoom level in SL is good for looking around, but not good for taking pictures as it deforms them, so it is necessary to increase the zoom level (or decrease the field of view, which is the same thing) in order to "flatten" the image. The same happens in real life. When you take a picture of someone, you want to take a few steps back and to zoom in, instead of staying up close and taking the shot with a wide angle. That's why selfies look deformed and selfie sticks are a thing.
To change the zoom level, simply press Ctrl+8 to zoom out, Ctrl+9 to return the zoom to default and Ctrl+0 to zoom in. The numbers are the row above the letters on your keyboard, not the numbers on the keypad. It works whether you are using a QWERTY or AZERTY keyboard.
When I talk about "zoom level" I mean the number of times you press Ctrl+8 or Ctrl+0 after having gone back to the default zoom with Ctrl+9. So if you press Ctrl+0 twice, I call that "two zoom levels" or "zoom level 2". It doesn't mean "zoom x2" but you get the idea.
Let me show you :
Here is my face at zoom level 0 with the camera right in front of me. As you can see, my nose, my eyes and my lips look big and my head looks round. Also notice the door behind me that looks like I can't walk through it, as it is several steps in the back.

Now for zoom level 2 with the camera moved back a little. Isn't it much better already ? Still a little deformed but a lot less than above.

Zoom level 4 with the camera moved even further back. My head looks flatter and prettier, the door looks bigger :

Zoom level 6, the camera keeps moving back so my the top of the shoulders are on the bottom of the frame and the top of my head clears the top of the frame by only an inch. The differences with the one above are subtle but if you look closely, the proportions look better. Also the door behind me looks bigger.

Zoom level 8 now. The photo looks a lot more professional than the first one, and you can see that I actually fit through the door now. In fact, I could keep moving the camera back and zooming in (provided there's enough clearance behind the camera so it doesn't go through a wall), and eventually I'd reach what is called an "orthographic view". But the zoom is limited in SL so we can't have that.

And if you wonder how I look with zoom level -2 (remember that means press Ctrl+8 twice from the default zoom level) and the camera practically on my nose, well... let's just say it can be a wanted effect, in fact I used that effect twice in New Life to simulate a certain uneasy feeling. But usually I steer clear from negative zoom levels when taking pictures.

Zoom levels are very important for taking good pictures, and you probably guessed that every situation has its own preferred zoom level. Here are the zoom levels I usually set depending on the kind of photo I take :
- Zoom level 2 : A single standing character taken full-length, two characters who are talking but are not very close to each other, or a closeup when I have very little clearance for the camera (when moving back makes it clip through something or someone).
- Zoom level 4 : A single standing character taken from the waist up, a whole character sitting on something, two characters close to each other taken from the chest up.
- Zoom level 6 : A single character taken from the chest up, an interesting small object, a closeup on the faces of two characters standing or sitting close.
- Zoom level 8 : A closeup on the face of a character (or two characters kissing), or on any other part of their anatomy, a small object with something to read on it.
Remember that the higher the level, the further back you have to move your camera. This means that you must select the "Disable camera constraints" in the Advanced menu (Ctrl+Alt+D to have it show if you don't see it). Also make sure to have enough view range especially if you activate the dynamic shadows (more on that later) because some back walls may disappear from your viewer and they wouldn't cast shadows anymore, disrupting the scene.
Portrait height
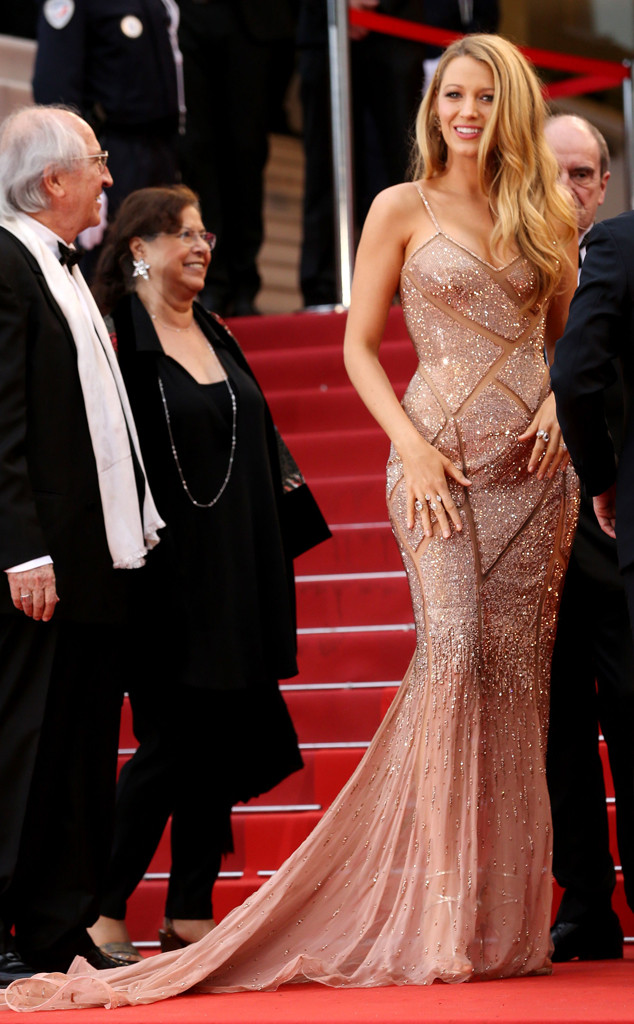
There is something to remember when you shoot someone's whole character, standing (which usually means zoom level 2). When you look at pictures of famous people taken at an event, for example at the Cannes festival, you often see them deformed, especially women, who are often smaller than the male photographers. This is because the photos are difficult to take since there is a crowd so the photographer has to stand where they can and shoot from there, usually at face level with a wide angle. The result is a mildly deformed top and heavily deformed legs, like this :

Now don't get me wrong, the subject is sublime and the photographer is a professional, but the photo itself is still not good because it was taken too high, too close with a wide angle. See how you see her face almost level but her feet from above ? That's deformation you don't want because it makes the top of her body look bigger than her legs and you don't want the legs to look short, especially on a woman, double especially if she is wearing high heels. That's a faux pas (pun totally intended).
If the photographer had had more time and space (*), he or she would have crouched a little further back, increased the zoom and gotten a photo like this :
See how divine she looks on the picture above ? She's the same woman (Blake Lively). This is because this photo was taken at hip level (the photographer was crouching) from further back with a higher zoom. The result of this is that the deformation is a lot less visible and the model looks like she is towering the spectator. This makes a all the difference.
(*) At the time I wrote this, I checked the same web page... and found out that all the other photos of the same set were taken at head level from the same distance. All the full-length photos are just as poor, so I could not take any one of them to prove my point. This is why the second photo comes from another website. Still, I do not criticize the first photographer's skill or choice of tools, because I certainly couldn't do better, not being a professional photographer myself.
All this to say, when you shoot a model in full-length, lower your camera so it is at crotch level, move it back and zoom in, two or four levels are enough.
Here is how the first photo would look in SL with the camera at head level, not far from the subject and without zoom :

And how the second one would look when following the advice above, camera at crotch level and moved back a bit, zoom level 2 :

Rule of Thirds
Like above, this tip comes from real life photography, and is not really a rule, more like guidelines to make your photo more enjoyable to look at.
Imagine your screen being divided in nine rectangles, like this :

On that picture, I "naively" tried to put the focus on the right road and on the horizon line, the perspective point being right in the middle of the screen. Let's discuss how to make it look better.
The four intersections are the nexus points to which the eyes are naturally drawn when looking at a picture. Same for the lines themselves, which are where the eyes scan first for interesting information in the picture.
For example, it is a good idea to keep the horizon on the lower 2/3rds line if you want to show sky, and on the upper 2/3rds line if you want to show the detail on the ground. Likewise, if the subject is not just a character but a character with its surroundings, it is good to make the character match with one of the two vertical lines or occupy one of the two outer columns instead of standing in the middle. When taking a portrait up close, for example the face, you want the eyes to be on the upper horizontal line and the lips to be on the lower one. Here we go :

What's the focus now ? I have simply panned the camera to the left and up, now the buildings are on the left and right vertical lines and the "horizon" is on the lower third line. This makes the photo more interesting to look at.
For a character in a scene it would look like this :

Notice how the two points of interest, the flower and the eyes, are both on nexus points. Incidentally, it is harder to notice the cup of coffee which is right in the middle. Odd, huh ?
As for a closeup on the face, we get this, with the eyes on the upper line (and the leftmost eye on the upper left nexus) and the lips on the lower line, allowing to see the chin and neck but not the top of the skull, which makes for a better framing. In this picture, the eyes of the spectator are naturally drawn to the eyes of the subject first, then on the rightmost part which is the window, as if she were expecting something there although she couldn't possibly be looking through the window since she is turning her back to it :

Although this "rule" is very well known among photographers, like any rule, it is sometimes a good idea to break it when you feel doing so would make your picture look better, your mileage may vary.
Rule of Tangents
Another real life "rule", although this one is (to me) more important than the rule of thirds. This rule comes directly from comic book drawing. In short, you don't want your spectators to think that two objects are connected when they are not.
Actually there is so much to say about this rule that I will not develop here or it would take a whole page. Instead, I will point you to this link.
However, here is an example of two bump-up tangents, one with the top of my skull bumping against the top of the frame, the other with the side of my head bumping against the side of the cabinet, plus one line tangent between my leftmost shoulder and the leaf of the plant behind me, making it look like it is part of my clothes (that one wasn't actually done on purpose so you see it's easy to get tangents without noticing) :

Advanced Lighting Model
When you shoot photos in SL, you absolutely want to activate Advanced Lighting Model or ALM to get dynamic shine and dynamic shadows. Your computer might not be powerful enough to handle the latter, but you can turn them off and keep the dynamic shine, which is not taxing on the graphics card.
To turn ALM on, simply go to your Preferences, to the Graphics tab and press "Advanced Settings...". Depending on your viewer the window may look different, but on the SL viewer and on the RLV it looks like this :

Locate the "Advanced Lighting Model" check box and activate it.
If your viewer slows down too much for you, choose either "None" or "Sun/Moon" in the "Shadows" drop-down list :

Same for Ambient Occlusion, which I keep turned on (except on these pictures but don't mind it), it tends to eat a lot of GPU time but makes the picture look better, and the shadows smoother.
If you use Ambient Occlusion too, you might want to increase the "dirt" effect in corners. You can do this by modifying the following debug settings (Advanced > Debug Settings) :
- RenderSSAOEffect : x=0.6
- RenderSSAOFactor : 1.0
Speaking of shadows, I also use specific settings to keep them from looking weird. Here is an example of a cube and a rod standing on it but not clipping through it, under two different projected light sources.
Something is odd in this picture. The rod touches the surface of the cube but the shadows make it look like it is hovering above it. This is with the default spotlight shadow debug settings.

But with the right debug settings, you can get this :

The debug settings I use are :
- RenderSpotShadowBias = 0.000
- RenderSpotShadowOffset = 0.010
As for Depth of Field... I'm torn about it. It really depends on the situation. Depth of Field makes a picture look better by blurring whatever you are not focusing on, like this :
Here is a shot where I focus on the flower on the table, without DoF. It looks strange as I and the rest of the background should be blurry. Here taken at zoom level 6 (remember, 6 because I'm focusing on a small object) :

The same focus and angle, this time with DoF :

The problem occurs when you focus on yourself or on another avatar for a closeup while wearing a rigged mesh head and/or body. The DoF goes crazy ! It becomes frustrating to have your face crisp and the rest blurry. You most likely need to wear something unrigged and invisible on your face to focus on, making it a pain. There's also the problem of the animations you use, for example if you shoot yourself while standing and having your Animation Overrider activated, chances are you will move a lot. Then the time window when your face is crisp on the photo versus when it leaves the focus will be narrow.
Plus, particles actually blur whatever is behind them when DoF is activated. This is a bug but it can really ruin a photo when you shoot at the wrong time. I had this problem in the Magic Shower scene of the "Long Bondage Scenes" tape, as well as in New Life, which was shot entirely with DoF on. Alis and Ebony & Ivory never use DoF.
All in all, DoF makes a picture look better, but can be a real pain in the butt. I generally use it when I want to emphasize the setting or when I want the spectator to focus on a particular detail in the picture, but I turn it off otherwise, especially in "action" shots.
If you really want to use DoF, I recommend the following debug setting :
- CameraFocalLength = 10.0 instead of the default 50.0
That way it is easier to get a crisp face while keeping the background blurry.

It gives you more "crisp depth" than the default, for example on this picture my view is focused on the "Flour" pot :

Windlight settings
This one is relatively easy but oh so important for many reasons. First of all, you want your scene to be lit just the way you want it. I'll cut to the chase right away, the default Windlight settings and the default day/night cycle are not good for taking pictures. At all. You need good Windlight settings instead, either custom ones or the ones issued with Firestorm (which I don't use so I don't know about them, instead I made my own).
Here is a scene with the Midday setting where the sun comes exactly from above :

The same scene in the "Hot day" setting I had made for the movie "Hot Mouse" :

A good and easy to make Windlight setting is one I called "Pitch Black", which is good for simulating total darkness. To create this Windlight setting, simply set the Blue Horizon color to black, the multipliers and altitude to the maximum, and the sun/moon and ambient colors to black. That's it. Of course you have to use local lights to see something in this setting, as it is completely black otherwise.
To create your own Windlight setting, go to "World" > "Environment Editor" > "Sky presets" > "New preset" (or "Edit preset" to edit an existing one) :


Another reason for a fixed Windlight setting instead of a free day/night cycle (either the default one or one you made yourself) is continuity issues. You don't want to start shooting a scene in the morning of the sim you're in, interrupt yourself, then come back to shoot the rest of the scene not noticing that it is afternoon and the light has changed, making you redo the whole scene.
Lighting
Now this is a big subject but I will stay general, as everything is subjective and depend on your personal tastes, and on the mood of the scene you want to shoot.
Generally, in real life, you do not want your subjects to be hit with direct lights. Instead you want them to receive indirect light, light that bounces off white walls or other neutral surfaces. This is why you see lamps in umbrellas in studios. A direct light "pollutes" a surface while indirect light lets you tweak the lighting in post-production (in the case of SL movies, you could use Gimp or Photoshop to tweak a picture after having taken it in SL, that's what I did in Alis for the overlays).
You cannot simulate indirect light in SL as the light doesn't bounce off a surface, SL does not use ray-tracing for rendering as it would be way too costly for the GPU.
So instead, you want your lights to be not too strong, and multiple. In fact it entirely depends on what you want your scene to look like. You generally want to avoid sharp shadows on the face as they tend to make the character look older, sometimes even weird (hence the use of face lights, more on that below).
I'm not an expert at this but I usually set two or three lights. One to the left, one to the right (with different intensities, the more intense one being the main light, giving its color to the scene) and one behind and slightly to the side, acting as the fill light. Those lights are regular lights, not projectors, as I reserve projectors for scenes where shadows matter. A shadow can even be a subject of its own in some pictures.
Lighting your scene is a matter of preference and often artistic taste. For example, in Ebony & Ivory one of the lights is red and the other is blue, creating a stark contrast between both sides, emphasizing the volume of the scene.
In dark scenes, I like to light the character with a single, very low and small light to emphasize the consciousness of the character of her own body, leaving the rest in the dark. I did that a lot in By A Thread and in Alis. The light I use is usually yellow with intensity 0.1, range and falloff 0.5. In Alis it was a projector but not in By A Thread, I don't know which option is better.
Here is a picture taken from Alis in the dark with such a light, which lights only the top half of the body, and not much :

Face lights are often a good idea (except in the dark) because they help removing the hideous shadows on the face of the avatars. I don't go overboard with my face light, it is very subtle. I wear it attached to my nose (or any head attachment), just for your information here are its values :

With this kind of light, the face shadows are greatly reduced but the rest of the body and the surroundings are not washed by a strong light.
Projector lights are also very interesting for making the scene look more real, as they project shadows accurately (don't forget the debug settings I pointed out earlier). Without at least one projector light, your scene looks like it is lit uniformly, which may or may not be what you want. It works for a bright scene like a hospital or a sci-fi spaceship bridge, less so for a dark themed setting.
For example, here is a shot taken with a strong overhead light without a projected texture :

The same scene but this time the light is a projector, with a blurry white circle as the projected texture :

The values for this projector are the following :

The texture I use to make this projector is this one, feel free to download it and use it for your own projectors :

One thing that is very important to keep in mind and that can quickly ruin a shot when using a projector is that the alpha-blended rigged surfaces such as hair are lit when inside the light radius regardless of them being inside the cone of light or not. For example, when your head is inside the light radius (here within 8 m) but not inside the cone of light (but still inside the maximum cone of light, the one it would have if its FOV were set to 3.0), the alpha-blended parts of the hair will be lit and not the masked or opaque ones and it will look ugly :

On this picture I am turning my back at the light and standing outside the cone of light, but with my head still less than 8 m away from the projector, and not above it. Notice how some of the hair strands are lit and others are not.
Framing
The art of taking a picture is the art of showing the right thing and hiding the right thing, leaving it to the imagination. What you hide is just as important as what you show.
A good framing is a matter of taste and situation, but here are a few tips that should help you.
Firstly, make sure to hide your HUDs with Alt+Shift+H so you're not confused by whatever HUDs you are wearing on the sides of your screen and shoot off-center without noticing. I know I fall into that trap all the time. Also hide your inventory window because it too can lead to a mistake with centering your snapshot, since it is usually a big vertical opaque window that is put either on the left or on the right of the screen, reducing the screen estate by that much only on one side, while it will not appear on the snaphsot.
Secondly, you may want to use animations that have from the look of them nothing to do with the actual action the character is supposed to execute on the picture, and take only a part of the character's body. Let me illustrate this with a concrete example.
Suppose the character is sitting in a chair at a table and talking to someone sitting next to her :

Now suppose you're at a point in the dialog where you want the character to look like she is pondering an idea, but you don't have the means or the time to make the pose yourself. And suppose you do have such an animation in your Animation Overrider, but it's a standing animation, not a sitting one. Something that looks like this :


You could really use the upper part of the body right now, while sitting on the chair. This is what we're going to do.
First, make sure the chair is phantom, because the character is going to stand through it. It needs to be modifiable for that :

Now stand where the chair is, clipping through it, and lower your Avatar Z Offset until the character's height makes her look like she is sitting on the chair, at least when seen from across the table (here I chose -0.47 for the example) :

Now move your camera back to where it was and shoot when the time is right :

To the spectator, the character is sitting on the chair and pondering. The rest doesn't matter as it is outside the frame of view.
Emulating movement
Sometimes you want to show that the character is moving, for example walking across the room. And sometimes you don't want to use two shots to do that, as the second one brings very little information compared to the first one.
The two techniques I use are "walking in place" and "shooting off-center". Let's start with the first one, walking in place.
Shooting a picture while walking is a recipe for disaster, you don't really want to do that. And in SL, when you walk your camera loses its focus and goes back to the "locked" state (see above), so it simply doesn't work. So if you want your character to look like she is walking, you have no other choice but to trigger a walking animation and to let her walk in place. Whether your Animation Overrider is modifiable or not, you can grab a copy of one of the walking animations it contains (provided said animation is copiable) or at least double-click on it from the AO's inventory to bring the animation popup with the "Play Inworld" and "Play Locally" buttons.
For this example I chose the "SexyWalk3Slow" walk animation I made for the Sassy Pony AO. It is sexy and makes it clear that the character is walking :

I was not moving while taking the shot, I was just standing there with the animation playing, looking like I was walking in place.
The second technique is even easier. In the shot above, I look like I am about to cross the doorway to the next room. But if it doesn't matter for the story which room I am going to, but rather which room I am walking out from, then you may want to make the character look like she is leaving the room, rather than entering the next one. To do this, I shoot off-center, putting the focus on the area the character is leaving and the character way off-center, almost at the edge of the picture, like this :

Cheating with angles
Sometimes you need extreme precision in a character's position, for example when she is pushing a button, grabbing an object or touching another character's body. And it can be rather impossible (or extremely time-consuming) to do so even with all the animation HUDs you may have. So sometimes you need to cheat. Remember the tangent rule ? This is a case where you want to break it. The art of making a movie (or even taking good pictures) is the art of illusion after all.
Here is an example.
Suppose I want my character to press a particular key on the keyboard of this computer :

To do this, I use the "bend_90_parted "pose (provided for free with a few of my products), lower my Z offset down to -0.07 (that's what works best for my avatar with this keyboard), and I tweak my pose with my Animare HUD until my hand points at the key I want. Oh, and I use my Maitreya HUD to animate my left hand into a pointing finger, like this :

Now suppose the key I want to press on this keyboard is the "Q" key. You see that my finger is near it but not exactly over it :

Animare angle steps are too coarse to precisely move my finger to the left so it hits the "Q" key exactly, so what to do ? I don't want to turn my character either or my hand would go way off the keyboard, and I don't want to move the character to the left side either because I can't see the result easily, and it would be too coarse a movement anyway. Well, an easy solution is to shoot from an angle that makes it look like my finger is over the "Q" key, and what's more, touching it, like this :

To take this shot I did not change anything in the position of my character, only the camera angle. Since the zoom level is rather high (level 6 here), the difference in size from the perspective is not obvious. The higher the zoom level, the less an object shrinks when it moves away from the camera. In orthographic view the sizes wouldn't change at all.
It's cheating but it works. I have used this trick a few times (but not often) in the movies I made. Before you ask, there was no such cheating going on during any of the kissing or sex scenes I shot :)
Continuity errors
They are the bane of every director, and I think most movies (as in, 99.9% of them) have some, as tiny as they are. It can be the weather changing brutally from scene to scene (in Batman The Dark Knight Rises, the attack on the stock exchange begins during the day but it is night time when Bane walks out, although the whole scene could not have taken more than 15 minutes), or an object changing place on its own (the pen on the desk in The Shining), or a piece of clothing that changes color, or a piece of jewelry missing, etc. It can be anything.
This is because movies are taken in several takes, over several months, and SL movies are no exception (except you hopefully won't take months to shoot your own). Suppose you spend a few hours with friends shooting a scene, and you have to call it a day because at least one of the members of the team has to log off, so you all agree to pick up where you left the next day, or the next week, or whenever.
When the day has come, everybody must go back to the same scene dressed exactly like they were before without omitting anything. But depending on how much time has passed during the two takes, things may have changed, memories may be blurry, and the props may have changed places especially if the stage is an actual living area and not just a place made for the movie. If it has known some use between the takes, there's a good chance there will be continuity errors.
How do you make sure you avoid those ? You can't. You can only be very attentive to details, review all your snapshots before picking up where you left, and controlling everything. You must be Kubrick-level of control freak, at least. But then again, even The Shining has continuity errors.
But you know what ? It's fun for a spectator to spot continuity errors, it gives them some insight of how the movie was taken :)
Resolution, ratio
This is a technical tip and specific to the HD Video System and RemVision. When you take a snapshot in Second Life, the resolution depends on that of the monitor your viewer is, and how much screen space it takes. For example, I have two monitors, one being 1920x1080 and the other 3840x2160, on which I usually make SL run (except when taking videos, I need the smaller monitor for that). Since I keep the SL viewer (or rather RLV here) maximized, it takes all the space on the screen but you can still see the Windows 10 task bar and the viewer's top bar. This means that when I take a picture, it defaults to the resolution 3840x2066. I find that to be too high for my personal work (your mileage may vary), so I tone it down to 1920x1033. It is not really important what resolution you choose as the uploaded texture will be 1024x1024 anyway (except if you want to go HD and span your snapshot over 4, 9, 16 or even 25 prims), but what is important is to stick to it or be prepared to have to specify the ratio for every texture that doesn't respect the default ratio.
Speaking of default ratio, you need to do the math and calculate the one corresponding to the resolution you prefer. For example, 1920x1033 gives a default ratio of about 1.886 because 1920 / 1033 = 1.858664. This number goes in the description field of the tape so the VHS player or the RemVision plugin knows what ratio to display the textures at.
Attention, if you switch monitor to take videos like I do, check the resolution again when you get back to taking snapshots, sometimes the resolution changes by itself and is off by 1 or 2 pixels. It's not a big deal, but it is better to stay exact.
Taking many pictures
For every picture I upload to be part of a movie, I usually have taken three, sometimes up to ten, sometimes I get it right at first try. It entirely depends on you but the more pictures you take the more time you need to sort them out and decide which ones you want to upload. The Alis movie contains exactly 588 uploaded textures (not including videos which generate their own textures, making it 777 textures in total), 463 pictures were rejected and not uploaded, so that's a pretty good ratio.
Adding glow
Adding some bloom to your picture can be a good idea, it makes it look prettier, brighter. However you can't do that with a HUD as HUDs can't glow, so it has to be an object in-world, unless you plan on doing post-processing with Gimp or Photoshop, but that's additional work to do on hundreds of pictures.
I have made such an object that follows the camera, always taking the whole view and overlaying what you see with a subtle glow. I used this trick during the epilogue of Alis because I liked how the volumetric light looked like during the movie and I wanted to reproduce the effect in a scene with no volumetric light as well.
See for yourself :

Without glow

With glow
The back face of the object has a visible center the avatar can focus on, in case you are taking photos of someone talking to a camera so they can focus on it.
This object is available for free at my shop with the rest of the tools I can provide.
This is the end of this tutorial about SL photography, you can move on to the next one about positions and animations...
Or return to the menu page.
Marine

