Let me introduce you to the latest product in the RealRestraint brand : the Deluxe Straps !


(please note that the accessories such as the feather duster and the outfits are not included)
Many already know and own the arms & legs RR straps, which were some of my very first and most successful products. They still work well after 9 years since they are still kept up-to-date like the rest of my products, but they are a bit basic in terms of functionality and looks (they were made with prims, when sculpties were not even an idea).
So I've been wanting to make a full set of mesh straps for a while, not with just 6 straps but with dozens ! And with binders ! And chains ! And materials ! And total control over what to show and what to tint and texture !
This is why this set of straps is not an upgrade to the existing ones, but a new product. They are completely different and much more full-featured. In fact, they are on par with the Siren Ropes and the Pretty Mummy set (minus its gag and blindfold) in terms of functionalities. And they are made to complete the Body Harness, the Deluxe Gag & Blindfold (and its bridle) and the Highbinder, as they use the same textures and lighting effects. They can even be made of clear plastic, just like the Body Harness and the Deluxe Gag !
On a side note, I'd like to upgrade the old RR straps by making them mesh at some point and look like these Deluxe Straps. It is a lot of work though so I can't give an ETA, but that's definitely in the plans, and when it's done it will be provided as an update at no cost for you. That way you will be able to texture your old straps just like these Deluxe Straps, while currently they are just black. Attention, this doesn't mean they will have the same features, both products are different and have different prices.
Advanced Lighting Model
Before we go further into the presentation of the Deluxe Straps, be aware that like the Body Harness, Deluxe Gag and Highbinder, they make extensive use of the Advanced Lighting Model, a.k.a. materials. In fact, if your ALM is off, they will look flat and bland to you as they won't shine. You need to activate ALM in order to see them the way they are meant to be.
To do this, open your Preferences, go to "Graphics" and tick the "Advanced Lighting Model" checkbox, if not already done :

And if this cripples your FPS (Frames Per Second, the speed at which your viewer renders your view in SL), just deactivate the dynamic shadows like this :

How tightly you can be restrained
The Deluxe Straps are tight, very tight. And there are many of them. That's what makes their strength, there are so many straps and you have so much control over the ones to show and the ones to hide, that it will be a while until you visit all the possible looks. In fact, I won't even show you all of them here, that would take too long to even read. I'll give you a few examples, from lightest to tightest.
Let's start with the arms first.
How about one strap around the elbows ? It doesn't look secure but if the elbows strap is tight enough, you won't slip out.

Really not tight enough ? Ok, how about two straps then ?

Three ? Four ?


How about a binder instead ?

Wait, there are other ways to make this kind of bondage secure... Just add a chain between the wrists. Even with just one strap around the elbows, it is almost inescapable. A personal favorite of mine.

What's more, the hands are not frozen so you can actually use objects like this, and do for example... maid duties !


Or if you need to go to bed and feel comfy, this is how to tuck you in :

Playful bondage is nice, but you may want it more serious. Arms behind the back, pinned against the torso :

More secure ? How about adding a strap around the hips and a chain that links your wrists strap to the front of that belt, going between your legs ?

But if you're flexible, why not do the classic "elbows back, arms parallel" bondage ?

Pfft, you can take more than two straps, can't you ?

Haha ! Try getting out of that !
Granted, it could be made comfier. How about we replace those straps with binders instead ? So you can sleep ?

It's no less secure, but certainly easier on the skin.
And if you're into ponyplay, these arms could be put into a pretty pose like this :

Oh, you spend all day like this ? How about binders instead so you feel comfier and avoid pesky marks on your skin ?

This bondage too is comfy. Intricate, too. You think you could get out of it ? But every time you pull with an elbow, the middle strap cinches your wrists tighter. Japanese-style bondage but with belts and a few rings !


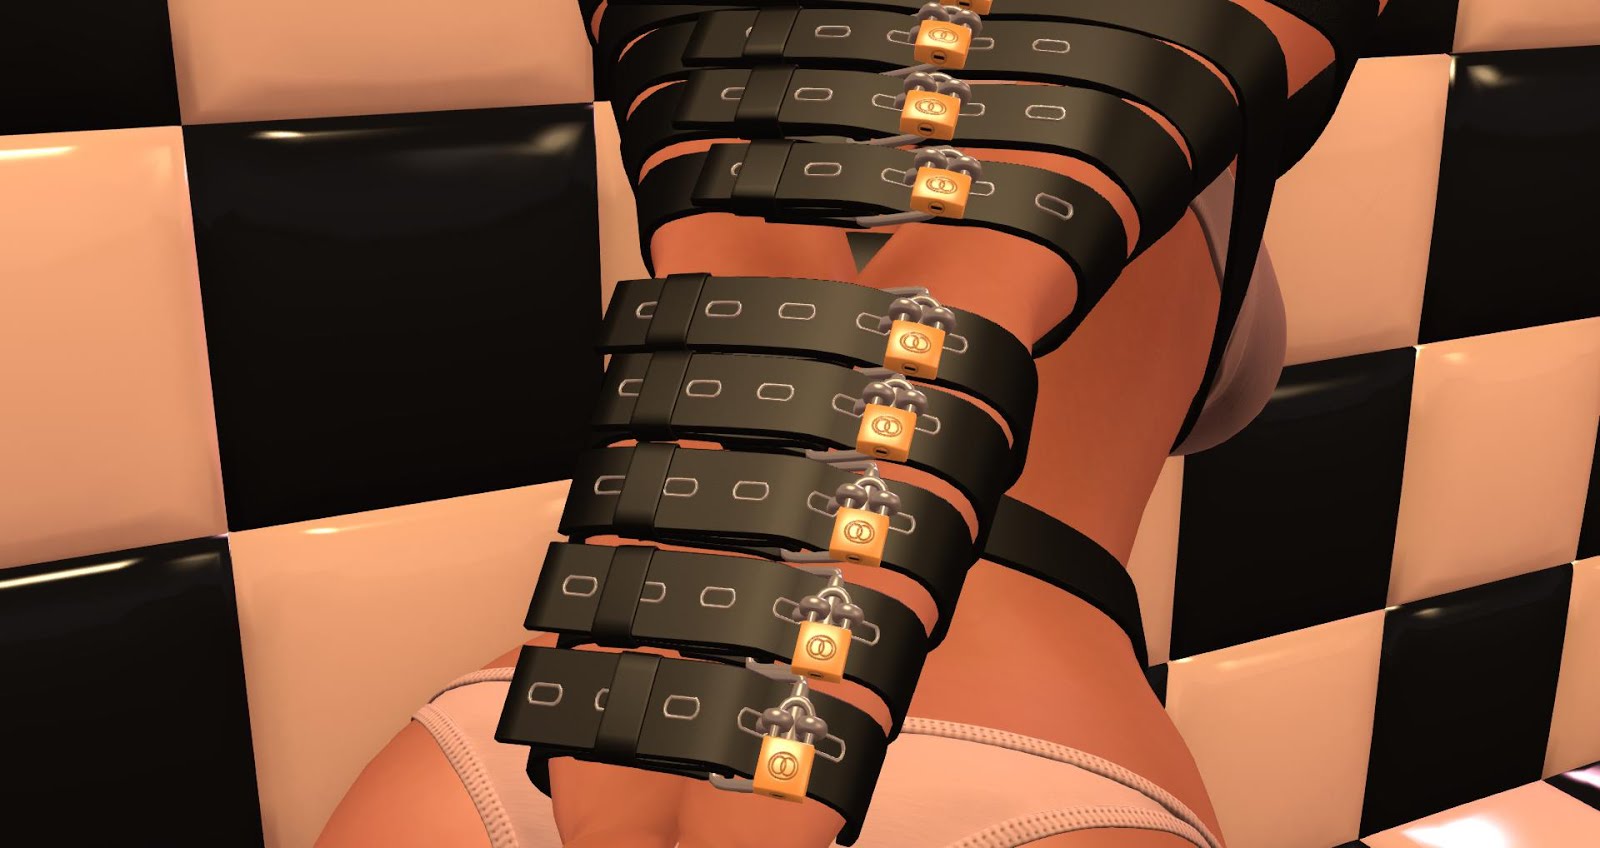
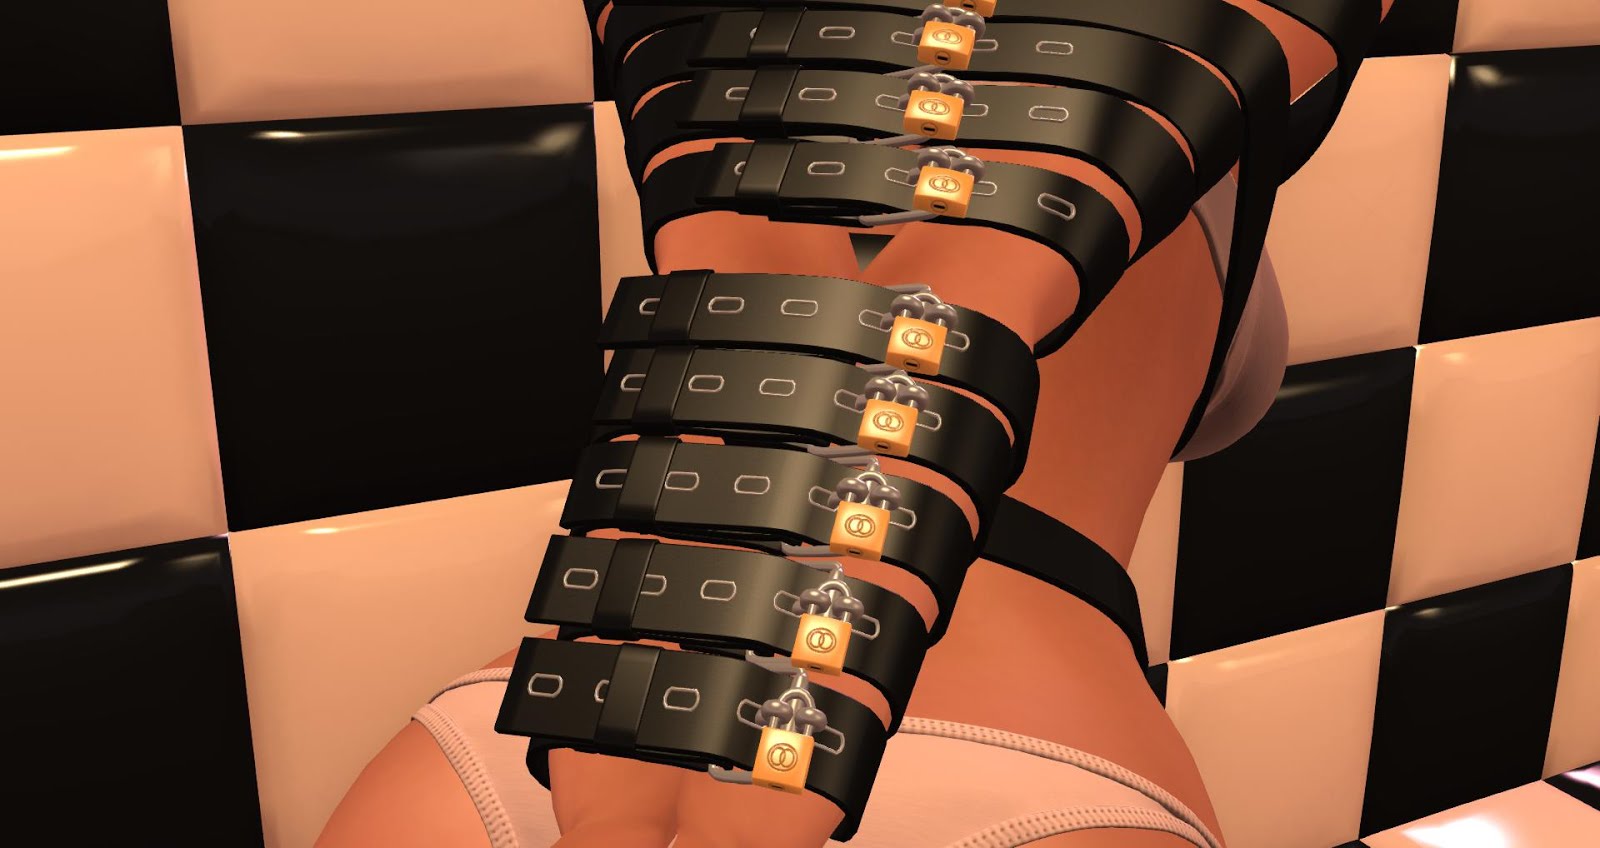
How about we use it all together ? This lock is called "Supertight" for a reason !


Yes, there is even that nasty crotch chain to make sure you won't move your arms away from your ass.

Of course you don't have to have so many straps, some can be hidden too. Even the crotch chain can be removed. It might be too tight and secure for you after all. *grin*

See ? It looks a lot more reasonable.
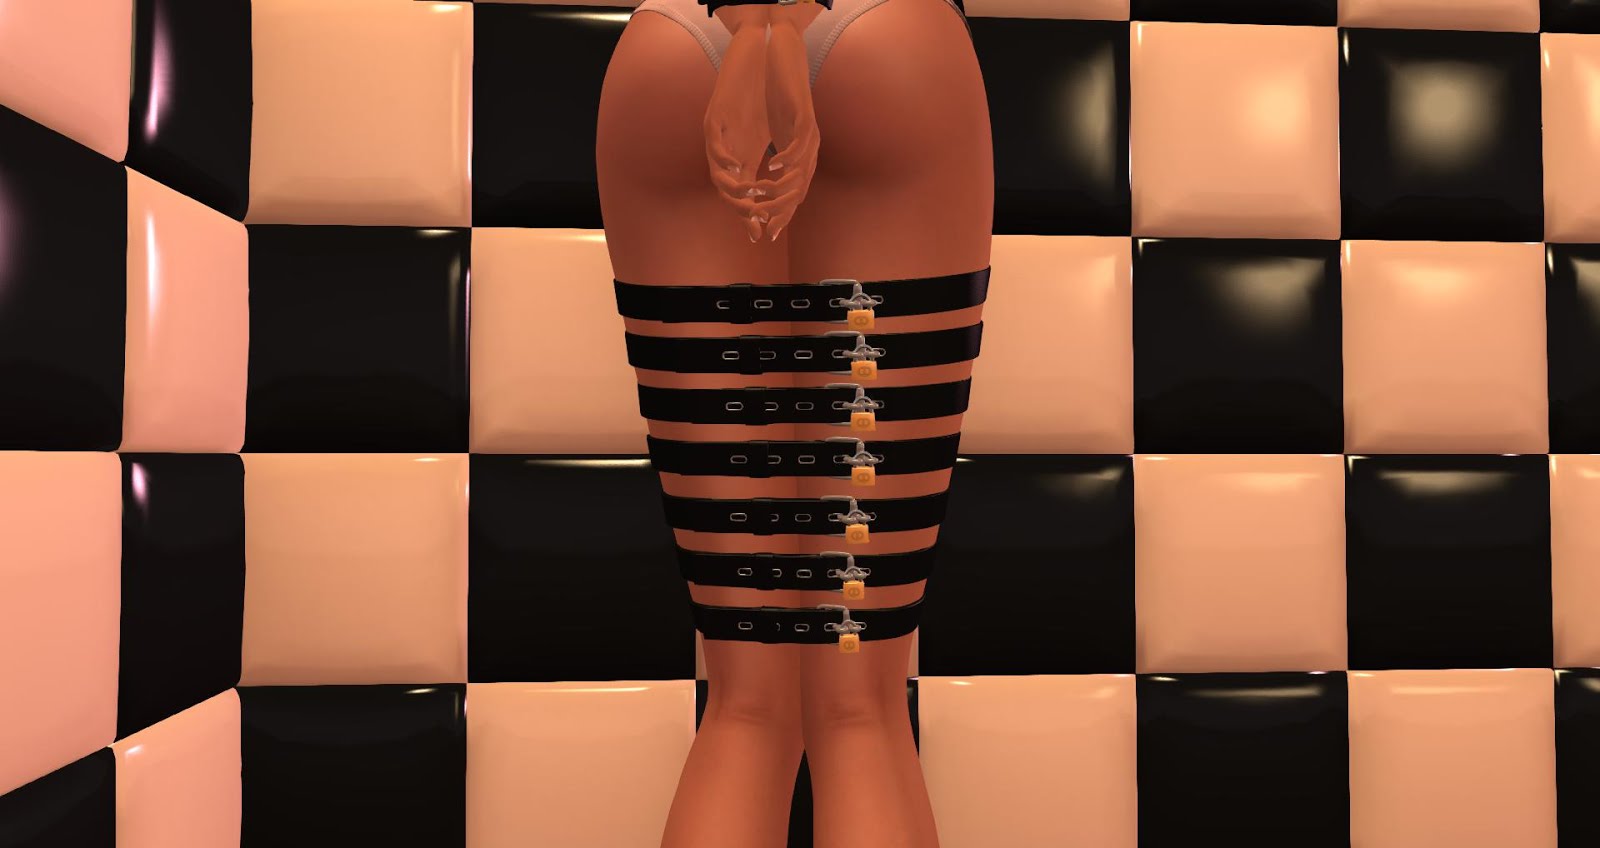
Now, the legs.
There are also 8 locks, but a lot more straps !
For example, a single chain between the ankles :

With the thighs tied :

With or without the ankle chain, your choice :

... but with many straps instead :

Continuing with the shins :

OK, that's a lot of straps. How about making it lighter ?


Oh, have you noticed ? If you choose the "Seam W&B" pattern, the "2+2 straps" style on the legs and the "1+1 straps" style on the arms, it looks almost exactly like the current RR straps !


Now how about... using the straps in a kinkier way ?

And how about making it look more serious ?

Wait, it must be painful to crawl like this, on knees and elbows. Let's add some pads to protect your joints :

And after a day of training, time to go to bed :

Pfft, a real bondagette needs more straps to be secure !

Or binders !

Or maybe you weren't done playing after all !

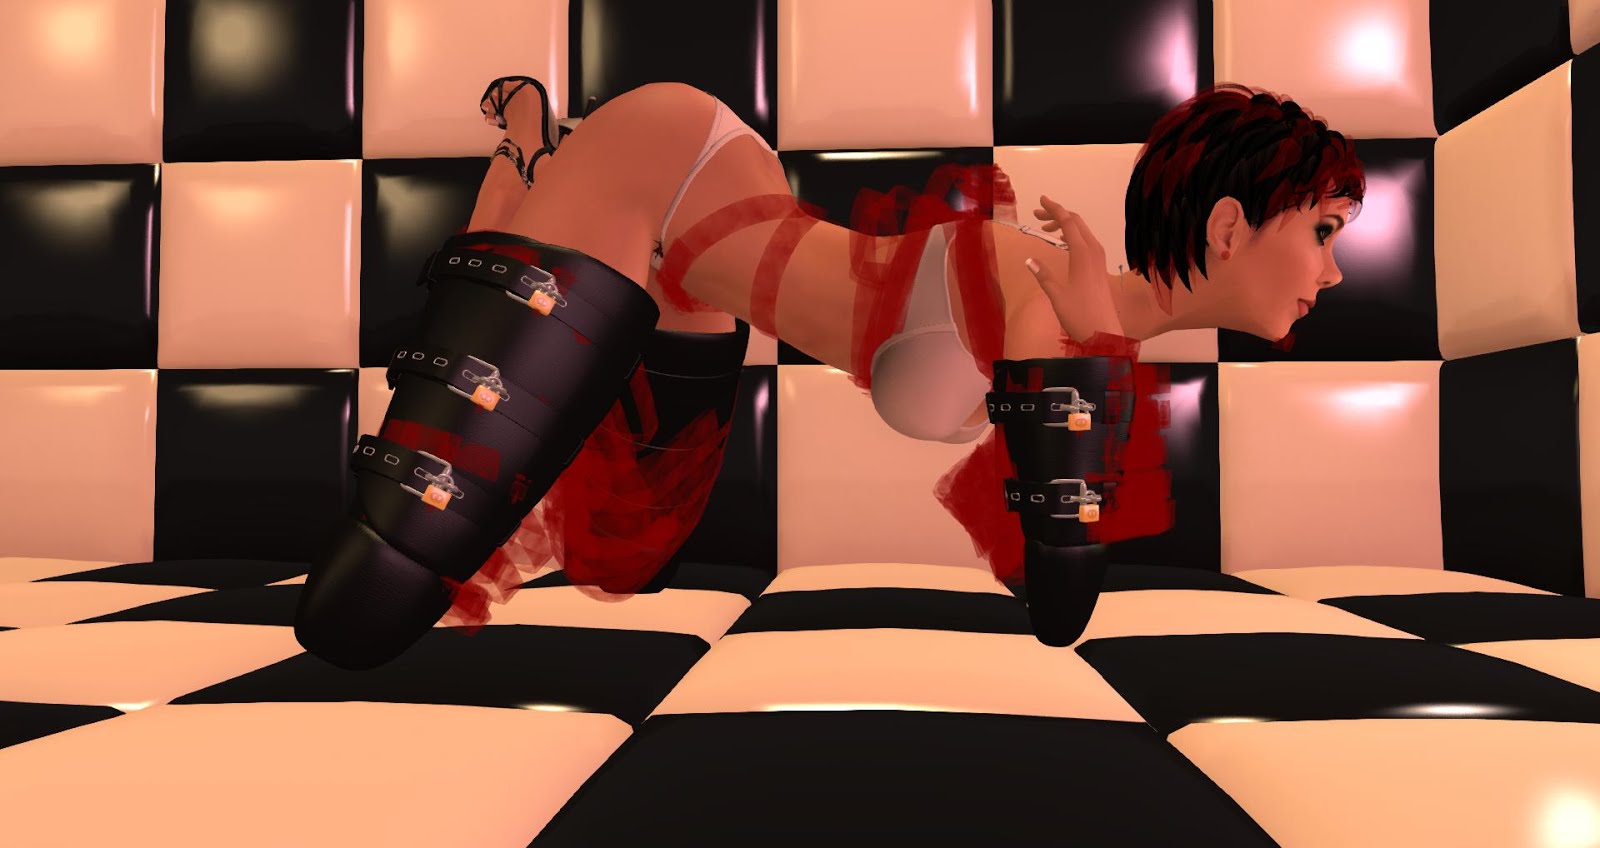
Another favorite of mine : the frogtie :

With straps or binders :

And finally, a secure and relaxing one, the lotus :

Oh, do you recognize that waist strap ? Yes, it is the same one we used with the arms :

Now, if you still wonder how tight it can be... I think this one ("Hogtie" + "Supertight") is a good candidate :


That's 27 straps on one girl ! That must make several pounds of padlocks !
But that's ok, since you can show and hide them at will :

The padlocks themselves are of an imaginary brand, which logo might remind you something... It is inspired from the many padlocks I have at home.

Little disclaimer here, the original logo is the property of its owner (Tri-Circle), the one I made here is inspired from it but is not a copy, and is not officially authorized by, endorsed by or associated with this real life brand of padlocks. It is not intended to defame or criticize or create confusion with the original brand in any way.
Like all padlocks, they have a key. The key shows when the "Leave Keys" button is pressed, but only if the padlock itself is visible.

One last thing, all the straps can be made invisible, so you can mix them with other outfits, such as a hobble dress for example (or a tight skirt that hides the straps underneath) :

With this kind of bondage, nobody sees the straps but they're there, and you can't walk fast or run, as you are hobbled. It's just not obvious.
To recapitulate, the Deluxe Straps set is a set of two mostly independent products : the arms straps and the legs straps. Each product has 8 locks ("Elbows only", "Maid", "Arms front", "Arms back", "Arms tight", "Pony", "Box" and "Supertight" for the arms, and "Taut", "Hobble", "Tight", "Pet", "Hogtie", "Hogtie open", "Frogtie" and "Lotus" for the legs), and each lock has several, sometimes many animations to let you pose yourself the way you want.
To control which pose to choose within a lock, you need to use the provided RR Anim HUD (standard for all RR products) or the one you already have, its use is explained here.
For example, this HUD is useful to make sure your arms stay against your torso when you bend forward :

Not using the RR Anim HUD
With the RR Anim HUD you can force your arms down (for example) :

Another use of the RR Anim HUD is with the "Arms tight" lock, to raise your arms into a strappado :

Of course such a pose makes little sense when standing up like that, but imagine that you are bent over, either on a furniture with a chain going to your wrists, or with a simple leash linked to a prim in-world :

This is why there are 6 free animations included in the box to help you simulate a strappado the way you want (bent 45° or 90°, with your legs together, parted at chain-length or widely spread), useful when your captor leashes you arms straps to the ceiling and you are supposed to remain there, without being actually locked to a piece of furniture. They can also be used standalone, as they are priority 3 and the arms rest on the thighs, so they look good even when you are not bound. A good idea is to add them to your Sublimator so you don't have to play them manually or to make a gesture for each one of them. It isn't allowed to resell these animations or to include them into a commercial product, they are only for personal use. You are allowed to give a copy to your friends, though, even if they don't own the Deluxe Straps themselves. That's fair use.
This is the end of the demonstration of what the Deluxe Straps can do, the rest of this blog post is the actual manual, which explains how to do it.
You can find the RealRestraint Deluxe Straps in any of the RealRestraint vendors in-world, they are Modify, No-copy and Transfer, and cost L$1000 :

One location where to find a RR vendor is in Pak :
http://maps.secondlife.com/secondlife/Pak/76/61/105
Another one is the Little Shop of Kink :
http://maps.secondlife.com/secondlife/Lineside/102/146/77
Have fun !
Marine
This was a long demonstration ! But necessary, given the versatility of the straps, and the fact that this blog post is both a demonstration and a manual. Now let's switch to the manual itself, to explain how to do all that you've seen in the pictures above.
Versatility with the Style plugin
The arms and legs Deluxe Straps both contain a Style plugin that is in charge of hiding and showing some parts of your straps.
Click on "Plugins..." then "Next >>" if you have to (the Style plugin is on the second page on the arms straps, the legs straps have only one page of plugins), then click on "Style..." to access it. You have to be free or to have the keys to your straps to do that. Thanks to the Style plugin, the look of your bondage can be changed completely, as you saw in the pictures above.


Out of the box, the menu of the Style plugin looks like this (here shown for "Supertight") :

This means the "Supertight" lock looks like this :

The menu always contains a "Main..." button to go back to the main menu of the straps, the rest of the menu is entirely dynamic and depends on the lock. For example, the options will not be the same for "Arms back" or "Pony" on the arms, let alone "Hogtie" or "Lotus" on the legs.
There are two kinds of buttons on the Style menu :
- The normal buttons (from bottom to top) define complete styles, for example "All straps", "2+2 straps", "Binder"... Those buttons are specific to each lock and won't influence any other lock. For example, if you click "2+2 straps" on "Supertight", that won't make "Arms tight" display 2+2 straps too, the styles are independent even if they share the same name.
- The toggle buttons (from top to bottom) begin with "( )" or "(#)" and define global toggles, as in, do we show the crotch chain, the under-breast strap, the padlocks... Unlike the normal buttons, the toggles are global to all locks, even though you won't see the same toggles over different locks. For example, you will see "Under-breast" only for "Arms front", "Arms back" and "Supertight", and deactivating it on one of these locks will deactivate it for all of them. Same for "Padlocks", "Crotch chain" etc.
The combination of styles and toggles lets you define precisely how you want your bondage to look. Well you or your captor. I repeat, you do not have access to Style if you're bound by someone else. This makes sense, as that person decided to bind you in a certain way, you can't magically add or remove straps yourself.
Let's see what it does in practice. Suppose you click on "2+2 straps", what happens ?


Granted, that is not very "2+2", more like "2+3", but hey, this is for the sake of demonstration. Want to know why it is called "2+2 straps" ? Well, simply because of the toggles. Suppose you hide the belly strap and the torso straps :


Aha ! Now it shows 2+2 straps ! But wait... Isn't this "Arms tight", rather ? No, this is really "Supertight", it just happens that if you select this style and hide the torso straps, it looks exactly like the "2+2 straps" style of "Arms tight". Here, let me show the chest straps again by clicking on the "Under-breast" and "Over-breast" toggles :


That's more like it. On a side note, have you noticed that when the under-breast strap was hidden, it was replaced by the top arm strap ? Likewise, if the belly strap is hidden, it is replaced with the top forearms strap.
Notice also that the Style plugin is what allows you to show and hide the padlocks, it is a global toggle so if you hide the padlocks on one lock, they are hidden on every lock of the same restraint. And if the padlocks are hidden, the keys will be hidden too, no matter whether they are left on the straps or not. You won't see keys floating in the air.
It is the same thing for the chains. Suppose you are bound in "Hobble" on the legs. Out of the box, this is what this lock looks like :

Seven straps plus a chain between the two ankle straps. If that's a bit much for you, you can go to the Style plugin of the legs restraints, and decide what to show and what to hide :

As you can see, this menu is completely different from the "Supertight" one of the arms straps. Yet it is the same plugin. Notice that here you have only two toggles, "Ankles" and "Padlocks". The latter is actually present for all locks, both on the arms and the legs. "Ankles", on the other hand, is specific to "Taut" and "Hobble", just like "Wrists" is specific to "Maid" in the arms, simply because no other lock shows the wrist straps and their chain.
So if you want to hide the ankle straps and the chain, all you have to do is click on "(#) Ankles" :


Easy enough ! And if you want to only show some of the straps, simply select which style you like best, or hide them all entirely with "Invisible".
Speaking of "Invisible", know that all locks allow you to completely hide all the straps and chains, but in some locks you may have to deactivate some of the toggles as well, like the under-breast and over-breast parts for example. This is a limitation of the Style plugin, but not a very serious one.
One word about a special part of the set : the waist strap. This strap is used both by the arms (for "Arms back" and "Supertight") and the legs (for "Lotus"). But it is a leg strap in essence, so it obeys only to the leg straps in terms of color and whether it is detachable or not. The Style plugin of the arms allows you to have it hide and show though. Likewise, its padlock obeys to the legs straps so if you leave the keys on the arms straps, or if you hide the padlocks of the arms straps, it won't have any effect on the waist strap. This is a limitation of the system. And if you want it non-detachable, simply lock the legs in "Lock". It will show the ankle straps by default, but you can always hide them in the Style plugin of the legs. If the Deluxe Straps are organized in two folders in your inventory ("Arms" & "Legs") like they are in mine, I recommend you create a link to the waist strap, and move that link into the "Arms" folder. That way you're guaranteed to wear the waist strap while wearing the arms, even if you're not wearing the legs. To do this, right click on the waist strap, select "Copy", then right click on the Arms folder, select "Paste As Link" (if you can't find this option, turn the "InventoryLinking" debug setting to TRUE in your viewer).

There is also a special lock on the legs that deserves a little explanation : "Pet". It behaves exactly like the Pretty Mummy set, actually. If your legs are locked in "Pet" and your arms are either unlocked, or locked by the same person who is locking your legs, then your arms will automatically be locked in "Pony" with the "POA" pose (that's a pose that lets your upper arms free, fixing only your forearms and hands, unlike "POC" that also fixes the upper arms and is more suitable for ponyplay, and is the one by default in "Pony"). Please note that unlocking from "Pet" will not unlock the arms from "Pony". Nor will struggling out, or autolocking, or anything else.
Fashion with the StrapTex plugins
You have seen how to hide and show parts of the straps, now let's see how to color and texture them. And how to change their materials as well. This is all made through the StrapTex plugins, and like the Style plugins, there is one of the arms and another one for the legs. Unlike the Style plugins though, you are able to access StrapTex whether you have the key to your straps or not. I know this doesn't make sense from a realistic point of view, but more often than not, captives are more interested in looking pretty than their captors, who often leave them into unassorted bondage. There is nothing worse for a good submissive than to be left into unassorted bonds ! Fashion is very important when you're bound ! Therefore, the captive has the ability to change the look of her straps at any time, even if she can't hide or show them if she doesn't have the key.
Using the StrapTex plugins may look a bit daunting at first glance, as there are so many options you can choose. You can tint, change the pattern (the texture) and even the material (latex, PVC, rubber, plastic, Cordura...) of each strap almost individually, and even target specific faces of the straps. As in, you can tint the front of the straps black and their trims red. You can make the binders look like white fabric and the straps locking them brown and rugged leather. Even though each binder is an individual mesh part, containing its own straps (see below in the "Adjusting your straps" section).
The StrapTex plugins function exactly like the Highbinder's HighbindTex plugin, the Deluxe Gag's HeadHarnessTex plugin and the Body Harness' HarnessTex plugin. So if you're already familiar with those, you will quickly wrap your head around this one.
Here is how it works.
Suppose we're starting from fully black leather straps on the arms and the legs :

To access the arms' StrapTex plugin, click on your arms straps, go to "Plugins...", then press "StrapTex..." :


We're going to modify the arms only, but the legs work the same way.
Sections, surfaces, presets
The StrapTex plugins allow you to select what section to modify. A section is simply a group of straps defined by their location. For example, "only the upper arms straps", or "only the odd straps (strap 1, 3, 5, 7, 9), or "only the even straps" (strap 2, 4, 6, 8), etc.

Suppose you want to change the color of the inner straps. Since there are always an odd number of straps, this means you want to change the color of the even straps. The second and fourth straps only. So you click on "Even straps".
Now you're back to the main menu of the StrapTex plugin, and you click on "Tint...", which brings you to the color menu. It is called "Tint" and not "Color" because "Tint" is technically more correct. You will see why below.

Notice that the menu says "Surfaces : Whole strap" by default. We didn't change the surface yet, we will do it later. For now, click on "White" and see what happens :

As you can see, the inner straps have turned white, but only the leather part of them, not the padlocks, buckles and holes. More over, only the arms straps have changed, the legs one remained the same. This is because unlike the Pretty Mummy set and the Deluxe Gag & Blindfold, there is no bridge here, one StrapTex does not influence the other. I tried to make one but SL throttles the number of private chat messages going between the bridges (the StrapTex plugins are very talkative when you change a preset, as they have to send one message per section and per surface, and SL cuts the flow short pretty much halfway, leaving the work half done. Yeah, it's totally SL's fault).
Now that you know what a section is, let's see what a surface is. To understand surfaces, you have to know that each strap is an individual "prim", or rather an individual mesh object, that is part of the attachment. You will see below that you can resize each strap individually and will have all the resize handles (red, green, blue and white) instead of only white handles. This is very handy for fitting them to your shape as it gives you much more control. Mesh objects like these straps can have several "faces", just like a prim box, but I prefer calling them "surfaces", as it is easier to understand. A surface is a sub-part of the strap and it would be the holes+buckles, the padlock's hook, the key and the padlock itself, as well as the front of the strap and its trim.
So, let's say you want to change the color of the trim of the white straps only, for example you want them dark red. Go to "Surfaces..." and see what you have :

Click on "Trim", then go to "Tint..." when you are brought back to the main page.
On the Tint menu, click ">>" and choose "Blood" (that's dark red), and...


Voilà ! You have successfully tinted the trim of each even strap, and no other !
You can do the same with the padlocks, as they are just a surface like the trim. So let's do this again and tint the padlocks of the even straps, silver. Go to "Surfaces..." again, select "Padlock", then back to "Tint...", press "<<" to go back to its first page as "Silver" is not on the same page as "Blood", then press "Silver" :

This is how much control you have over which strap and surface you want to change.
Patterns
Now that you know how to change one particular strap's color (or rather, tint), let's see how to change its pattern and material. Because if you thought those straps were plain leather only, think again ! You can actually make them show a texture and change their material to turn them into latex, Cordura, even clear plastic ! Let's see how to do that.
First of all, make all the straps white, it will be easier for demonstrating the patterns. "Sections...", "ALL", "Surfaces...", "Whole strap", "Tint...", "White". Simple as that.

Now go to "Pattern..." and see what you have. The buttons are actually dynamically generated (except "Plain" and "Clear" which are hard-coded) from the textures found in the right wrist and right ankle attachments. You could actually add your own. Let's click on "Cow" :

There you go ! A pattern is actually a texture applied to the straps. The common thing between the patterns is that they are all (or most of all) black and white. That way, when you tint a strap with a pattern, it will be black and tinted, instead of black and white. And the patterns with "W&B" at the end mean "White over Black background", meaning the strap itself will always be black. For example, if you choose "Hearts W&B" :

Now you could tint the white hearts and make them red by going to "Tint...", then choosing "Red" :

Aww ! Isn't this pretty ?
So this is why we speak in terms of "tint" instead of "color", as the patterns are always "black + color". They can't have two tints, it's always black and something. There are a few exceptions, like "Lips R&W" ("red over white"), which I don't recommend tinting. Therefore, you should keep the tint white :

Tinting this pattern in a dark color like "Gunmetal" would make the red lips barely visible :

Yeah. Not a good idea. It does work with light tints like "Gold" or "Light yellow", though.

You can actually create your own textures, the process is simple. Here is the UV map of the textures used by the straps, all you have to do is download it, open it in Photoshop or Gimp and start creating your own. The orange part is the trim, the middle part is the front, and the two edges are the back of the strap.

Please note that unlike the Deluxe Gag and the Body Harness, the Deluxe Straps do not have any vertical strap, they are all horizontal, so there is no vertical variant for the textures.
Materials
Now let's talk about materials. I said earlier that the straps could be something else than leather. Only the straps and binders, though, as the metal parts are meant to stay metal, you can't change their textures or materials but you can tint them. There are 9 different materials you can select from the "Material..." menu :

Rough leather, it has a low shine

Leather, shinier than rough leather

Patent leather, which is a glossy leather

Plastic, very glossy and shiny, almost metallic

Cordura, a low-shine, very resilient military fabric

Reinforced spandex, shinier than cordura
Thick rubber, not as elastic as it sounds
PVC, industrial-grade flexible polymer for bondagettes

And latex coating over PVC straps, for that extra shiny touch
Wait... where is the clear plastic I've been talking about earlier ? It's easy. "Plastic" is the material as you saw in the pictures but it doesn't necessarily have to be clear. If you want clear plastic, simply select the "Clear" pattern, the "Plastic" material, a skin-like tint and...

It's clear, it's shiny, it's plastic !
Please note that the "Plastic" material in the StrapTex plugins does not exist in the Deluxe Gag and Body Harness' own texture plugins, which use "Latex" instead. But plastic should shine more than latex and its shine should be more metallic, so I created a material just for it (replacing the "Jeans" material which was not very different from the "Cordura" one anyway). I'll probably update the Deluxe Gag and Body Harness to get them in line with the Deluxe Straps on this matter, later.
But what if you don't want to go to that level of fine-tuning ? Easy, the StrapTex plugins offer you presets !
On the main page of the StrapTex plugin, click on "PRESETS..." and you are given two pages of common presets. A preset is a little macro that does the work for you, for example the "Clear plastic" preset automatically selects the "Whole strap" surface, the "All" section, as well as the "Clear" pattern, the "Flesh pink" tint and the "Plastic" material. And in a few seconds your straps all turn into clear plastic.
Before I finish with the StrapTex plugins, let me give you a couple tints I frequently use for the straps, that are not in the "Tint" menu, but that you can enter with its "CUSTOM" button :
The original color of the padlocks : 228 169 85
An alternate color for the padlocks, more brass-like : 108 125 115
An alternate flesh color for clear plastic : 201 143 122
A good khaki color to use with "Plain" or "Camo" and a "Cordura" material : 87 97 65
A good brown for rough leather straps : 91 62 44
There is a known issue with the "Clear" pattern. Once the straps are made transparent with "Clear", if you change back to an opaque pattern (any other than "Clear", in fact), there will be an alpha sorting issue. This is not due to the scripts but to the viewer which messes up with alpha blending when a texture changes. To fix this, simply select another material, then back to the one you wanted.
Adjusting your straps
The Deluxe Straps are made with many, many straps. So when it comes to adjusting, a little plan is in order or you'll go crazy. A good way is to wear only what is necessary to resize the straps without having to dig under transparent stuff.
So first things first, let's wear all the straps, arms and legs, and then remove the left elbow, left forearm, left thigh and left ankle parts. Then lock your arms in "Supertight" and your legs in "Tight", turning your AO off. Also make sure your hair won't get in the way. It should look like this :

Press Ctrl+Alt+T to highlight all the invisible parts (there still are a lot, despite how many straps are now visible) :

All the red parts on this picture are invisible straps that would become visible at some point, given the right lock and the right style. But for now, let's focus on the visible ones.
I mentioned earlier that each strap was an individual object, let's see now what it means. Select one of the straps, the one you want, by pressing or Ctrl-3, then clicking on "Edit Linked Parts" (on the RLV the shortcut is Alt-W, very handy shortcut to know), then clicking on one of the straps :


You can now resize the strap at will, as you can see you have all the resize handles that you need. And if you need to move it, I recommend switching the axes to "Local" instead of "Attachment" on the drop-down list :

Otherwise you'd be driven nuts when moving the upper arms straps. I have designed the straps with care so that their local axes match their visual aspect, as in, the wider part along one axis, the narrower part along another axis and the width along the third axis. Of course it is not always possible for non-planar straps, but most of them are planar. This is because if you coil a string around a complex object, even a concave one, the more you tighten it the more planar it becomes.
There is one strap that you cannot move or resize because it is rigged, that's the cinch between the waist and the arms. It appears only on "Supertight" and only if the "Belly" toggle is on. But this is the only rigged strap of the whole set, you can resize and move all the other straps.

So, resize, move, adjust, curse, resize some more... it will take a little time but you will eventually manage to fit those straps to your shape. Once done, it is time to switch to other locks, as there are straps yet to show and adjust.
Lock your legs in "Lotus" and resize the oblique ankle strap and the waist strap. If you are still seeing the invisible straps, you'll see how to select the ankle part :


Once done, select and position the D-ring on the back :

Then the waist strap :

Then its own D-ring :

Then its chain points. Wait, what's a "chain point" ? And where is it supposed to go ? You may have noticed that the Deluxe Straps are not only made of straps, but also chains. Those chains are particle chains that go from one prim to another. But SL particle chains can only go from the center of a prim to another one, so there were two solutions. Either I would design the straps so that one extremity was its "center" (not geometric center but actual center, where the particle chain goes), and that would have caused issues when resizing, or I would add invisible prims to act as chain points for the chains and leashes. For the D-rings I chose the first option, but for the straps I chose the second one, which is more forgiving when resizing.
All the chain points are either D-rings which turn visible and invisible along with the straps, or invisible balls (such as the crotch chain that you will resize in a moment), or slices (such as Lockguard and Lockmeister points), or crosses (for leashes, usually). You can see such a cross here :

This cross is where a leash will spawn from when your legs are leashed and you are locked in "Lotus". In other locks, the leash would spawn from another point on your straps.
Now on to the crotch chain. remember how it looked on the pictures ? You can't see it by default though, it has to be activated, so let's activate it. Click on your arms straps, go to "Plugins...", then "Style...", then activate "Crotch chain".
Here is how it looks with the camera inside your left leg :

Notice how the particle chains go from one invisible sphere to the next. Well, you'll just move the invisible spheres to adjust the chain to your body, it's easy.
These three spheres here are not to be touched, the lower two are useless (I keep them in reserve), while the bigger one, highlighted in yellow, is the root prim of the attachment. It is not dangerous if you move them, it just won't do anything.

Do not move those
But all the other spheres, selected here, are to be moved :

That's 6 spheres. No need to actually resize them, just select them one by one and move them, using the widget here, which allows you to move them on a plane instead than in 3D (here, as the "Local" axes are still set, the widget restricts to the local XZ plane, preventing you from moving the sphere along Y --green axis-- which is left-right in its case) :

There are other D-rings, leash points and chain points to move, but I won't list them all here, you'll see them as you stumble on them. For example, there is a D-ring behind the wrist strap, that appeared when you activated the crotch chain :

Why did I make you lock yourself in "Supertight" and "Tight" then "Lotus" in the first place ? Wouldn't have been easier to start with the lower locks ? Well... to answer this question quickly, lock your legs in "Hobble" now :
See that ? The thigh straps are already fitting ! This is because "Hobble" and "Tight" share the same straps on the thighs. Lock yourself in "Hogtie" now :

Even better, the shin straps are also fitting ! Simply because "Hogtie" use the same straps as "Tight". You won't have to resize those a second time. And "Hogtie open" ? Still the same outcome, its ankle strap is the same one as the one used in "Lotus", which you just adjusted. So no need to redo it either.
Same thing for the arms, you will notice that if you lock your arms in "Maid" or in "Elbows only", the straps will already fit you, as you just resized them for "Supertight". I made you choose the locks that displayed the most straps so that you knew what you were doing right away.
Now, you need to resize the "Arms front", "Arms back" and "Box" locks of the arms. All those locks involve most of the chest straps (you have already resized two of them in "Supertight", but there are others), as well as the oblique wrist strap.
Lock your arms in "Arms front" :

Resize the three visible straps and the wrist D-ring, then go to "Arms back" :

Oh, right, the crotch chain is active. But you have already adjusted it, so pay no attention to it. You have also already resized the wrist part in "Arms front", since it is the same one. All you have to do is resize the chest straps that are visible. Wait, didn't you already do that in "Arms front" ? Unfortunately no, these straps are different since the arms are posed differently. They do look similar, though.
Then lock your arms in "Box" :


As you can see, the chest straps are different again. This time you have to adjust the top strap like before, but the bottom strap is divided into four parts, plus rings to act as glue. It is much easier to adjust like that, even if it requires more work. For example, one of the parts is the left arm loop :

Another part is the metal cinching that loop :

If you have trouble resizing the back strap that cinches the wrists, it might because of the length of your arms or the width of your shoulders. Those two shape values influence where the arms cross behind the back. Same for the "Arms front" and "Arms back" locks.
Now, remember that I asked you to unwear four parts ? This was to clear the way to the straps you wanted to resize, but now you will need to resize them anyway, so wear them again, then lock your legs in "Pet".

Oy ! What happened ? By locking yourself in "Pet", your arms went automatically into "Pony" and your pose was set to "POA". This is simply because you own your own key on the arms and there was no timer, so the change was automatic, as explained above. Now highlight invisible with Ctrl-Alt-T :

Yikes ! What a mess ! Don't panic, you will still be able to resize the straps you want. Just resize the visible straps for now, by taking care of selecting them one by one and none of the invisible ones.
Once done, click on the legs, go to "Plugins...", then "Style..." then select "Binder" and activate the knee pads. Then do the same on the arms :
As you can see, it will be pretty easy to select them. The pads are made so they more or less follow the lower section of the binders, but their shape isn't very important. They cover the elbows and knees, that's what matters. By the way, they are set to match the tint you use for the trim, so you can make for interesting color combinations. Just like the "cow" picture in the demonstration, with the cow pattern on the binders and the black pads to look like hooves (from afar).
By resizing those straps and binders in the "Pet" lock, you have also successfully adjusted "Frogtie" for the legs and "Pony" for the arms, as they use the same straps.
Now lock your legs in "Tight" and your arms in "Arms tight" again :

Wait, haven't we already resized those straps ? Yes we have, but not their binders. Choose the "Binder" style for the legs and do the same for the arms :

Those are the 4 objects you will need to adjust
We are almost done ! All that's left is the extremities (single wrist and ankle straps). Then to check that the chain points are correctly placed, or at least not too far off.
Lock your arms in "Maid" and your legs in "Taut". You won't have to resize the elbow straps again since you have already done them once, only the wrist and ankle straps :

And that should be it ! That was a lot of work, but thankfully, you need to do this only once. And you don't have to do it all the same day, when you adjust stuff to your body, usually you notice little flaws later and you correct, and then you correct again when you tweak your shape, that's the way SL works.
Have fun !
Marine

