Hi there,
It's been a while since I have updated the RLV, but LL has been busy in the meantime so here is me releasing a version that is up to date with the latest additions from LL. Plus a few bug fixes including one that was really annoying.
- changed : The cache location is now located in %APPDATA%/Local/RLV instead of %APPDATA/Local/SecondLife
- fixed : The "fix" I added a few versions ago to account for llUnSit being called on an avatar who's restricted from standing up, did more harm than good so I removed it until I can think of a better way (namely, several furnitures llUnSit the avatar before releasing their RLV relay, which forces them right back on in an endless cycle).
- fixed : Hover height was reset when changing region
- fixed : @detachme called from a child prim didn't work.
- fixed : bool warning when compiling RRInterface.cpp
You can grab the RLV for Windows here :
www.erestraints.com/realrestraint
Direct download :
www.erestraints.com/realrestraint/RestrainedLoveSetup.exe
And the MD5 hash for the executable is
b509f0ca50e55e510f65960ffb1ce5b7
Have fun and Merry Christmas !
Marine
Thursday, May 25, 2017
Friday, May 19, 2017
Update to the MdlM Catsuits, Bodysuits and Socks
Hello there,
An update is available for your Latex Catsuits, Latex Bodysuits, and Latex Socks & Gloves from Maison De La Marquise.
In fact the latex suits themselves are not updated at all, but their neck piece and boots are :
- Neck piece : Completely redone the shape to make it tighter around the neck and fitted the lower part to the Maitreya mesh body, made the upper part more flared on the back so it fits a Lelutka mesh head. If your neck thickness is 30 or more, there should not be any clipping. Of course this is experimental since I don't have a Lelutka mesh head dev kit. Please note that the rigging on the Lelutka mesh head is damped quite a fair bit compared to that of the system head, Catwa head and other mesh heads I know of. This is why the neck piece does not deform itself the same way as this particular mesh head. This also explains why facial animations made for Lelutka look weird on other mesh heads.
- Boots : The ones contained in the Socks & Gloves product switched to "no blend mode" when applying opaque socks, and you had to switch back manually to have a smooth continuous shine. Now they behave just like the Bodysuits neck pieces, which stay in "blend mode" even when applying an opaque bodysuit, until you switch manually.
To update your products, simply rez the updater contained in the folder, and you will receive a new box a short moment later.
Have fun !
Marine
PS : You might wonder why the lower part of the neck piece is not fitting the neck of the Maitreya mesh body exactly. There are two reasons for that. The first one is that the dev kit I have is not exactly the same as the mesh body in-world (don't ask me why) so that means a lot of trial and error, the second one is that you can apply to any layer (Tattoo, Underwear and Clothing), and those layers are at different distances from the skin, so the neck piece has to be at least as thick as the Clothing layer.
RR tutorial : Texture plugins
Hi !
This is the manual/tutorial explaining how the RealRestraint texture plugins work. There are several of them in different RR products such as :
- Body Harness ("HarnessTex" plugin)
- Regular Straps ("StrapTex" plugin)
- Deluxe Straps ("StrapTex" plugin)
- Highbinder ("HighbindTex" plugin)
- Regular ball gag and ring gag ("BallgagTex" and RinggagTex plugins)
- Deluxe gag ("HeadHarnessTex" plugin)
- Vixen set ("VixenTex" plugin)
They are all different but they all share the same objective : to let you apply different textures, colors and materials to different parts of your set. In this page I will use the most complex and complete one of them (at the time of this writing) as an example, the VixenTex plugin, contained in the Vixen Set.
To access the texture plugin of your product, you need to click on your restraint or call its menu on channel /77 (if you can), then go to "Plugins", browse a little then select the one which name ends with "Tex". Here, "VixenTex".
This plugin is accessible by the wearer even if she does not have the key. The reason for this is simple : subs love fashion, their dom/mes less so and they're often left in unassorted restraints, which drive them crazy if they can't make them look good. I know it's a little unrealistic, but that's an acceptable tradeoff when some dominants are forgetful or just won't bother to experiment different looks on their sub's restraints.
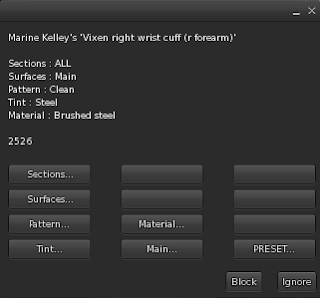
This menu looks a bit confusing but fret not, let me explain what this is all about.
Sections
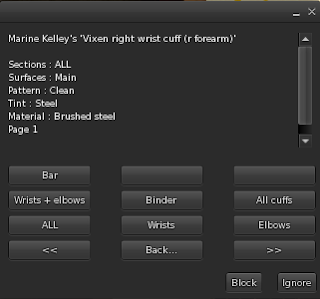
A section is a group of "prims" (even though most are actually mesh sub-objects). For example, just the two wrists, or just the two elbows, or both the wrists and the elbows, etc. If you change a texture now, it will change only the sections you've selected and no other.
Surfaces
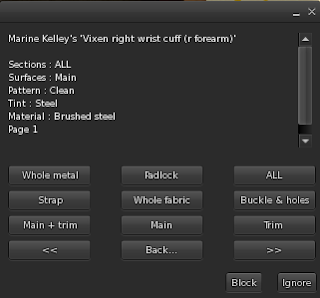
Just like an SL prim has faces, an SL mesh object has "sub-meshes", which are just parts of the mesh like the eyelets, the padlock etc. And surfaces are just groups of sub-meshes, such as the whole metal on a cuff or just the front strap, or just the main part of a posture collar, etc.
By selecting a section and surface, you tell the plugin precisely what you want to modify.
Important : The next three buttons actually modify the restraint when you choose one of their settings, while the Sections and Surfaces buttons do not.
Patterns
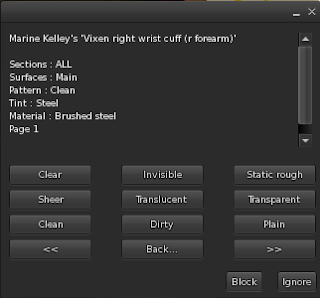
A Pattern is a fancy term for a texture... But you'll see why it makes more sense to call it a pattern.
Each surface can display exactly one texture at a time. For example, the front strap of a cuff can display one texture of leather. Depending on the product, you can have textures of clean or dirty fabric, or transparent (that's handy for rendering clear plastic), or even baked lighting textures (only on the Vixen Set for now). Or you can have other kinds of textures that show some writings or some symbols, repeated all over the surface, and that's the reaon for the name "pattern".
Most patterns are white or mostly white, for example the "clean" and "dirty" patterns of the Vixen cuffs are white textures with shadows to make them look more realistic :


Other patterns are simple white textures with black markings, such as this "Slave" pattern :

This is handy when you want to tint the surface to give it a non-white color, so it shows black text over that color. Or the other way around, a colored text over a black surface.

You will notice that the metal parts do not receive the pattern you select, whatever you try. This is to be expected, some metal parts do not even have a UV map anyway, so they remain with a plain color and always the same shine.
Please note : There is a known issue with changing the pattern, it may or may not make the surface look partly transparent, even if the pattern is opaque, like its blend mode is switched to "alpha blending" instead of "none". I have no clue why it does this as the plugin does set the blend mode to "none", but it's like the viewer isn't listening. To circumvent that, you need to change the material (or even set the same) after changing the pattern. I'll keep looking into that bug and if I find a solution, I will fix it.
Tints
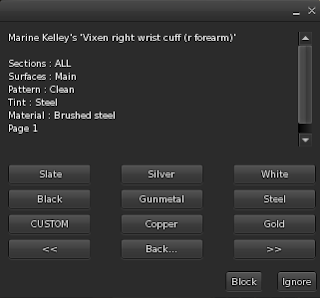
Tints are colors, simple as that. When you select a tint in the Tints menu, or when you enter a custom RGB one (it also works with a LSL-type vector), the white parts of the surface you've selected become that color.
But there's a twist : when you apply a tint on a surface on which you applied a pattern that isn't white, the tint you chose will mix with the color of that pattern, so you may not obtain the color you wanted. For example, if you choose a "Lip" pattern, which is red over white, and you tint it green, you get this :


The rule is simple : tinting a white texture gives you the color you chose, while tinting a black texture gives you black. Any other color on that texture becomes a mix with your chosen tint. This is why most patterns are black and white, to give you black and your tint as the final color.
Here are the RGB values of all the colors (or should I say tints) used in the VixenTex plugin :
- Ivory : 247 242 223
- Copper : 120 51 15
- Gold : 252 194 0
- Black : 13 13 13
- Gunmetal : 66 56 51
- Steel : 128 128 128
- Slate : 112 128 143
- Silver : 191 191 191
- White : 255 255 255
- Blood : 117 10 10
- Red : 191 0 0
- Light red : 255 64 64
- Orange : 224 117 33
- Yellow : 252 219 20
- Light yellow : 255 245 176
- Dark green : 5 51 15
- Green : 8 120 38
- Lime : 89 242 128
- Navy : 20 41 66
- Blue : 26 94 217
- Azure : 94 176 255
- Indigo : 112 0 255
- Amethyst : 153 102 204
- Plum : 143 69 133
- Purple : 191 0 128
- Flesh pink : 204 138 128
- Princess pink : 245 194 194
Those colors are the same as the ones used in other RealRestraint products such as the Highbinder, the Deluxe Straps, the Basic Straps, the Deluxe Gag, the Pretty Mummy, the Body Harness and even the products in the Maison De La Marquise line, the latex catsuits, socks & gloves, and bodysuits. That way you can stay assorted.
Some of the colors used in the presets are not in the "Tints" menu, let me write the RGB values below so you can use them yourself with the "Custom" button in that menu if you wish :
- Old leather used in "Dirty Leather" and "Institutional" : 100 71 53
- Gold used in "White gold" : 219 182 134
- Padlock used by the Deluxe Straps : 228 169 85
- Khaki used in "Battlefield" : 66 74 59
- Blue jeans used in "Dirty Jeans" : 28 51 77
- Ivory : 247 242 223
Materials
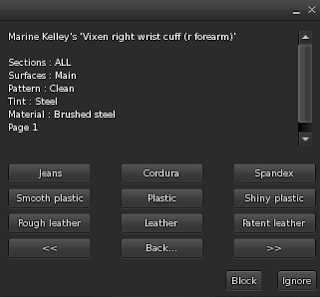
There we go. Materials. This is what makes your restraint look next-gen. In short, materials give you a dynamic shine, as opposed to baked shine, which is lighting directly painted into the texture, which was the only way to make something look shiny before we had materials in SL. To see materials you need to make sure your viewer's Advanced Lighting Model setting is on, and that you're near some local lights, otherwise your product will not shine at all and look flat.
To activate ALM, open your Preferences, go to "Graphics" and tick the "Advanced Lighting Model" checkbox, if not already done :

If doing so cripples your FPS (Frames Per Second, the speed at which your viewer renders your view in SL), just deactivate the dynamic shadows like this :

Vixen Set only : If your viewer is not able to render materials, or if you don't want to activate ALM for whatever reason, you can always make the cuffs and collar show baked lighting instead of materials. The best way to do this is to select one of the presets beginning with "static", which both sets the textures and removes the materials.
You can even do both, selecting the materials you want and the static texture you want.
When done well, materials look so much better than baked shine. On the Vixens you have a lot of different materials, from rough leather to shiny leather to plastic to latex to rubber, PVC, spandex... Since you can change the material of one surface in particular, you can customize your restraints pretty far.
Here are examples of the materials you have at your disposal on the Vixen set, on a cuff and collar that are tinted "blood" (which is a good middle ground between dark and bright, showing shadows, reflections and bumps pretty well).


Presets
You may think that customizing your restraints through this plugin takes a lot of time, and you might be right. After all, it lets you select the individual parts of your set to modify, and what to make it look like, that's a lot of info to enter.
Fortunately, there is an easier way, and that way is through presets. A preset is simply a little program, or macro if you prefer, that selects the sections, surfaces, patterns, tints and materials for you, automatically. For example, "black leather" (pretty much all the RR products have that preset) will apply a leather material to all the fabric (strap, highbinder main part, etc), tint it black and set a steel tint to the metal.
After selecting a preset, the plugin puts you in a configuration that makes it easy to customize the part you probably want. For example, after selecting the "black leather" preset, the plugin has the "all" section selected (meaning all the objects in this set will be modified), the "whole fabric" surface (that's the straps and other non-metallic parts), the "leather" material selected, the "plain" or "clean" pattern and the "black" tint. This means that you can now choose the tint you want and that will modify the straps only, while retaining a leather shine and bumpiness.
At the time of this writing, presets are built into the plugin, they can't be changed. I wanted to make them readable from a notecard, after all these data are written in readable form inside the source code already, it would be easy to do that but there's a memory limit not to go over and the code is pretty big already, almost at the limit. When I find a way to optimize the script enough to let it read a notecard, you can be sure that this will stop being hard-coded, and you will be able to define your own presets yourself. And probably tints, too.
That's pretty much it. Remember that every texture plugin behaves a little differently, they all evolved over time from the very first one of them, "HarnessTex" inside the Body Harness. That particular plugin contains "show" and "hide" buttons on top of it to show and hide some sections, but in the other restraints this would the role of their "Style" plugins. The texture plugins should only modify the textures, colors and materials, not the visibilities.
Have fun !
Marine
This is the manual/tutorial explaining how the RealRestraint texture plugins work. There are several of them in different RR products such as :
- Body Harness ("HarnessTex" plugin)
- Regular Straps ("StrapTex" plugin)
- Deluxe Straps ("StrapTex" plugin)
- Highbinder ("HighbindTex" plugin)
- Regular ball gag and ring gag ("BallgagTex" and RinggagTex plugins)
- Deluxe gag ("HeadHarnessTex" plugin)
- Vixen set ("VixenTex" plugin)
They are all different but they all share the same objective : to let you apply different textures, colors and materials to different parts of your set. In this page I will use the most complex and complete one of them (at the time of this writing) as an example, the VixenTex plugin, contained in the Vixen Set.
To access the texture plugin of your product, you need to click on your restraint or call its menu on channel /77 (if you can), then go to "Plugins", browse a little then select the one which name ends with "Tex". Here, "VixenTex".
This plugin is accessible by the wearer even if she does not have the key. The reason for this is simple : subs love fashion, their dom/mes less so and they're often left in unassorted restraints, which drive them crazy if they can't make them look good. I know it's a little unrealistic, but that's an acceptable tradeoff when some dominants are forgetful or just won't bother to experiment different looks on their sub's restraints.

This menu looks a bit confusing but fret not, let me explain what this is all about.
Sections

A section is a group of "prims" (even though most are actually mesh sub-objects). For example, just the two wrists, or just the two elbows, or both the wrists and the elbows, etc. If you change a texture now, it will change only the sections you've selected and no other.
Surfaces

Just like an SL prim has faces, an SL mesh object has "sub-meshes", which are just parts of the mesh like the eyelets, the padlock etc. And surfaces are just groups of sub-meshes, such as the whole metal on a cuff or just the front strap, or just the main part of a posture collar, etc.
By selecting a section and surface, you tell the plugin precisely what you want to modify.
Important : The next three buttons actually modify the restraint when you choose one of their settings, while the Sections and Surfaces buttons do not.
Patterns

A Pattern is a fancy term for a texture... But you'll see why it makes more sense to call it a pattern.
Each surface can display exactly one texture at a time. For example, the front strap of a cuff can display one texture of leather. Depending on the product, you can have textures of clean or dirty fabric, or transparent (that's handy for rendering clear plastic), or even baked lighting textures (only on the Vixen Set for now). Or you can have other kinds of textures that show some writings or some symbols, repeated all over the surface, and that's the reaon for the name "pattern".
Most patterns are white or mostly white, for example the "clean" and "dirty" patterns of the Vixen cuffs are white textures with shadows to make them look more realistic :

Clean white, notice the shadows

Dirty white, with shadows and some gunk

Plain white, there are no shadows

"Slave" written over the cuff, it's plain too but at least there's some writing,
and it's repeated over the surface hence the term "pattern"
and it's repeated over the surface hence the term "pattern"
This is handy when you want to tint the surface to give it a non-white color, so it shows black text over that color. Or the other way around, a colored text over a black surface.

Red
hearts (notice the shine that is red too because the texture
itself is white and black, I had to tint it light red, which tints the shine as
well)
You will notice that the metal parts do not receive the pattern you select, whatever you try. This is to be expected, some metal parts do not even have a UV map anyway, so they remain with a plain color and always the same shine.
Please note : There is a known issue with changing the pattern, it may or may not make the surface look partly transparent, even if the pattern is opaque, like its blend mode is switched to "alpha blending" instead of "none". I have no clue why it does this as the plugin does set the blend mode to "none", but it's like the viewer isn't listening. To circumvent that, you need to change the material (or even set the same) after changing the pattern. I'll keep looking into that bug and if I find a solution, I will fix it.
Tints

Tints are colors, simple as that. When you select a tint in the Tints menu, or when you enter a custom RGB one (it also works with a LSL-type vector), the white parts of the surface you've selected become that color.
But there's a twist : when you apply a tint on a surface on which you applied a pattern that isn't white, the tint you chose will mix with the color of that pattern, so you may not obtain the color you wanted. For example, if you choose a "Lip" pattern, which is red over white, and you tint it green, you get this :

Pattern is "Lips R&W", tint is white, notice the lips are red
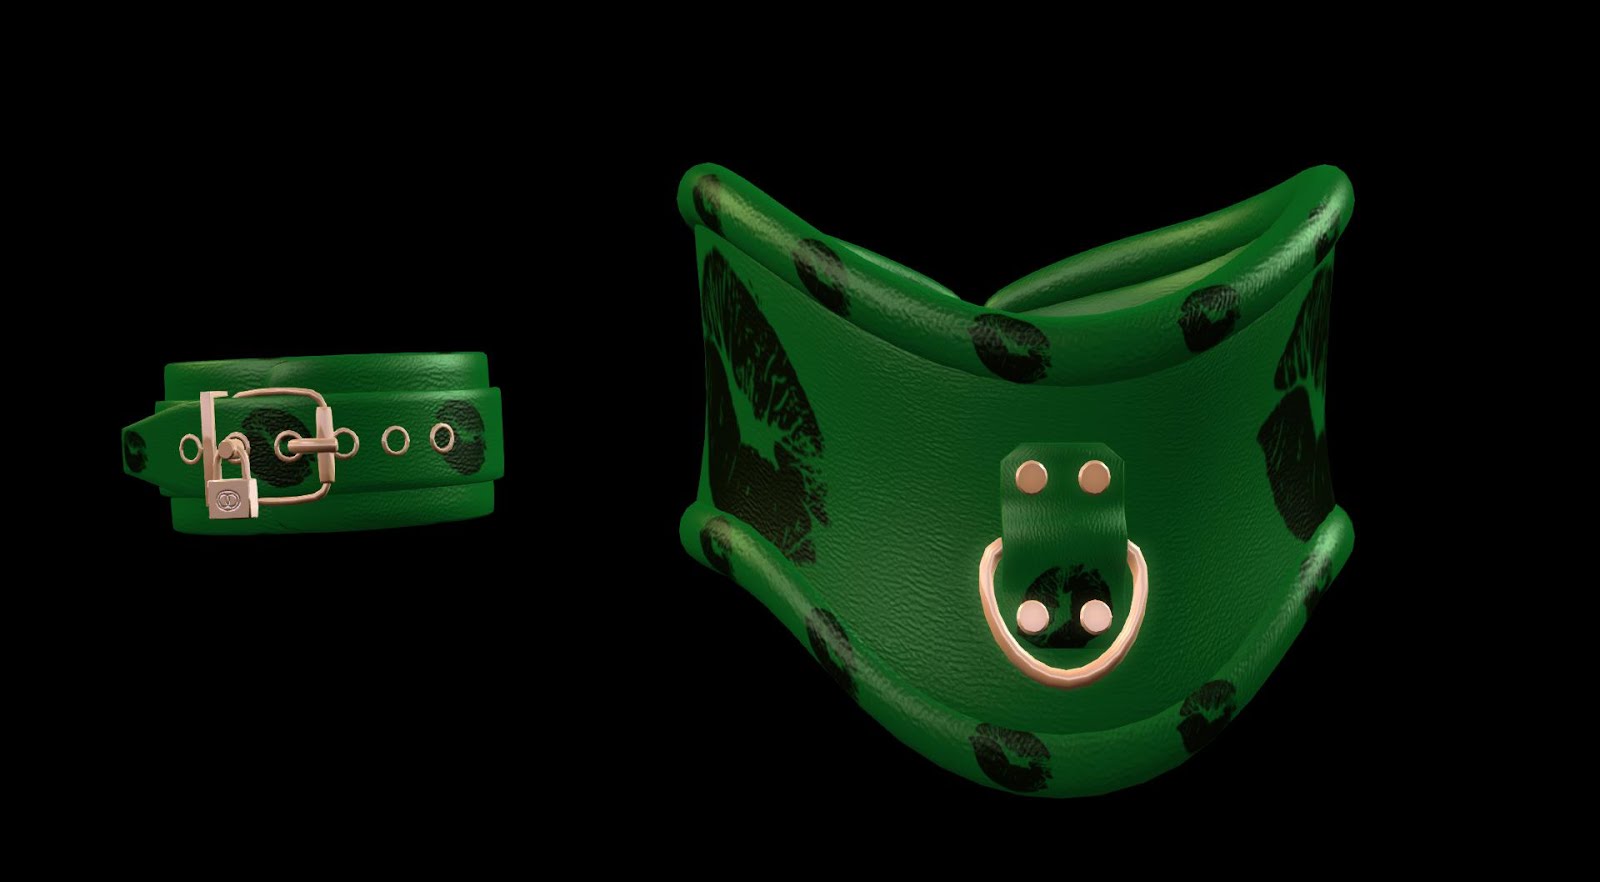
Same pattern but tinted "Green". The lips are now... Black ? Difficult to say. With an eyedropper you find out they're a very very dark green, almost black but certainly not red anymore.
The rule is simple : tinting a white texture gives you the color you chose, while tinting a black texture gives you black. Any other color on that texture becomes a mix with your chosen tint. This is why most patterns are black and white, to give you black and your tint as the final color.
Here are the RGB values of all the colors (or should I say tints) used in the VixenTex plugin :
- Ivory : 247 242 223
- Copper : 120 51 15
- Gold : 252 194 0
- Black : 13 13 13
- Gunmetal : 66 56 51
- Steel : 128 128 128
- Slate : 112 128 143
- Silver : 191 191 191
- White : 255 255 255
- Blood : 117 10 10
- Red : 191 0 0
- Light red : 255 64 64
- Orange : 224 117 33
- Yellow : 252 219 20
- Light yellow : 255 245 176
- Dark green : 5 51 15
- Green : 8 120 38
- Lime : 89 242 128
- Navy : 20 41 66
- Blue : 26 94 217
- Azure : 94 176 255
- Indigo : 112 0 255
- Amethyst : 153 102 204
- Plum : 143 69 133
- Purple : 191 0 128
- Flesh pink : 204 138 128
- Princess pink : 245 194 194
Those colors are the same as the ones used in other RealRestraint products such as the Highbinder, the Deluxe Straps, the Basic Straps, the Deluxe Gag, the Pretty Mummy, the Body Harness and even the products in the Maison De La Marquise line, the latex catsuits, socks & gloves, and bodysuits. That way you can stay assorted.
Some of the colors used in the presets are not in the "Tints" menu, let me write the RGB values below so you can use them yourself with the "Custom" button in that menu if you wish :
- Old leather used in "Dirty Leather" and "Institutional" : 100 71 53
- Gold used in "White gold" : 219 182 134
- Padlock used by the Deluxe Straps : 228 169 85
- Khaki used in "Battlefield" : 66 74 59
- Blue jeans used in "Dirty Jeans" : 28 51 77
- Ivory : 247 242 223
Materials

There we go. Materials. This is what makes your restraint look next-gen. In short, materials give you a dynamic shine, as opposed to baked shine, which is lighting directly painted into the texture, which was the only way to make something look shiny before we had materials in SL. To see materials you need to make sure your viewer's Advanced Lighting Model setting is on, and that you're near some local lights, otherwise your product will not shine at all and look flat.
To activate ALM, open your Preferences, go to "Graphics" and tick the "Advanced Lighting Model" checkbox, if not already done :

If doing so cripples your FPS (Frames Per Second, the speed at which your viewer renders your view in SL), just deactivate the dynamic shadows like this :

Vixen Set only : If your viewer is not able to render materials, or if you don't want to activate ALM for whatever reason, you can always make the cuffs and collar show baked lighting instead of materials. The best way to do this is to select one of the presets beginning with "static", which both sets the textures and removes the materials.
You can even do both, selecting the materials you want and the static texture you want.
When done well, materials look so much better than baked shine. On the Vixens you have a lot of different materials, from rough leather to shiny leather to plastic to latex to rubber, PVC, spandex... Since you can change the material of one surface in particular, you can customize your restraints pretty far.
Here are examples of the materials you have at your disposal on the Vixen set, on a cuff and collar that are tinted "blood" (which is a good middle ground between dark and bright, showing shadows, reflections and bumps pretty well).

Rough leather

Leather

Patent leather with a hint of metallic shine because it's polished

Smooth plastic

Plastic with some metallic shine

Shiny plastic, very reflective

Jeans, barely any shine (but you see it under a bright light)

Cordura, a kind of strong weave used by the military

Spandex (or Lycra if you prefer)

Soft steel

Brushed steel

Polished steel, almost a mirror

Rubber

PVC

Latex

Polished latex

Shiny latex
Presets
You may think that customizing your restraints through this plugin takes a lot of time, and you might be right. After all, it lets you select the individual parts of your set to modify, and what to make it look like, that's a lot of info to enter.
Fortunately, there is an easier way, and that way is through presets. A preset is simply a little program, or macro if you prefer, that selects the sections, surfaces, patterns, tints and materials for you, automatically. For example, "black leather" (pretty much all the RR products have that preset) will apply a leather material to all the fabric (strap, highbinder main part, etc), tint it black and set a steel tint to the metal.
After selecting a preset, the plugin puts you in a configuration that makes it easy to customize the part you probably want. For example, after selecting the "black leather" preset, the plugin has the "all" section selected (meaning all the objects in this set will be modified), the "whole fabric" surface (that's the straps and other non-metallic parts), the "leather" material selected, the "plain" or "clean" pattern and the "black" tint. This means that you can now choose the tint you want and that will modify the straps only, while retaining a leather shine and bumpiness.
At the time of this writing, presets are built into the plugin, they can't be changed. I wanted to make them readable from a notecard, after all these data are written in readable form inside the source code already, it would be easy to do that but there's a memory limit not to go over and the code is pretty big already, almost at the limit. When I find a way to optimize the script enough to let it read a notecard, you can be sure that this will stop being hard-coded, and you will be able to define your own presets yourself. And probably tints, too.
That's pretty much it. Remember that every texture plugin behaves a little differently, they all evolved over time from the very first one of them, "HarnessTex" inside the Body Harness. That particular plugin contains "show" and "hide" buttons on top of it to show and hide some sections, but in the other restraints this would the role of their "Style" plugins. The texture plugins should only modify the textures, colors and materials, not the visibilities.
Have fun !
Marine
Monday, May 15, 2017
Hotfix for the Deluxe Gag v1.30
Hey,
Another day, another hotfix... This time for the Deluxe Gag v1.30.
It seems that its chin strap didn't retain its positioning after being unlocked... it was a silly bug, really, it didn't lose anything at all but refused to update its position after relocking, because of an optimization after including the Bento animations.
To fix that for your own Deluxe Gag, you can go to Dark Wishes and request a soft update (that is when you choose "UPDATE" instead of "REPLACE") from that updater (the other updaters do NOT have this hotfix installed). You do NOT need to rez your gag on the floor for that, since the update is only about a script and not no-copy animations. I know it's confusing, it confuses me too sometimes.
Please note that the Deluxe Gag is the only gag concerned by this hotfix, since other RR gags do not use a chin strap that moves with the lock.
Have fun !
Marine
Vixen Training Set
Hi !
Let me introduce you to a product that you have probably seen a lot in SL : the Vixen Training Set !
This set is a complete set of cuffs for the arms and the legs, four collars, a tight armbinder with a metal bar, a yoke, a spreader, chains and straps for the heels. All in one package.
Please note that this product is not new, it was actually created and released in March 2011, but it got a complete overhaul in May 2017, turning it from sculpties to mesh and from baked lighting to materials. You can find the original blog post here. (*)
This set used to be named "Vixen Leather Training Set" but although it can still do three shines of leather, it can also do latex, rubber, PVC, plastic (transparent or not), fabric and brushed steel so the "leather" part could be dropped. You might notice that the box still contains the name "leather" but don't mind that, it will change over time.

The Collar
For one, the collar is actually 4 collars in 1. The same object has four different appearances : a simple strap collar looking very much like the cuffs but with sequins, a classy version for everyday use with sequins too, a medium posture collar and a high posture collar. See for yourself :

The cuffs also have a few surprises. Beyond the usual bondage (chaining the hands in front, behind the back or along the body), they come with two interesting pieces of equipment : a u-binder and a yoke. The u-binder binds the arms behind the back in a U, very useful for workout and ponyplay, while the yoke locks itself directly on the collar (the "Reshape" plugin allows you to resize the yoke to your shape). Told you this set was meant for training !
The Arms

The chains

The yoke

The U-Binder


The Legs
As for the legs... it gets even better. You have the usual loose chaining of the ankles to slow the sub down, two hogties (the same ones as in the Restrained Elegance Shackles), and not one but three spreader bars. Standing, sitting, laying down and hogtie, all with the legs spread widely apart. Like the yoke, the "Reshape" plugin allows you to resize the spreader bar without having to edit it by hand. Did I tell you this set was meant for training ? Hehe.

Textures and materials
Of course black might not be your color of choice... Fret not, you can customize the cuffs and collars entirely. You can choose whether to use materials, in which case they will look realistic with a dynamic shine that moves with the camera, or not to use materials, meaning you can use any of the static textures (another name for "baked lighting", meaning the light is directly "painted" onto the texture, it was the old way of rendering shine in SL before materials). See for yourself :


Locking the shoes
And last but not least, the legs cuffs come with a little plus : the ability to lock high heels on with a small strap that goes under the sole. For long sessions of, uh, training, y'know. Of course since the set uses the RLV, the shoes are really locked on when the strap is applied. More so, since every heel is different, the "LockShoes" plugin embedded in the legs cuffs allows you to actually rotate and stretch the straps as you see fit.

It does add some special look to the heels on top of it !
So if you combine everything, you get a quite devious set of sober but elegant restraints that is guaranteed to keep your little vixen squirming. Or perfectly still, if so is your choice.
This set costs L$1200, is modify, no-copy and transfer, and can be found in any of the RealRestraint vendors in-world, for example in Pak. It is not available on the Marketplace.
The rest of this blog post talks about how to use your Vixen set, how to resize it and how to change the text on the Classy collar. I don't go much into detail because I don't want to bore you, and you will probably want to experiment yourself anyway.
How to see materials
In order to see your cuffs shine, you need to activate Advanced Lighting Model in your viewer's Graphics Preferences, if not already done.
To activate ALM, open your Preferences, go to "Graphics" and tick the "Advanced Lighting Model" checkbox, if not already done :
If doing so cripples your FPS (Frames Per Second, the speed at which your viewer renders your view in SL), just deactivate the dynamic shadows like this :
Of course there need to be local lights around, at the very least some sun. If you are in an area without any local lights, the cuffs won't shine, obviously.
If your viewer is not able to render materials, or if you don't want to activate ALM for whatever reason, you can always make the cuffs and collar show baked lighting instead of materials. The best way to do this is to select one of the presets beginning with "static", which both sets the textures and removes the materials.
You can even do both, selecting the materials you want and the static texture you want.
How to change texture and shine
To change the appearance of your cuffs and collar, you use the VixenTex plugin. Please be aware that this set is three products in one : arms cuffs, legs cuffs and collars, so you need to do this once per sub-set if you want to make the appearance homogeneous (but then again, you might not want that, it is your choice). Click on a cuff or on the collar, go to "Plugins", then browse until you find "VixenTex", and select it. There will be a full tutorial and explanation on how this plugin works, but for now here are a few pointers, then you'll probably want to experiment yourself.
Firstly, you may want to try out some presets by going to the "Presets" menu. You can customize your cuffs and collar with a lot of control, but that also means to spend time doing it, and you might not want that so presets are a good way to speed things up. Here are how those presets look :


Here are the RGB values of all the colors (or should I say tints) used in the VixenTex plugin :
- Ivory : 247 242 223
- Copper : 120 51 15
- Gold : 252 194 0
- Black : 13 13 13
- Gunmetal : 66 56 51
- Steel : 128 128 128
- Slate : 112 128 143
- Silver : 191 191 191
- White : 255 255 255
- Blood : 117 10 10
- Red : 191 0 0
- Light red : 255 64 64
- Orange : 224 117 33
- Yellow : 252 219 20
- Light yellow : 255 245 176
- Dark green : 5 51 15
- Green : 8 120 38
- Lime : 89 242 128
- Navy : 20 41 66
- Blue : 26 94 217
- Azure : 94 176 255
- Indigo : 112 0 255
- Amethyst : 153 102 204
- Plum : 143 69 133
- Purple : 191 0 128
- Flesh pink : 204 138 128
- Princess pink : 245 194 194
Those colors are the same as the ones used in other RealRestraint products such as the Highbinder, the Deluxe Straps, the Basic Straps, the Deluxe Gag, the Pretty Mummy, the Body Harness and even the products in the Maison De La Marquise line, the latex catsuits, socks & gloves, and bodysuits. That way you can stay assorted.
Some of the colors used in the presets are not in the "Tints" menu, let me write the RGB values below so you can use them yourself with the "Custom" button in that menu if you wish :
- Old leather used in "Dirty Leather" and "Institutional" : 100 71 53
- Gold used in "White gold" : 219 182 134
- Padlock used by the Deluxe Straps : 228 169 85
- Khaki used in "Battlefield" : 66 74 59
- Blue jeans used in "Dirty Jeans" : 28 51 77
- Ivory : 247 242 223
Once you have selected a preset, you might want to customize further. You can do this through the "Sections", "Surfaces", "Patterns", "Tints" and "Materials" menus. "Sections" are like prims, for example only the wrists, or the wrists and elbows, or only the elbows, or the bars, etc. "Surfaces" are parts of those sections, for example only the main strap, or only the trim, or only the metal, etc. By the way, if you wonder about these bizarre terms, I assure you they make sense. See the "PS" at the very end of this post to get a better explanation.
Once you have selected the sections and surfaces you want to modify, choosing a tint, pattern and material will have an immediate effect. The tint is the color, the pattern is the texture you choose, the material is what it is made of and how it shines in the light.
One word about patterns. They are the very textures applied on the cuffs and collar, but they are not all applied the same way. Some textures such as the "static" ones (the ones with baked shine in them) have a shadow map, which means some grey and black areas to emphasize the relief and shadows, making the cuffs look more realistic, like this :
One is named "Dirty", which is the same as "Clean" but with some gunk added, giving it a worn and dirty look, ideal for darker play. For example, the "Institutional" and "Dirty leather" presets use it :
But if you don't want shadows at all (because let's face it, it is the viewer's responsibility to render Ambient Occlusion, which is the other word for these shadows), you can use the "Plain" pattern, which is nothing else than a plain white texture :
Patterns are textures, but they also influence the opacity. The Vixen set has three opacities : completely opaque such as demonstrated above, transparent (called "Transparent", how original) and almost invisible (called "Clear", not to be mistaken with "Clean" which is opaque) :
The "Static" patterns are the baked lighting ones, you have several colors at your disposal, plus rough leather and black latex :


Note : the shadows near the eyelets look a bit blocky on these pictures but that's because of my viewer, there must be a graphics setting somewhere that filters them according to the distance, seen from closer they look more defined :

Full disclosure, the "Static white" texture (or rather textures, there are many of them, two per cuff and collar) is exactly the same as the "Clean" pattern in the "Patterns" menu of the VixenTex plugin. Likewise, the "Static rough" texture is the "Dirty" pattern with two brown tints (one for the base, another for the light). So you can easily reproduce the same effects with materials.
And then you have all the remaining patterns which are the reason why it is called "pattern" in the first place : simple textures that are repeated to give a pattern to the cuffs and collar, such as camo, cow, little hearts and others :


Sorry, this section was a lot longer than anticipated, but customization is a big feature in this set so it had to be demonstrated in detail.
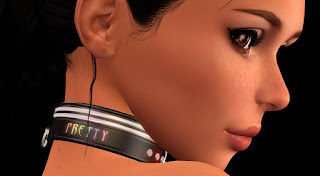
How to change the text on the Classy collar
One of the four collars is able to display custom text over up to 32 characters, as a texture, this is the one that shows on the second lock, the "Classy" one. To do this, simply go to the "Text" plugin, which allows you to change the text, the font and color of the classy collar. The text does not display on "Simple", "Post. Med" or "Post. High", only on "Classy".
It is originally showing your own first name in an "ivory" color, but you have several choices on the menu, including a way to enter any text you want. The text will be centered but the Classy collar actually has two sides, since the padlock is in the middle, so you may want to display a short text on each side, rather than a long one that will be cut in the middle. In other words, you may specify to repeat your text twice automatically if it is short enough. To do this, simply add a star ("*") after your text to repeat it twice and center it twice.
For example, if you simply enter "Prisoner" in the "Text" menu of the Text plugin after pressing on "CUSTOM", this is what will happen :

But if you enter "Prisoner*", with the trailing star, then you get this :


The other menus in the Text plugin let you choose the font and color, it's pretty straightforward.
And if you want to go further, having several fonts and/or several colors on the same text, you can specify an interval thanks to the "Interval" menu. This menu lets you specify at which character to start and at which one to end, and whether you move both limits when moving one of them or not ("linked" and "unlinked" modes respectively). When you choose a color or a font, the change is applied only to the characters inside this interval. You can literally set one different color per character like that, if you like.
How to resize
Resizing this set is easier than before, because the main parts are mesh instead of sculpties.
First press Ctrl Alt T to highlight invisible objects in red, then select the part you want to move with the "Edit Linked" checkbox ticked on your Edit window.


Please be aware of the four 8-letter parts that go with the Classy collar, and that are individual parts, they need to move with the Classy collar or the text won't look good. A good way to do this is to move the whole collar object locked in "Classy" until it fits, then to select all the collars EXCEPT Classy individually, it's much easier. Each collar behaves like an individual prim with regards to resizing and positioning, so that will be much easier than the sculpty version.

Also please notice the invisible prims that serves as leash and chain points, they need to be moved as well (not necessarily rotated or resized, they're just points) so the particle chains touch the mesh rings more or less well. It's easy but it has to be done.

Have fun !
Marine
(*) I had some fun reproducing the exact same poses for this post as the ones I was using to demonstrate six years ago. I was still using my system shape and body at the time, as well as N-core and Skifija high heels (if I remember well), and that Graves bikini was not lost either. And now, six years later with my still trusty and useful Amacci ponytail but this time with a Maitreya mesh body, hands and feet, a Lelutka Simone Bento head, H@S Miss S heels and of course, new Vixens with materials, you can tell SL has improved a lot over time and now easily competes with the best looking modern video games !
PS : You might wonder why VixenTex uses the terms "sections", "surfaces", "tints" and "patterns" instead of "prims", "submeshes", "colors" and "textures" respectively, but this is because the terms I chose make more sense. Let me explain. The cuffs are partly mesh and a single mesh is not a prim, even though it is often called that way in the context of a complex object, so "section" works better than "prims". As mesh objects, they have several "submeshes" but come on, who uses that word except 3D designers ? In SL they would be called "faces" and behave the same way, but a "face" in 3D design is a triangle, so that doesn't work either, "surface" is better. "Tint" is more exact than "color" because you actually tint a texture that might not be white in the first place, so what you get is a mix, not necessarily the "color" you selected. It is the color you selected only if the underlying texture is white. And "pattern" is better than "texture" because it may be repeated on the surface, that depends on the pattern you choose.
PPS : I normally make the metal shine with materials by using 100 for the shine, 30 for the environment, a white specular color and a steel grey diffuse color. But in the case of the Vixens I cannot do this, since they predate materials by years. Switching from Medium or High shine to materials would mean some users would not see their metal shine at all anymore, breaking the product for them. Probably I will switch the metal to materials over time but not yet.
Let me introduce you to a product that you have probably seen a lot in SL : the Vixen Training Set !
This set is a complete set of cuffs for the arms and the legs, four collars, a tight armbinder with a metal bar, a yoke, a spreader, chains and straps for the heels. All in one package.
Please note that this product is not new, it was actually created and released in March 2011, but it got a complete overhaul in May 2017, turning it from sculpties to mesh and from baked lighting to materials. You can find the original blog post here. (*)
This set used to be named "Vixen Leather Training Set" but although it can still do three shines of leather, it can also do latex, rubber, PVC, plastic (transparent or not), fabric and brushed steel so the "leather" part could be dropped. You might notice that the box still contains the name "leather" but don't mind that, it will change over time.

The Collar
For one, the collar is actually 4 collars in 1. The same object has four different appearances : a simple strap collar looking very much like the cuffs but with sequins, a classy version for everyday use with sequins too, a medium posture collar and a high posture collar. See for yourself :

Simple


Classy


Medium posture, the head can still move but not as much


High posture, the head can't move at all
The cuffs also have a few surprises. Beyond the usual bondage (chaining the hands in front, behind the back or along the body), they come with two interesting pieces of equipment : a u-binder and a yoke. The u-binder binds the arms behind the back in a U, very useful for workout and ponyplay, while the yoke locks itself directly on the collar (the "Reshape" plugin allows you to resize the yoke to your shape). Told you this set was meant for training !
The Arms

The chains

The yoke

The U-Binder

Hands to collar

Reverse prayer
The Legs
As for the legs... it gets even better. You have the usual loose chaining of the ankles to slow the sub down, two hogties (the same ones as in the Restrained Elegance Shackles), and not one but three spreader bars. Standing, sitting, laying down and hogtie, all with the legs spread widely apart. Like the yoke, the "Reshape" plugin allows you to resize the spreader bar without having to edit it by hand. Did I tell you this set was meant for training ? Hehe.

Spreader bar, a classic for your eyes only


Sitting on a spreader, try to get out of this one

Moving around in this bondage is fun

Moving around in this bondage is fun
Textures and materials
Of course black might not be your color of choice... Fret not, you can customize the cuffs and collars entirely. You can choose whether to use materials, in which case they will look realistic with a dynamic shine that moves with the camera, or not to use materials, meaning you can use any of the static textures (another name for "baked lighting", meaning the light is directly "painted" onto the texture, it was the old way of rendering shine in SL before materials). See for yourself :

Black leather and blood trim, with the local lights shining over its surface

The same from another angle

White leather with gold metal, notice the shadows on the surface making it look more realistic

Clear plastic ! Yay !

Black latex, of course

The collar is not forgotten either, here is an example of the "dirty leather" preset
Locking the shoes
And last but not least, the legs cuffs come with a little plus : the ability to lock high heels on with a small strap that goes under the sole. For long sessions of, uh, training, y'know. Of course since the set uses the RLV, the shoes are really locked on when the strap is applied. More so, since every heel is different, the "LockShoes" plugin embedded in the legs cuffs allows you to actually rotate and stretch the straps as you see fit.

It does add some special look to the heels on top of it !
So if you combine everything, you get a quite devious set of sober but elegant restraints that is guaranteed to keep your little vixen squirming. Or perfectly still, if so is your choice.
This set costs L$1200, is modify, no-copy and transfer, and can be found in any of the RealRestraint vendors in-world, for example in Pak. It is not available on the Marketplace.
The rest of this blog post talks about how to use your Vixen set, how to resize it and how to change the text on the Classy collar. I don't go much into detail because I don't want to bore you, and you will probably want to experiment yourself anyway.
How to see materials
In order to see your cuffs shine, you need to activate Advanced Lighting Model in your viewer's Graphics Preferences, if not already done.
To activate ALM, open your Preferences, go to "Graphics" and tick the "Advanced Lighting Model" checkbox, if not already done :
If doing so cripples your FPS (Frames Per Second, the speed at which your viewer renders your view in SL), just deactivate the dynamic shadows like this :
Of course there need to be local lights around, at the very least some sun. If you are in an area without any local lights, the cuffs won't shine, obviously.
If your viewer is not able to render materials, or if you don't want to activate ALM for whatever reason, you can always make the cuffs and collar show baked lighting instead of materials. The best way to do this is to select one of the presets beginning with "static", which both sets the textures and removes the materials.
You can even do both, selecting the materials you want and the static texture you want.
How to change texture and shine
To change the appearance of your cuffs and collar, you use the VixenTex plugin. Please be aware that this set is three products in one : arms cuffs, legs cuffs and collars, so you need to do this once per sub-set if you want to make the appearance homogeneous (but then again, you might not want that, it is your choice). Click on a cuff or on the collar, go to "Plugins", then browse until you find "VixenTex", and select it. There will be a full tutorial and explanation on how this plugin works, but for now here are a few pointers, then you'll probably want to experiment yourself.
Firstly, you may want to try out some presets by going to the "Presets" menu. You can customize your cuffs and collar with a lot of control, but that also means to spend time doing it, and you might not want that so presets are a good way to speed things up. Here are how those presets look :

Black leather

Black/blood

White/gold

Black latex

Dirty leather

Institutional

Black ops

Battlefield

Dirty jeans
Trans. plastic
Clear plastic

Brushed steel
Here are the RGB values of all the colors (or should I say tints) used in the VixenTex plugin :
- Ivory : 247 242 223
- Copper : 120 51 15
- Gold : 252 194 0
- Black : 13 13 13
- Gunmetal : 66 56 51
- Steel : 128 128 128
- Slate : 112 128 143
- Silver : 191 191 191
- White : 255 255 255
- Blood : 117 10 10
- Red : 191 0 0
- Light red : 255 64 64
- Orange : 224 117 33
- Yellow : 252 219 20
- Light yellow : 255 245 176
- Dark green : 5 51 15
- Green : 8 120 38
- Lime : 89 242 128
- Navy : 20 41 66
- Blue : 26 94 217
- Azure : 94 176 255
- Indigo : 112 0 255
- Amethyst : 153 102 204
- Plum : 143 69 133
- Purple : 191 0 128
- Flesh pink : 204 138 128
- Princess pink : 245 194 194
Those colors are the same as the ones used in other RealRestraint products such as the Highbinder, the Deluxe Straps, the Basic Straps, the Deluxe Gag, the Pretty Mummy, the Body Harness and even the products in the Maison De La Marquise line, the latex catsuits, socks & gloves, and bodysuits. That way you can stay assorted.
Some of the colors used in the presets are not in the "Tints" menu, let me write the RGB values below so you can use them yourself with the "Custom" button in that menu if you wish :
- Old leather used in "Dirty Leather" and "Institutional" : 100 71 53
- Gold used in "White gold" : 219 182 134
- Padlock used by the Deluxe Straps : 228 169 85
- Khaki used in "Battlefield" : 66 74 59
- Blue jeans used in "Dirty Jeans" : 28 51 77
- Ivory : 247 242 223
Once you have selected a preset, you might want to customize further. You can do this through the "Sections", "Surfaces", "Patterns", "Tints" and "Materials" menus. "Sections" are like prims, for example only the wrists, or the wrists and elbows, or only the elbows, or the bars, etc. "Surfaces" are parts of those sections, for example only the main strap, or only the trim, or only the metal, etc. By the way, if you wonder about these bizarre terms, I assure you they make sense. See the "PS" at the very end of this post to get a better explanation.
Once you have selected the sections and surfaces you want to modify, choosing a tint, pattern and material will have an immediate effect. The tint is the color, the pattern is the texture you choose, the material is what it is made of and how it shines in the light.
One word about patterns. They are the very textures applied on the cuffs and collar, but they are not all applied the same way. Some textures such as the "static" ones (the ones with baked shine in them) have a shadow map, which means some grey and black areas to emphasize the relief and shadows, making the cuffs look more realistic, like this :
White "Clean" pattern
White "Dirty" pattern
But if you don't want shadows at all (because let's face it, it is the viewer's responsibility to render Ambient Occlusion, which is the other word for these shadows), you can use the "Plain" pattern, which is nothing else than a plain white texture :
White "Plain" pattern, there are no shadows but the viewer
does generate some faint ones at runtime
does generate some faint ones at runtime
Patterns are textures, but they also influence the opacity. The Vixen set has three opacities : completely opaque such as demonstrated above, transparent (called "Transparent", how original) and almost invisible (called "Clear", not to be mistaken with "Clean" which is opaque) :
Trans. plastic
Clear plastic
The "Static" patterns are the baked lighting ones, you have several colors at your disposal, plus rough leather and black latex :

Static rough (formerly named "Hide" but renamed because of confusion)

Static black

Static blood

Static blue

Static azure

Static pink

Static white
Note : the shadows near the eyelets look a bit blocky on these pictures but that's because of my viewer, there must be a graphics setting somewhere that filters them according to the distance, seen from closer they look more defined :

Full disclosure, the "Static white" texture (or rather textures, there are many of them, two per cuff and collar) is exactly the same as the "Clean" pattern in the "Patterns" menu of the VixenTex plugin. Likewise, the "Static rough" texture is the "Dirty" pattern with two brown tints (one for the base, another for the light). So you can easily reproduce the same effects with materials.
And then you have all the remaining patterns which are the reason why it is called "pattern" in the first place : simple textures that are repeated to give a pattern to the cuffs and collar, such as camo, cow, little hearts and others :

Seams

Skulls ("Yarrrr !")

Lips
Red
hearts (notice the shine that is red too because the original texture
is white and black, I had to tint it light red, which tints the shine red as
well)
Sorry, this section was a lot longer than anticipated, but customization is a big feature in this set so it had to be demonstrated in detail.
How to change the text on the Classy collar
One of the four collars is able to display custom text over up to 32 characters, as a texture, this is the one that shows on the second lock, the "Classy" one. To do this, simply go to the "Text" plugin, which allows you to change the text, the font and color of the classy collar. The text does not display on "Simple", "Post. Med" or "Post. High", only on "Classy".
It is originally showing your own first name in an "ivory" color, but you have several choices on the menu, including a way to enter any text you want. The text will be centered but the Classy collar actually has two sides, since the padlock is in the middle, so you may want to display a short text on each side, rather than a long one that will be cut in the middle. In other words, you may specify to repeat your text twice automatically if it is short enough. To do this, simply add a star ("*") after your text to repeat it twice and center it twice.
For example, if you simply enter "Prisoner" in the "Text" menu of the Text plugin after pressing on "CUSTOM", this is what will happen :

"Pris", then sequins and padlock, then "oner"
But if you enter "Prisoner*", with the trailing star, then you get this :

One prisoner...

... on each side.
The other menus in the Text plugin let you choose the font and color, it's pretty straightforward.
And if you want to go further, having several fonts and/or several colors on the same text, you can specify an interval thanks to the "Interval" menu. This menu lets you specify at which character to start and at which one to end, and whether you move both limits when moving one of them or not ("linked" and "unlinked" modes respectively). When you choose a color or a font, the change is applied only to the characters inside this interval. You can literally set one different color per character like that, if you like.

How to resize
Resizing this set is easier than before, because the main parts are mesh instead of sculpties.
First press Ctrl Alt T to highlight invisible objects in red, then select the part you want to move with the "Edit Linked" checkbox ticked on your Edit window.

Select the object...

Check "Edit linked", select the cuff, and resize it
as if it were a normal prim
Please be aware of the four 8-letter parts that go with the Classy collar, and that are individual parts, they need to move with the Classy collar or the text won't look good. A good way to do this is to move the whole collar object locked in "Classy" until it fits, then to select all the collars EXCEPT Classy individually, it's much easier. Each collar behaves like an individual prim with regards to resizing and positioning, so that will be much easier than the sculpty version.

Those two parts, as well as the two on the other side,
must be moved along with the Classy collar
(show but not selected here)
Also please notice the invisible prims that serves as leash and chain points, they need to be moved as well (not necessarily rotated or resized, they're just points) so the particle chains touch the mesh rings more or less well. It's easy but it has to be done.

I'm talking about these prims, the big cross being
the leash target while the two pies are for
the Lockguard chains.
Have fun !
Marine
(*) I had some fun reproducing the exact same poses for this post as the ones I was using to demonstrate six years ago. I was still using my system shape and body at the time, as well as N-core and Skifija high heels (if I remember well), and that Graves bikini was not lost either. And now, six years later with my still trusty and useful Amacci ponytail but this time with a Maitreya mesh body, hands and feet, a Lelutka Simone Bento head, H@S Miss S heels and of course, new Vixens with materials, you can tell SL has improved a lot over time and now easily competes with the best looking modern video games !
PS : You might wonder why VixenTex uses the terms "sections", "surfaces", "tints" and "patterns" instead of "prims", "submeshes", "colors" and "textures" respectively, but this is because the terms I chose make more sense. Let me explain. The cuffs are partly mesh and a single mesh is not a prim, even though it is often called that way in the context of a complex object, so "section" works better than "prims". As mesh objects, they have several "submeshes" but come on, who uses that word except 3D designers ? In SL they would be called "faces" and behave the same way, but a "face" in 3D design is a triangle, so that doesn't work either, "surface" is better. "Tint" is more exact than "color" because you actually tint a texture that might not be white in the first place, so what you get is a mix, not necessarily the "color" you selected. It is the color you selected only if the underlying texture is white. And "pattern" is better than "texture" because it may be repeated on the surface, that depends on the pattern you choose.
PPS : I normally make the metal shine with materials by using 100 for the shine, 30 for the environment, a white specular color and a steel grey diffuse color. But in the case of the Vixens I cannot do this, since they predate materials by years. Switching from Medium or High shine to materials would mean some users would not see their metal shine at all anymore, breaking the product for them. Probably I will switch the metal to materials over time but not yet.
Subscribe to:
Posts (Atom)

