Hi,
There's an oops in RLV 2.9.25.2, the RestrainedLoveHeadMouselookRenderRigged debug setting wasn't updated at startup so it was always set to FALSE until you set it to TRUE... during each session. Sorry about that. it now correctly reads the debug setting value which is persistent across sessions.
You can grab the Windows version here :
http://www.erestraints.com/realrestraint/
The MD5 hash for the Windows executable is :
30d6eef1d3d6649fb225c238e6aba764
Sorry for the inconvenience,
Marine
Tuesday, January 29, 2019
Monday, January 28, 2019
RLV 2.9.25.2
Hi there,
As I hinted here, this version of the RLV contains a new debug setting named "RestrainedLoveHeadMouselookRenderRigged" to help you decide whether your head rigged attachments (those attached to "skull", "chin" etc) should render or not while you are in mouselook. The default is "not".
That way if you are having trouble seeing your body because for some reason your mesh body is attached to the head (or your mesh catsuit, or any mesh outfit that covers your body) and you don't want to or can't attach it elsewhere, you can set this debug setting to "true" and it will render again while in mouselook.
To change a debug setting, especially a "RestrainedLove" one, simply open the Advanced menu (press Ctrl Alt D if you don't see it), go to "Debug settings" near the bottom.

Type "Restr" then press Enter, this will select the "RestrainedLove" debug setting.

Then click on the down arrow to open the list and choose the debug setting you wish to change. Most of them do not require a restart and "RestrainedLoveHeadMouselookRenderRigged" does not either.


Once set to TRUE, your rigged head attachments will show while in mouselook like they did before RLV 2.9.25.
You can grab the Windows version here :
http://www.erestraints.com/realrestraint/
The MD5 hash for the Windows executable is :
a4673435db9c2352691a79e1743eb56a
Have fun !
Marine
Saturday, January 26, 2019
RLV 2.9.25.1
Hi,
This version of the RLV contains a hotfix for a bug introduced in RLV 2.9.25 and that I didn't see while testing.
This bug would make other avatars not render (except their unrigged attachments) while you are sitting on something and blindfolded. Because of course, the position of a standing avatar and that of a sitting avatar are not calculated the same way.
You can grab the Windows version here :
http://www.erestraints.com/realrestraint/
The MD5 hash for the Windows executable is :
006fa0adc9d78bb723d4050eca21b569
Sorry for the inconvenience,
Marine
Friday, January 25, 2019
RLV 2.9.25
Hi there,
Here is the latest version of the RLV, with a fixes to several bugs that have been annoying me for some time, and I'm sure they've been annoying you too !
Here is the quick list of changes, I will detail them below :
- Force a rebake whenever we change attachments and wearables.
- Don't let the avatar go into T-Pose while editing an attachment we've been wearing only for a couple seconds.
- When in Mouselook, don't show rigged attachments that are worn on any head attach points (before this fix, unrigged objects worn on the head would not show but rigged ones would, making us see our own teeth, tongue and nose).
- Optimize the rendering of the vision restriction spheres.
- Remove the artificial fartouch restriction when our vision is restricted, because there are cases where we might want to be able to touch something beyond our visual range.
- Include Kokua's RLV windows.
You can grab the Windows version here :
http://www.erestraints.com/realrestraint/
The MD5 hash for the Windows executable is :
728bd5758eb1c318ae9179b023a29810
The rest of this post is details about the changes, if you feel like reading a wall of text.
Force a rebake on outfit change
The first bug is the worst. This bug would sometimes (emphasis on "sometimes", making it particularly hard to track) make your outfit a mess when relogging, with attachments being worn again while you remember having detached them in the previous session, and attachments missing (including locked ones) while you were sure you were wearing them before logging off.
I'm not entirely sure if this bug is my own doing or not. The RLV has a lot of my code in the appearance manager to speed it up and make it easier to use, especially with scripts (obviously) and one of my changes might have provoked this bug. Or not, I have no idea at all. The fix itself does not fix the bug but sets things straight after changing your outfit, by calling a "rebake textures", which also re-synchronizes your "Current Outfit Folder" (aka "COF") with what you see on your screen.
For example, before this fix, wearing shoes then detaching them immediately, without giving enough time to the viewer to update its COF (compounded by possible lag due to your connection), would sure make your avatar wear the shoes again at the next relog, whether it happens immediately or hours later. This was because when detaching the shoes, the version of the COF containing the link to the shoes hadn't had time to arrive to the viewer from the sim when the shoes were already detached. So when the message finally arrived, it would contain the link to the shoes, effectively "programming" the viewer to reattach them next time it had to synchronize its COF.
When you rebake the textures, and now whenever your outfit changes, the links in the COF are checked against what you are wearing in-world. Doubles are removed, links that point to attachments that are not there are removed, and links are added for attachments that are worn but not in the COF.
Don't go in T-Pose while editing
The second fix is for another bug that this time I'm sure is my doing. Except that this is not really a bug. It is a fix for a fix, more like.
That fix ensures that whenever the outfit changes on an avatar nearby, your own included, the skeleton of that avatar is reset so there is no odd deformation. These deformations would occur when wearing attachments that trigger Bento animations with bone displacement.
I'm not a fan of the fix itself, but it does the job so it's ok for now. However, there is something I do often, which is wearing an attachment and immediately editing it. Problem is, the new version of the COF is received by the viewer while I'm already editing the attachment, hence the skeleton is reset... and that puts the avatar in a T-Pose, very high above the ground. If I'm trying to position the attachment at that moment, it may disrupt the positioning and I have to do it again. Annoying.
So this second fix will prevent the viewer from resetting the skeleton while you are editing an attachment of yours.
Don't show rigged attachments in Mouselook
The third fix is something I've been meaning to do for a while. When you are in Mouselook, normally all the attachments you are wearing on your head attach points (skull, chin, ears, nose etc) are not rendered so you can see through your glasses, blindfold or whatever might get in the way.
Problem is, rigged attachments such as a mesh head, which usually comes with tongue and teeth, as well as rigged mesh hair, are still rendered and may very well get in the way.
This fix ensures that none of your rigged or unrigged attachments worn on any head attach point will be rendered while in Mouselook. If you are in Mouselook and want to see one particular rigged attachment that is now hidden, such as your rigged hair for instance, simply wear it on another attach point that is not one of the head, such as chest or spine. It doesn't matter where a rigged attachment is worn, it always looks the same.
Likewise, if you still get some rigged attachments in the way like your mesh head, this would be because it is not worn on the head. Wear it on nose, chin, skull, ear or any other head attach point to make it be invisible while in mouselook.
I might make it an option later if this feature is too bothersome.
Optimize the vision spheres
It has been an annoyance for a while : vision spheres (the spheres that are rendered to block your view when your vision is restricted) slow the viewer down when you are in a crowd.
To be more precise, when you are in a crowd and all the avatars around are rendered as silhouettes. This is due to having 40 alpha-blended spheres stacked upon each other, and the silhouettes being sprites. Graphics cards do not like this at all.
The fix to this issue is multiple. First, avatars and silhouettes are no longer rendered if they are further than the outer sphere and the latter is opaque. In other words, if you are blindfolded without any way to see through the spheres (with RR blindfolds, that means medium, thick and opaque locks, the others let you see through a little bit), then you should notice a speedup.
Second, displaying 40 spheres is good when you want to simulate fog, but most of the time you are just blindfolded, so you don't really need to see so many spheres. Now, the viewer will display 4 spheres for every 10 cm between the inner and the outer sphere, maxed out at 40. This should speed up the rendering as well.
Remove the artificial @fartouch restriction
When your vision was restricted, the RLV used to impose an artificial @fartouch restriction that prevented you from touching any object further than your vision range... But I don't think that kind of artificial restriction is needed, if you need to be prevented from touching further than your vision range, then there is a good chance the script that restricts you imposes the touch restriction anyway. And there are cases where you may want to touch beyond your vision range so this automatic restriction is lifted.
Include Kokua's RLV windows
With the permission of Chorazin Allen and Nicky Perian, this version of the RLV now includes Kokua's RLV windows (debug, console, status and worn status) that look a lot better than the original "List restrictions" action that simply shows all the current RLV restrictions on your private chat. That feature is still there in the RLV menu, but you now have more tools to control what restrictions you are under. You can find these additions in the RLV menu in your top menu bar. Thanks Chorazin and Nicky !
Here is how they look, you can see how much control you have with them :

You will find all the information you need about those windows on the Kokua blog :
http://blog.kokuaviewer.org/2018/12/08/new-rlv-information-windows/
Have fun !
Marine
Friday, January 18, 2019
New product : Env Probe
Hi !
This product is the companion/sibling/compliment of the "Env Box", which is a set of 20 cube maps to make your latex, or any metal object like an armor, shine realistically, as if there was an actual reflection of the world around it.
If you want to go one step further and make your own Second Life environments, and possibly sell them, you need a tool to help you do that. This is the role of the Env Probe that I will explain here.
Important note : Since the introduction of PBR in SL, you might wonder why this product is still a thing, since its primary goal is to let you make your own static environment reflections, which PBR now covers. So if that's your goal, I don't recommend buying this product since PBR lets you do it for free, provided you own the land you're doing this on. But if you want to make your own reflections (from an SL environment to be used elsewhere, or even reflections of something else entirely), then this product will help you with that !
The purpose of this product is to position your camera in a way that you can take six snapshots of the surroundings and create a seamless cubemap from those pictures. Then you upload those six pictures and set each prim of an empty Env Box (full perms, included). Once the box is loaded with your pictures, it is ready to sell. You may want to write your own scripts to control it, if you are a programmer, before selling it. Or you may want to simply keep it for your own usage, whichever you prefer.
Once this is done, you may or may not want to rez the new Env Box in-world, for example to simulate the reflection of the room around you. When you step out of that room, there is no point in keeping that environment anymore, you might even want to make another one for the next room.
Or you may decide to wear the Env Box you made regardless of where you are. It's entirely your choice.
The Env Probe is a complimentary product to the Env Box, but neither needs the other one to work. They just work better together.
There is no demo for this product, but this whole post details it all so you know exactly what to expect.
You can find this product here on the Marketplace and its price is L$240. It contains a HUD, a probe, a controller, a blank static Env Box (its script is different from the Env Box that you wear), an example environment (the one we will be demonstrating here), all are copy/mod/no-trans.
There is also an empty, unscripted Env Box that is full perms
and ready to receive your textures and be sold at the price of your choice. The included
"Env Box Static" object is meant to be used with the Env Box Controller (also included), and is copy/no-mod/no-trans. Finally, there is a simple unscripted sphere to help you test your environments.
If you are good, you will quickly recoup your expenses by selling your own environments in no time.
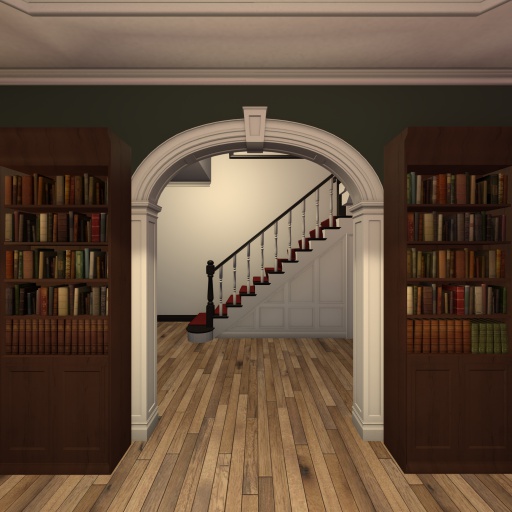
Here is an example of one of the rooms in my house having its own environment made with this product :


What we want to achieve is something like this :


Of course, spheres are all good and well, but we're here for shiny latex, right ?


Yeah, that's what I thought.
I know the reflections are over the top in these pictures, it is on purpose to show you what to expect in the final result, but you can tone the brightness down of course.
The product contains an example Env Box with this very environment.
If you wish to create more than one Env Box, let's say one per room in your house, you will want to use the Env Box Controller that is included in the product. You will find all the details about the Env Box Controller in this post.
This post, unlike the others, does not demonstrate the product then details the manual, but rather exposes the procedure step-by-step to take the snapshots and to upload them in SL after a little tweaking. It is meant to be comprehensive so that you don't have to think hard or guess anything every step you take. Just follow the procedure and you'll have your very own environments in no time.
The following procedure assumes that you are making a new environment for a room inside a house, but it works just as well for an outdoors environment. I will use the study room I showed above as an example to illustrate the different steps of the procedure.
Please note that using a RLV is strongly recommended as the included HUD will control your zoom. If you are not a RLV user and do not want to download a viewer supporting RLV capabilities, no problem, you will just have one additional step to take manually.
Before you even begin, there is one thing you need to take care of. You must do this only once, not every time you create a new environment.
You need to download ImageMagick, which is a free software that we will use to flip the pictures horizontally and vertically. Let's get this out of the way now.
To download ImageMagick for Windows, go to this location :
http://www.imagemagick.org/script/download.php#windows
If you are a MacOS user, go there :
http://www.imagemagick.org/script/download.php#macosx
And if you are a Linux user, get it there :
http://www.imagemagick.org/script/download.php#unix
ImageMagick is a well known tool for image manipulation, montage, collage etc. It is very powerful and virus-free (but check with your anti-virus anyway, you can never be too careful). The Windows installation is straightforward and the x64 version with dll included should do just fine, but do read the instructions if you run in any trouble. If you're using Unix, sorry, you're a geek. I don't need to help you, you probably already know more than I do. If you're using MacOS, I uh... don't know. Please don't look at me.
Once it is installed, if you are a Windows user its location should already be in the path. Check it by opening a command prompt (Start menu, type "cmd" then Enter) then type "magick" and press Enter. If you see something that begins with "Usage: magick tool" etc, then your ImageMagick is installed properly.

ImageMagick is installed properly.
Now that this is out of the way, you can follow the procedure for every new environment you want to create. Be aware that at some point you will need to upload the pictures you'll take, and that requires to spend L$10 per picture, which means L$60 per environment since there are six pictures per environment.
If you don't want to download and install ImageMagick for any reason, you will need to flip the pictures by hand with Gimp or Photoshop after having taken them. It is easy to do but takes more time since it would have to be manual instead of automatic.
A. Prepare your folder on your hard drive
The first thing to do is to create a folder in a location of your choice. For the sake of the example, let's say you create a folder named "Slenv" at the root of your "C:" hard drive.

You are of course free to put it where you want and to name it what you want.
Once the folder is created, go inside it and create a text file that you will call "flip.bat". The ".bat" is important because it will be a MS-DOS batch file with a very simple set of instructions that will tell ImageMagick to flip the snapshots that you will save in this folder. The name of the file (here, "flip") is not important but the ".bat" extension is.


Answer "Yes" when the system asks you if you really want to change the extension.
Then right-click on this file and select "Edit" to open the text editor.


And now you are going to program. Don't panic ! Just copy the following lines and paste them in the file, then press Ctrl-S to save, and close the editor.
@echo off
mogrify -flop *_F*.jpg
mogrify -flop *_R*.jpg
mogrify -flop *_B*.jpg
mogrify -flop *_L*.jpg
mogrify -flip *_U*.jpg
mogrify -flip *_D*.jpg

The "mogrify" calls are calls to a component of ImageMagick that is in charge of running a command over several files. Here, it takes the "flip" and "flop" parameters to flip two pictures vertically and to flip horizontally four pictures, respectively. Those are the six pictures you are going to take in SL shortly. You might have guessed that the "_F" suffix means "Front", "_R" means "Right", and so on with "Back", "Left", "Up" and "Down". If you hadn't figured that out already, now you know. This also means that you will need to name your snapshots accordingly.
That's it. No more programming.
Of course, if you have already taken this step once, no need to create a new batch file and copy this code in it. Simply copy the "flip.bat" file you've created before to the folder you are using for this new environment.
Now that the file is created, you can go to the next step.
B. Prepare your settings
First of all, you want to make sure that nothing around you moves. No avatars (unless you want them to appear in the pictures), no pets, no moving objects, nothing. The sun must not move either so you can't use a day cycle, it has to be a specific Windlight Setting.
Also make sure that the clouds do not move or you'll see seams in the sky in the resulting cube map. You can use a Windlight setting where the clouds are still (Firestorm has a few) or create your own.
And make sure that you are not inside the room, or in any location that can be seen from inside the room.
Once everything is set, you can go to the next step.
C. Rez the Env Probe
The box contains one Env Probe that looks like a hollow glowing box with a yellow cross in the middle. Rez it somewhere in the room :

You can resize it to be the same dimensions as the room, but it is not mandatory. In fact, at this stage of the procedure, the dimensions of the probe do not matter at all, all that matters is where its center is, because that's where your camera will be.
I recommend making it so the center of the probe is roughly at the center of the room (which is why it is a good idea to resize it now, because the cross in the middle of the probe will de facto indicate the center of the room). However, it is a good idea to keep the center around hip level so that the reflections will look normal as seen on a standing avatar. If the ceiling is high (and ceilings in SL are often high), prefer keeping the center of the probe at hip or chest level otherwise the reflections will look like they are seen from above, and the avatars will look taller than they really are.
What you want is the bottom side of the probe to touch the floor, and that each of the four vertical sides to touch each wall (if the room is rectangular, that is). If you are making an outdoors environment, you don't need to bother about resizing the probe, just about positioning it well.


Notice that in this particular room, I pushed the sides of the box to touch the walls on the front and back, but the bookcases instead of the walls on the left and right sides. This is because an avatar cannot walk through the bookcases, making them effectively walls. It doesn't matter though, I could have pushed the sides through the bookcases to touch the walls behind them, the center would have remained roughly at the same spot. I did it this way so you see the "left" and "right" labels on the sides, but where you put the limits is entirely up to you.
The yellow cross in the middle indicates the center of the room :

Please note that although I didn't do it in this example, you can actually rotate the box around its Z axis, in case the room is not aligned with the global grid (or you want the Front side to be turned towards the north direction, for example, as it is turned towards the east here). Just keep in mind that you can rotate it ONLY around the Z axis, because SL does not allow for any camera roll, so rotating around its X or Y axis would not deliver the expected results.
In other words, the "Bottom" side must always be horizontal and below the yellow cross, and the "Top" side must always be horizontal and above the cross. Don't give the box any pitch or roll, only yaw.
Once the probe is positioned and resized the way you want, you can go to the next step.
D. Wear the HUD
The product also contains a HUD which is in charge of controlling your camera. It is very simple to use, you basically always click on the same button, the one labeled "Next".
There should not be any red button on the HUD, otherwise that means that you have rezzed more than one probe, or no probe at all. The HUD needs exactly one probe rezzed in-world in order to work.
So there shall be one probe, no more, no less. One shall be the number, and the number shall be one. Two you should not rez, neither zero, unless you proceed to rezzing one. Three is right out. Once the number one, being the first number, is reached, then shall the buttons turn green and the probe obey you unless it feels naughty. (*)
If you have two probes or more, derez all of them except one, then click on the "Scan Probes" button to set things straight.

HUD with no probe detected

HUD with exactly one probe detected
Now that the buttons are all green or dark yellow, you can go to the next step.
E. Position your camera
Or rather, let your HUD do it for you. That's what it is designed for, in fact.
Click on the "Next" button once, and your camera should be moved inside the center of the probe and oriented to look straight through its "Front" side (notice that the probe itself becomes invisible so it does not appear on the pictures). If you are a RLV user, your zoom should automatically change to 90° and you can already go to the next step.
Otherwise you have to change the zoom yourself. Here is how to do it.
Open the Debug Settings window by clicking on "Debug Settings" in the "Advanced" menu on your top menu bar. If you don't see an "Advanced" menu there, press Ctrl-Alt-D to show it :

In the window that appears, type "CameraAngle" (without a space between "Camera" and "Angle") :

This means that your camera currently has a vertical Field Of View of 1.047 radian (that's 60°). Replace "1.047" with "1.5708" (that's exactly 90°) and hit Enter :

It will probably be rounded to 1.571 upon validation but don't mind that, it won't make a difference.
Voila, your Field Of View is now set to 90° and you are ready to take the first snapshot. Go to the next step.

This is what looking through the front side looks like, with 90° FOV.
F. Take a snapshot
Press Ctrl-Shift-S to make the Snapshot window appear. Make sure that the HUDs are not showing, and neither is the Interface.

The snapshot will need to be square so set the dimensions to 512x512, like this (remember to uncheck "Constrain proportions") :

The snapshot preview should now look like this :

Now click on the small arrow to the right of the "Save" button, and choose "Save As..." :

Select the folder you have created in the window that opens and go in it by double-clicking on it :

Then enter the name "Room_F" in the edit field at the bottom of the window :

Press Enter and that's it, your first snapshot is taken. It should be square and in JPG format. Make sure that it didn't save in PNG format because otherwise the batch file won't modify it (unless you want to change all the "jpg" parts in the file into "png") and the textures will take longer to upload.
The resulting file will be named "Room_F_001.jpg" (the SL viewer always renames its snapshots with increasing 3-digit numbers, starting from 001, don't mind that) and look like this :

A square, 512x512 JPG texture taken from a certain spot in the room with a Field of View of 90°... See where this is going ? You are going to do this five more times to fill a full cube.
G. Repeat steps E and F
What you just did in steps E and F (moving your camera then taking the snapshot), you need to do it five more times, once for every side including up and down.
So repeat them by clicking on "Next", refreshing your snapshot preview with Ctrl-Shift-S and saving your snapshot (no need to set the dimensions again, your viewer should have kept your parameters already).
But the name of the file will change depending on the direction you are looking :
- For Right, name it "Room_R".
- For Back, name it "Room_B".
- For Left, name it "Room_L".
- For Up, name it "Room_U".
- For Down, name it "Room_D".
Once the five repetitions are done, go to the next step.
The order of the sides the camera looks through is always Front - Right - Back - Left - Up - Down. Clicking "Next" goes from one side to the next, "Prev" goes back one step. You can also click on any of the direction yourself to orient your camera towards that direction if you missed a shot.
At the end of the repetitions, your folder should look like this :

And your images should look like this (I'm displaying them in the order they were taken) :

Room_F

Room_R

Room_B
Room_L

Room_U

Room_D
If you messed up and took the same shot several times (like I did when writing this post), maybe there will be a file named "002" or even higher, so now might be a good time to review your pictures and see which ones are to be kept. You should end up with 6 pictures in any case, one for each side.
You can rename the files if you want, for example to remove the "001" part, but make sure their names end with a "_" followed by the letter they already had ("F", "R" etc), otherwise the batch file won't modify them. It doesn't matter if there is a number after the "_x" part and what this number is, the batch file doesn't care about it so you can leave it there.
H. Reset your camera
You can now click on the cross to release your camera. If you are a RLV user, your zoom will be set back to normal, otherwise press Ctrl-9 to set it back to normal manually.
I. Run the batch
It is now time to modify your snapshots. If you did not do this, the reflection would look weird because any writing seen in the environment would still be readable (instead of mirrored like it should be, since we are trying to simulate a reflection here), and the up and down pictures would be oriented badly and would not match the rest.
Here is how the pictures we just took would look on a reflecting surface, if we didn't flip them :


As you can see, the bottom of the green couch does not match the rest of its body, the brown chairs are inverted (the dark one should be on the left, since it is on the right in-world), the staircase is inverted too (it should go to the left, since it goes to the right in-world), etc.
Nothing matches, so we need to do something about it. This is where the "flip.bat" batch file comes into play.
Simply double-click on the "flip.bat" file that you created or copied earlier :

It will briefly open an MS-DOS window and if everything goes well, you should not see anything appear in it before it closes. If you see anything written there, it is probably an error and something went wrong with the names of your files.
What you just did was flip four pictures horizontally and two pictures vertically. Attention, if you run the file again, it will flip the pictures again and you'll have them back to how they were when you took them. And you'll have to run the batch once more.
The pictures are now ready to be uploaded in SL, go to the next step.
J. Upload the pictures to SL
In your viewer, open the "Upload" menu by clicking on the "Build" menu then on "Upload". Once there, click on "Bulk (L$10 per file)...".

It will open an explorer window, select the folder you are working with, where the six pictures are located. Select all six (not the batch file, obviously) :

Like I pointed out above, be aware that you will spend L$10 per picture, which means creating an environment costs you L$60. Make sure you have the money for that and that you can afford to spend it.
K. Apply to an Env Box
You will now apply the textures you have uploaded (and paid for) to either the empty Env Box or the "Env Box Static" object contained in the product. You can also use a copy of the actual "Env Box" that you wear (from the product of the same name), it doesn't matter which one you use for this step as they all function the same way.
- If you wish to wear the new Env Box, use a copy of one of the portable Env Boxes (you need to have bought that product for that).
- If you wish to make your new Env Box occupy a room without moving, use the Env Box Static object (and if you make several, you will want to rez one or several Env Box Controllers if you haven't already).
- If you wish to sell the new Env Box with the pictures you took, you need to use the "Env Box ~ Empty (rez me or add me) (root)" object as this is the only one that is full perms. It is also unscripted so you'll need to script it if necessary (unless you plan on selling unscripted Env Boxes, in which case no problem).
Rez an Env Box (sample, static or empty, or even one that you made from scratch if you want) and edit it (right-click, "Edit"). It is probably invisible so you need to press Ctrl-Alt-T to see it. If you chose to rez the sample Env Box, then you will see it in red immediately. If you chose to use one of the scripted Env Boxes and you can't see it, then you will want to bring its menu up (say "/456 *" on the chat), go to "Options..." and click on "Visible" to make it visible.

Now tick "Edit Linked" to be able to modify one prim at a time.
Then click on one of the prims, any of them except the root prim which is a small sphere in the middle. Any of the hollow rectangles will do. Let's say you click on the "Front" one.

Check its name in the General tab of the Edit window :

It should show "Front", "Back", "Left", "Right", "Up" or "Down".
Switch to the "Features" tab on the Edit window :

Then drag and drop the appropriate texture onto the right texture square next to the "Light" checkbox :

Alternatively, you can click on that square and choose the appropriate texture in the window that appears, that works too.
The appropriate texture is :
- Front : Room_F
- Right : Room_R
- Back : Room_B
- Left : Room_L
- Up : Room_U
- Down : Room_D
I recommend testing with the pictures on your hard drive locally before uploading them, in case you are unsure. To do this, click on the square on the Edit window instead of drag-dropping a texture onto it, and choose "Local" on the window that pops up. The rest depends on your viewer but it is fairly straightforward.
In the retail Env Boxes, "Up" is named "Sky" and "Down" is named "Ground", but the meanings are the same. The "EnvBox" script just needs those prims to be named "Sky" and "Ground" instead of "Up" and "Down".
That's it, you have created your environment ! If you want to create another one, repeat steps A to K (with E and F being repeated six times), you can choose another name for your pictures instead of "Room" if you want.
L. Position the Env Box
This step is optional and relevant only if you want to use the environment for this room in particular. If you want to wear the Env Box and/or sell it (or give it away) instead, you can skip this step.
If you want your new environment box to be static, i.e. not be worn but rather stay where it is in-world, then I recommend you use the "Env Box Static" object. This object already contains a script (named "EnvBoxClient" if you want to know everything) that is ready to be used with an Env Box Controller. It can also position your Env Box according to the Env Probe and the HUD.
The Env Box Static is visible when rezzed or reset, and stays that way until it is positioned or you click on it. So just click on the "Position" button on the HUD. This has three effects :
- It tells the Env Box to position itself where the probe is, taking its angle and dimensions.
- It hides the Env Box.
- It sets the radius of each projection according to the size.
This picture shows you what it does (I made the probe 50% transparent and turned the box visible so you can see it take the same dimensions and position) :

M. Clean after yourself
When you're done, you should derez the probe either by deleting it manually or by clicking on "Derez Probe" on the HUD. Otherwise if you rez a probe later to make another environment, the HUD will complain that it detects more than one probe.
If you've read this far and made your own environment, congratulations ! Let me offer you a little shiny latex dance as a reward :)
Have fun creating and selling your own environments !
Marine
(*) I'm uh... sorry, I just couldn't resist. If you didn't catch the reference, please ignore me. *hides*
Subscribe to:
Posts (Atom)

