Hi,
Here is the latest version of the RLV, including LL's latest code with Animesh and a few fixes for some annoying or silly bugs. Here's the change list :
- added : A "Refresh Attachments" menu item in "Advanced" (Ctrl-Alt-D to make that menu visible if you don't see it), a feature coming from Firestorm to help when one of your attachments is ghosted after a teleport.
- fixed : We could not move an attachment or part of it while sitting on someting and restricted from teleporting or sit-teleporting.
- fixed : When under @shownames, "Second Life" would appear in the chat history instead of an obfuscated name (thank you Carina Asbrink for the report).
- fixed : One of the debug screens was not affected by @shownames.
- fixed : Hearing emotes said by a personal attachment which imitated the name of an avatar around us, did not have its name obfuscated when under @shownames.
- fixed : RestrainedLoveAvatarShadows level 2 was broken.
- fixed : After changing the Windlight settins through RLV and restoring region defaults via the menu (not via RLV), the sun went on its course at a high speed.
You can grab the Windows version here :
http://www.erestraints.com/realrestraint/
Alternate download link if the erestraints website is down :
https://www.dropbox.com/s/siz5m89dbqf8xj0/RestrainedLoveSetup.exe?dl=0
The MD5 hash for the Windows executable is :
8ea8dfca1c5f0c5e437cf83c7877a54d
Have fun !
Marine
Wednesday, November 28, 2018
Tuesday, November 27, 2018
Update to the Police Collar
Hi there,
The Police Collar was created during the big update to the Police set as a replacement for the old Prisoner Transport Belt, which itself became a simple chain which is now included with the Elbows addon.
The collar comes with an interesting feature known as a "zapper", letting the keyholder/owner/captor control and punish the wearer/submissive/captive with strong jolts of electricity, either manually or automatically while having the collar monitor speech, relative and/or absolute position.
When I released the collar with the rest of the update, the only effect of the shocks were animations, sounds and lights on the sides of the collar, but nothing more punishing than that.
The update to the Police collar brings RLV effects on top of that, and counts punishments, which can be seen and reset by the keyholder at any time. Each time the sub gets zapped automatically, the corresponding punishment increases by one. For example, if she speaks three times and gets zapped for it three times, there will be a big "3" on the "Speech" line on the menu, and the keyholder will know the sub has been naughty.
See for yourself :


Efficient, right ?
Now, when the sub is zapped, her screen becomes tinted red and blurry, and although the color returns to normal when the zap stops, the blurriness wears off progressively over the course of a few seconds, the more blurriness the longer it takes. What's more, the blurriness accumulates with itself if the sub is zapped repeatedly (to be exact it accumulates with half of the previous blurriness, not all of it). Careful, you can literally blind your sub with pain if you keep doing that.
It sure keeps a sub nice and quiet. Don't you agree, Tiffany ?

Good girl.
To update your collar and get these new features, you need to go to one of these locations :
My Little Shop
Chorazin's store
Roper's Dark Playground
Dark Wishes
Once there, click on the updater and follow the instructions. You absolutely need to choose "REPLACE" on the menu instead of "UPDATE" because one of the changes involves a script contained in a child prim, which the updater cannot reach. If you do not get a "REPLACE" option, contact me (Marine Kelley) to get a manual replacement.
Have fun !
Marine
The Police Collar was created during the big update to the Police set as a replacement for the old Prisoner Transport Belt, which itself became a simple chain which is now included with the Elbows addon.
The collar comes with an interesting feature known as a "zapper", letting the keyholder/owner/captor control and punish the wearer/submissive/captive with strong jolts of electricity, either manually or automatically while having the collar monitor speech, relative and/or absolute position.
When I released the collar with the rest of the update, the only effect of the shocks were animations, sounds and lights on the sides of the collar, but nothing more punishing than that.
The update to the Police collar brings RLV effects on top of that, and counts punishments, which can be seen and reset by the keyholder at any time. Each time the sub gets zapped automatically, the corresponding punishment increases by one. For example, if she speaks three times and gets zapped for it three times, there will be a big "3" on the "Speech" line on the menu, and the keyholder will know the sub has been naughty.
See for yourself :

Hi ! I'm Tif--

--WHAAAA !!

What the hell just hap--

--AUGGGHH !!

*shuts up*
Efficient, right ?
Now, when the sub is zapped, her screen becomes tinted red and blurry, and although the color returns to normal when the zap stops, the blurriness wears off progressively over the course of a few seconds, the more blurriness the longer it takes. What's more, the blurriness accumulates with itself if the sub is zapped repeatedly (to be exact it accumulates with half of the previous blurriness, not all of it). Careful, you can literally blind your sub with pain if you keep doing that.
It sure keeps a sub nice and quiet. Don't you agree, Tiffany ?

*no comment*
Good girl.
To update your collar and get these new features, you need to go to one of these locations :
My Little Shop
Chorazin's store
Roper's Dark Playground
Dark Wishes
Once there, click on the updater and follow the instructions. You absolutely need to choose "REPLACE" on the menu instead of "UPDATE" because one of the changes involves a script contained in a child prim, which the updater cannot reach. If you do not get a "REPLACE" option, contact me (Marine Kelley) to get a manual replacement.
Have fun !
Marine
Thursday, November 22, 2018
Hotfix for the Police Legirons
Hi,
There was a bug in the new Police Legirons that would make their vertical chains go all gray without being able to fix it, after resetting or changing materials on the legs' PoliceTex plugin.
This bug slipped past my testing because it occurs to everybody but me (I did test the cuffs with my alt, but not this part apparently), and this is because of a silly permission issue.
The good news is that there is a fix for it, the bad news is that you need to get your legirons replaced to get the fix. When you request an update from any of the RR updaters, please make sure to choose the "REPLACE" option, not the other one or your legirons won't be fixed (this is because the culprit is in one of the child prims of the cuffs, the left ankle one specifically, and the updater does not touch child prim inventories).
Please note that although the bug is also in the Police arms cuffs and even in the Police collar, in practice you won't ever see it happen on these two parts because those do not feature rigged chains in 2D. This bug happens specifically on the 2D vertical chain of the legirons and nowhere else.
You can get the updated pair of legirons from any of the updaters found at these locations :
My Little Shop
Chorazin's store
Roper's Dark Playground
Dark Wishes
Sorry for the inconvenience,
Marine
Monday, November 19, 2018
Update to the Police set
Hi there,
After nearly a month of work, I am proud to announce the update to the Police set !
An update ? What am I saying. This is a complete rework, that's what it is.


The first part of this blog post demonstrates the Police set and what you get in this update, while the second part is the actual manual for all the specific features.
The update
The Police set was my very first commercial product. The Police Handcuffs were released in January 2007, the Police Elbows addon, the Police Legirons and the Prisoner Transport Belt followed shortly after.
They were made with prims and generic textures (we didn't have mesh, sculpties and materials at the time, everything looked plain and kind of dull compared to nowadays), and although there were many updates just like the rest of my products, getting new animations and features over time, they never changed in looks. This update is meant to correct that.
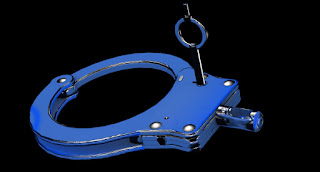
This is how they used to look until now :

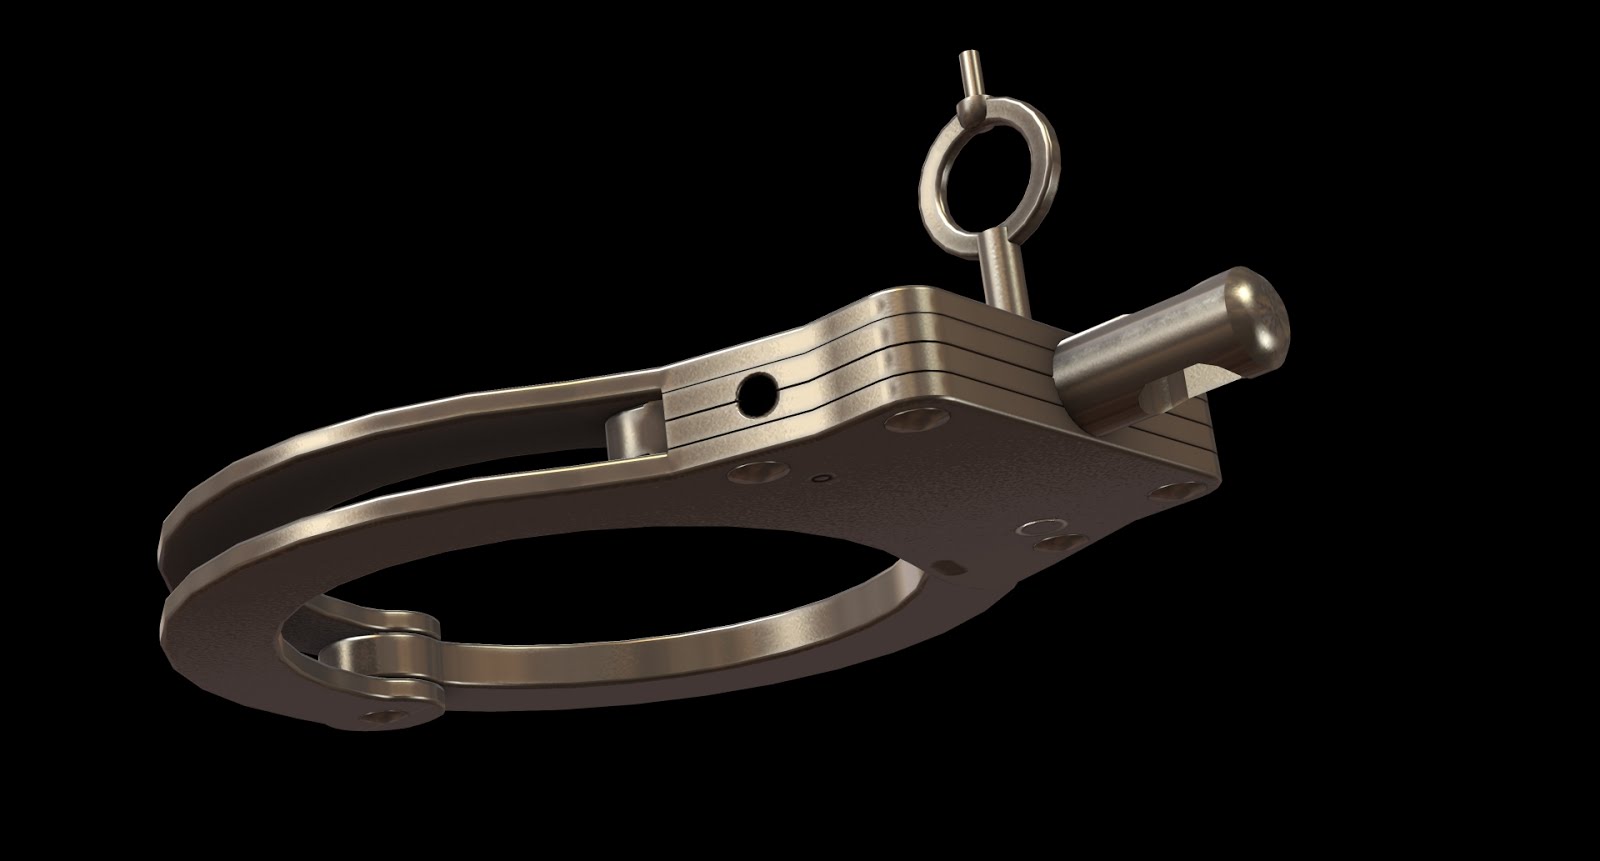
And this is how they look now :

The highlights of this rework are :
* The cuffs are now mesh instead of prims, they are designed from the Hiatts Police handcuffs I own in RL, down to the exact measurements and material. The only difference is that mine are hinged while the SL cuffs have a chain, because a hinge doesn't work well with the many differences in shape we can have in SL.
* Their textures look realistic and use materials for a nice dynamic shine. The shinier metals have a baked environment texture on top of it (although they also shine dynamically), this is to simulate a kind of mirror effect since SL cannot render mirrors or custom environments yet. They would look plain without it.
* There are a lot more animations to increase the quality of life, making the cuffs even more adaptable to any situation you could find yourself into. You can even pose the wrists independently or leave them unconstrained so you can actually use them to work. For example when dusting the place.
* Last but not least, there is a collar now, featuring a zapper for unruly prisoners. The collar is designed to match the cuffs in design and in textures, it is thin but looks robust and functional.
The update is free, but since the original Police set was divided in a pair of handcuffs and two addons (elbow cuffs and prisoner belt) plus independent legirons, what you get when you update your set depends on what you already have. Needless to say, you need to choose "replace" when presented with the option when updating your cuffs. A simple update won't give you the new mesh set.
Unlike the old set, the new set does not feature a "prisoner belt" (although it does contain a belt chain that looks more in line with the rest of the set), but a new Police Collar instead. I'll get into more details below but before I go further, please be aware that the replacement of the belt by the collar increases the total price of the set from L$870 to L$950.
The new pricing
If you don't already own the full set and want to know what the different parts will cost, read on :
- Police Handcuffs : L$250 like before. If you already only own the original basic handcuffs, this is what you'll get when you update your cuffs with a replacement.
- Elbow Cuffs addon : L$150 like before. If you already own the original basic handcuffs and the elbow cuffs addon, you will get the new Police Handcuffs and this addon when you update your cuffs with a replacement. Of course, the elbow animations and notecards must be installed in the right wrist cuff for the updater to recognize your set as such (there is now an automatic installer for that, no need to do it by hand anymore).
- Police Legirons : L$250 like before. If you already own the original Police Legirons, this is what you'll get when you update them with a replacement.
- Police Collar : L$300, it is meant to replace the original Prisoner Belt that costs L$220, and this is the reason for the price increase. If you already own the original Prisoner Belt and have installed its notecards and animations in your original Police Handcuffs, this is what you'll get when you update them, and you won't have to pay anything more even though you paid L$220 instead of L$300.
The Police Collar is independent from the rest of the Police set, actually, and can be bought separately. Its price is halfway between the Elegance Collar and the Vixen Collar, as it has a Zapper plugin, unlike both, but does not change shape like the latter.
How to update
Before going further, if you are eager to update your set already, simply go to one of these locations :
My Little Shop
Chorazin's store
Roper's Dark Playground
Dark Wishes
Once there, click on the updater and follow the instructions. You absolutely need to choose "REPLACE" on the menu instead of "UPDATE" since the objects are completely different. If you do not get a "REPLACE" option, contact me (Marine Kelley) to get a manual replacement.
Installation of the Elbow addon
If you get the addon for the Elbows cuffs (either from the update or by buying it later), simply rez your right wrist handcuff (the one labeled "MAIN" in your handcuffs folder), then the installer contained in the elbow addon, then drag and drop the "Police_Elbows_Request" script contained in the same folder into the right wrist cuff you rezzed in-world. Wait a little, and it's ready !
Please note that since the animations are moved from the installer object into the cuff, neither of these two objects can be worn, due to SL's permission securities. They have to be both rezzed in-world, and in the same sim.
Also it doesn't matter which order you rez both objects and when you drop the "request" script into the cuff. As soon as they are both rezzed and the "request" script is in the cuff, the installation starts.
For what it's worth, this installer does exactly what you used to do by hand before, when installing the elbow addon into the old style handcuffs. It just does it automatically now (and yes I know, I should have made this installer years ago :p).
New mesh design
As stated above, the whole set is now made with mesh instead of prims. I've reproduced my RL handcuffs using calipers, so the dimensions and proportions are exact to less than half of a millimeter. They are made to be easy to resize, and most of the set is unrigged so you can adjust the sizes regardless of the body you use, be it mesh or system. You will have to resize the parts individually though, but there are not many of them so it won't be a problem. The whole set is made so you can move rings and chains independently for more precision. This should satisfy even the most OCD among you. *snickers*
Also, the cuffs are now much easier to click on because their root prims are wide cylinders. No more having to pinpoint a tiny cuff on a squirming sub !

Materials
That's what gives the cuffs the realistic look they now have. There are 16 materials at your disposal, plus two variations for the Legacy material, exactly like for the Elegance set.


(*) The legacy shine refers to the way SL renders a shiny surface without using materials. The "Legacy" materials are there for those among you who can't or don't want to see materials on their cuffs. After all, you probably bought the Police set at a time when materials in SL were not even an idea, and if your computer cannot render materials, your set would be broken by this update if not for these "Legacy" materials.
All these textures can also be tinted, you choose the color and you can adjust the luminosity and saturation afterwards. It works well and lets you choose a good look faster than if you had to enter RGB values yourself (which you can still do, before you ask). The PoliceTex plugin works exactly like the EleganceTex plugin in the Elegance set, so if you are familiar with the latter, you won't have any issues using the former.
You can also choose different materials for the main part of a cuff, another one for the single strand, yet another one for the rivets and yet another one for the key, and the same goes for tinting, so you can get looks like this :

Police Collar
This collar is new and is the reason for the price increase of the whole Police set. Its purpose is to replace the old Prisoner Belt, which becomes a simple chain used to keep the wrists to the front of the belly without moving too much.
The collar itself is a shock collar, it comes with a Zapper plugin that allows the captor to manually or automatically punish the wearer with strong electricity shocks to the neck.

It can be set to shock the sub whenever she speaks, or moves too far from the captor, or moves too far from a set location. If the latter is set, then the distance is measured globally, meaning you can actually restrict the sub from moving more than, say, 10 kilometers away from a location, so if she's on mainland she can go only a number of sims away before being punished. This option is good if you want to keep the captive inside some kind of facility that spans over several regions.
The shock animations cannot be turned off at the moment, but you can control the faces. Since the faces are Bento, if you find that they do not look good for your own mesh head (they are tested on Lelutka Simone), you can switch from the "total" faces to the "partial" ones, which animate fewer bones, hopefully limiting the deformation. This is especially good for Catwa mesh heads, which are rigged a lot differently from Lelutka, so what works on the latter may not work on the former. It is a matter of taste and shape, really.

It also comes with a Spy plugin that works exactly like the ones in the Elegance, Vixen and Serious collars. The Spy plugin is explained here and allows the captor to keep an eye on the captive's activities even when the former is offline.
Like the cuffs, the collar has 16 different materials (the same ones as the cuffs so it stays assorted) and can be tinted freely. You cannot choose different materials for the front box and the circular parts because they are the same surface, but you can set a material individually for the key. This is due to the fact that we only have 8 faces per mesh in SL, and all the others are already taken by the LEDs, the screen, the wires and the rubber.
The LEDs on the collar indicate if the wearer is using the RLV, if she's "Blocked" by any RealRestraint arm restraint (through its "Block" menu item), if she's currently in Mouselook and if her Spy plugin listener is active. This allows the new Police Collar to do what the old Prisoner Belt used to do, that way you don't lose features when you update.

Chains
The Police set does not use particle chains at all (except for its leashes, of course, and the chains going to furniture, as it is Lockguard and Lockmeister compatible). Instead, it uses mesh chains, some rigged and some not rigged. This allows for a more solid and realistic look than particle chains that are rather limited and plain.
More over, this allows for the vertical chain going from the ankle chain to the wrists to finally stay in the middle. If you noticed, the old Police Legirons used to spawn particle chains from a spot more or less halfway between the ankles, to the wrists when locked in "Taut". However, this worked only for a small number of standing animations. There is a technical reason for this limitation that I will explain below.
Unlike the rest of the chains in the Police set, the vertical chain must stay straight at all times, regardless of the animation of your avatar. This means that there can't be any vertex between its extremities or the chain would curve when you kneel or sit (there is no way around that because when the ankles rotate in relation to the wrists, or the other way around, for example when you bend the knees, the rigging interpolates between the two angles and that produces a curve instead of a straight line). As a result, that chain is a plane. A double plane making a cross, in fact, using a technique that is commonly used in video games, even contemporary ones, with a chain texture with materials on it. Don't worry, it shines dynamically as if it were 3D, you won't see the difference unless you look closely :

A consequence, though, is that unlike the rest of the chains, this one cannot change texture when you change the materials, it can only change its tint. In practice this does not make much difference except when you use the "Iron rusty" material, making all the chains rusty except the vertical one that stays dark but not brown like the rest.
Speaking of the vertical chain, it has always bothered me that we could not choose between a "T" chain (one chain between the ankles, and the vertical chain going up to the wrists) and a single chain between the ankles. So now we have this option and you can finally use your Police Legirons independently from any restraint if you want, like the Elegance, Serious and Vixen legs cuffs.

Animations, locks
I have completely redone all the arms animations and changed the locks. The arms cuffs (with elbows) now feature 8 different locks, all of them featuring many variations for you to choose among, depending on the situation you're in.


(*) There are 6 variations, but you also have the choice between freezing the chest and torso, or just the chest, or not freezing it at all (it depends on what stiffness you prefer for the upper body when you walk, stand or sit, to keep the wrists close to the front part of the waist chain).
This are a lot more variations for each lock than in any of my other restraints because I want to provide you as much control as possible over your arms while you are in cuffs.
I did not change the legs animations at all, they are still the same as before.
Hands and feet
All the arms animations are priority 6 and all the legs animations are priority 5, like in every RealRestraint product. However, the hands are set to priority 2 and the feet are set to priority 3, so those parts can be overridden by your AO. This is on purpose to give your avatar a more life-like stance and more variations. However, there are times when you may want to control the position of your hands yourself, for example when your wrists are cuffed behind your back, you may want to rest one hand over the other instead of clipping through each other because your AO moves them that way. Or you might want to support yourself with your hands if your arms are moved back enough.

To do this, you simply use the Hands plugin in the arms cuffs and the Feet plugin in the legs cuffs. Those plugins allow you to override your hands and feet animations with specific poses. The poses are per-lock based so you can for example decide that the Kneel lock should have its feet frozen straight (which is not the case by default as the cuffs have no way to know if you are wearing high heels or if you are barefoot), or that when locked in "Maid" you should have your hands turned inwards. How to use these plugins is explained in the Manual section of this post.


Optional chains for armbinders
The old Police Legirons vertical chain used to be able to link to the tip of the RR Armbinder and the RR Highbinder, so the new Police Legirons are able to do the same, even though they don't use particle chains but rigged chains.
The Style plugin contained in the legs cuffs allow you to hide and show those alternate vertical chains so they don't go to the wrists anymore but further down the hands, beyond the fingers, to make them look like they are linked to the bottom ring of the Highbinder. For the Armbinder, same thing except the chains go way up because the RR Armbinder folds the upper arms up instead of hiding them with an alpha.
You are also provided two sets of full perms rings that you can use as a "glue" between the armbinder you are wearing and the tip of the rigged chain.
I haven't tested with armbinders from other brands, but with a little luck this should work as well if they are positioned and/or rigged correctly.


New RealKey design
The old RealKey object (the one given by the plugin of the same name) used to be made of prims, and its design was the same as the key in the original Police Handcuffs, so now that the handcuffs have a new design, it is normal that the RealKey gets one too.
The plugin does not change at all, only the object does, the protocol stays the same so your old RealKeys will still work. But if you get a new RealKey from the updated Police set, you get the new object with the original script, so new RealKeys will also work with older restraints.

The key is also embedded in a bigger transparent cube to make it easier to click on.

That's all for the quick demonstration of the new features of the Police set, the rest of this post is the manual explaining how to use and enjoy these new features.
Manual
The new features of the Police set are the Style plugin, the PoliceTex plugin, the Zapper plugin, the Spy plugin and of course the mesh design, materials, mesh chains and new animations.
Style plugin
The Style plugin lets you decide what parts you want shown and what parts you want hidden, depending on the lock, provided that you have the key and access to the cuffs. All the three parts of the set feature one : the collar, the arms cuffs and the legirons, with different styles for each.
To use it, go to the main menu of a cuff, click on Plugins, then Style (you might have to switch to the next page of the menu if you don't see it). The menu you then see depends entirely on the type of the restraint and on the lock it is set to. For example, the collar can only be "Visible" or "Invisible", while the arms cuffs have many more options, like the ability to hide and show some cuffs and chains to let the sub use the cuffs along with other restraints.
In the arms cuffs, you are given the choice to use the "3 rings" or the single ring for the wrists. This is entirely your choice and it depends on your taste and on your shape. If your shoulders are too wide compared to the length of your arms, you might want to switch "3 rings" on. When you turn it on, the single ring hides itself, and vice versa. This switch is not available for all locks because not all locks feature the wrist link between the wrist cuffs.


Likewise, in the legs cuffs, you have the ability to show and hide different alternate vertical chains, labeled "Highbinder" and "Armbinder" in the menu. If either of them is active, the normal vertical chain is hidden and replaced by the corresponding alternate version. You also need to choose a style that features the "Chain to hands" for this or you won't see any of those vertical chains at all. These switches are not available for all locks because not all locks feature the vertical chain.

If you use any of these alternate vertical chains to link to, say, an armbinder, you may want to wear one of the provided bonus rings attachments. Those objects are full perms and unscripted so you can modify them at will. The only difference between the two is where they attach. Being full perms does not mean being free to do anything you want with them, you are not allowed to sell them or to give them away.
Unwear what is not needed
At the time of this writing, the whole Police set contains 8 attachments, plus 2 bonus rings for the armbinders (they are not needed for the product to work, they're just here for the looks). That's 1 object for the collar, 5 for the arms and 2 for the legs.
Since we are limited to 38 attachment slots in total, it is a good idea to detach the parts that you don't need, and the RealRestraint system allows you to do that. For example, if your hands are cuffed behind your back but not your elbows, you are able to detach the elbow cuffs and the belt even if you are a RLV user, because those parts are not locked on your avatar until they are needed (i.e. when you are locked in "Elbows only", "Maid", "H+E front", "H+E back", "Belt" or "U-Shape").
Moreover, if your cuffs have changed in looks while some parts were not worn (like the elbows in the example above), therefore not able to register the changes when they occurred, then wearing them later will re-synchronize them so you don't have to apply the materials manually again. For example, if you are locked in "Hnd back", detach your elbow cuffs then switch your handcuffs from "Shiny steel" to "Painted clean" and paint them green, when you reattach your elbow cuffs later they will automatically become "Painted clean" and green without needing you to do anything.
This allows you to spare some attachment slots and to avoid rendering parts that are not needed. The Police belt is needed only in the "Belt" lock, so any other lock lets you detach it. Of course, the right wrist and right ankle cuffs are never detachable when locked, since they are the parts that contain the main scripts. Same for the Police collar which is the only attachment in its own set.
Attention, making a part invisible through the Style plugin does not make it detachable. For example, you cannot detach the elbow cuffs if you are locked in "H+E front" even if you turn them invisible in the Style plugin.
Animations
I highly recommend wearing the contained "RR Anim HUD", which is a HUD that allows you to choose the variations for the lock you are currently in, be it arms or legs. As stated above, the arms cuffs now contain a lot more animations than before, it would be a shame to use only one, right ?
The RR Anim HUD connects to the Anim plugin contained in the cuffs to switch the animations with the arrows. It is all very simple and is explained in detail here.
The Belt lock is special because it involves an unrigged chain belt around the waist as well as cuffs on the wrists and elbows. However, it is impossible in SL to make sure the wrists stay against the belly like this lock is supposed to do, as there is no inverse kinematics available (there used to be such a project but it was shelved by LL). As a result, if the upper body (torso and/or chest bones) moves, then the wrists move away from the belly, sometimes pretty far, and we don't want that. This is why you have 18 variations that look the same, when in Belt lock. The first six are the "ES" variations ("ESA" to "ESE" then "ESX" to "ESZ") that freeze the chest bone and reduce the overall movement of the upper body but not too much. If it is not enough, you have the next six variations labeled "ET" ("ETA" to "ETE" then "ETX" to "ETZ") which freeze both the Chest and the Torso bones, ensuring your arms stay close enough to your belt. But they also make you walk a bit funny, especially if your walk makes your pelvis sway a lot. So if you don't want to freeze the torso at all (for example when walking or sitting on something), you can use the third series of six variations labeled "EF" (like "Elbows Front", these are the same animations used by the "H+E front" lock) which do not freeze the upper body at all.
I tried to make a short rigged chain instead of relying on freezing the torso, but like the front Maid chain it ended up curved and offset and I have no idea why. Maybe when I figure this out I'll update this part.
A quick note about the names of the variations. They are all labeled with 3 letters because that's how I manage to cram so many of them in the Anim plugin, by shortening their names. I understand they are not intuitive but the only thing relevant to you is the last letter of each animation, going from A to something (E, G, P, that depends on the lock), then something else (U, X, once again it depends on the lock) down to Z. Then cycles back to A. Some letters are variations of 5°, others 10°, others are a completely different shape. This is all a bit arbitrary, I admit.
Most of the arms animations leave the hands to priority 2, which means your Animation Overrider will most likely override them. This may or may not be something you want so you can control your hands and feet through the Hands plugin in the arms cuffs and the Feet plugin in the legs cuffs respectively.


The "Active" button lets you switch between three activation modes :
* Not active : the plugin does not animate your hands or feet at all.
* Active if AutoRefresh is active : the plugin only animates your hands or feet if AutoRefresh is on in the same restraints (it is on by default but you can turn it off manually through the RR Anim HUD and the "More" menu of the restraint itself).
* Always active : the plugin animates your hands or feet regardless of the AutoRefresh state, but only if the restraints are locked.
This means that if the plugin is set to "Active if AutoRefresh is active" and you want to deactivate it, you have to press the "Active" button twice.
All the locks have at least the "Straight" option available in the Hands and Feet plugins. For the hands, this means keeping the hands more or less parallel regardless of the lock, and for the feet this means keeping the system feet 90° from the shins. If you are using a mesh body with high heels (and most likely the feet set to "high" or "point"), then this is the setting for you in locks like "Kneel".
The gestures included in the box of legirons do the same thing, if you prefer using gestures than a plugin. Don't forget to activate them first then.
Please note that the "U-Shape" and some of the "Hands back" variations won't benefit from any of the Hands plugin settings since the hands are already priority 6.
By default, "Straight" is the animation set for all the locks, both in the Hands and Feet plugins. However, the plugins are not active by default, you have to activate them yourself.
Please note that the hands animations managed by the Hands plugin are NOT Bento so they won't move the fingers. This is on purpose because most mesh bodies have their own built-in finger poses so you can use that if you want to, say, close your fists in U-Shape.
Also please know that choosing an animation in the list automatically activates the plugin if it was not active before.
Lastly, only the wearer can access those two plugins, and nobody else.
Textures and materials
This is another big highlight of the new Police set, the ability to change the materials and to make the cuffs look realistic.
First of all, please ensure that your viewer is set to render materials. To do this, open your Preferences, go to the Graphics panel, then click on "Advanced" and activate "Advanced Lighting Model" :


If this is too taxing for your graphics card, you can turn the dynamic shadows off and still see materials :

To change the materials of your cuffs and/or collar, go to the "Plugins" menu of your cuffs or collar respectively then click on "PoliceTex".

Through this plugin you can :
* Change the materials
* Choose a tint to replace the built-in tint of the chosen material (like Aluminium which is grey)
* Choose the surface to change the material or tint of
* Adjust the saturation and luminosity
* Dull down the shine (you can't make it brighter since this modifies the shine color, not the glossiness) with the "Shine factor" button
* Deny access to the sub with the "Deny" button
* Choose to apply manually or automatically with the "Live" button
* Reset the tint, saturation and luminosity with the "Defaults" button
* Reset the materials back to "Steel shiny" with the "Reset" button
Some materials come pre-tinted, like "Aluminium" which is blueish by default whereas its texture is actually white. When you tint a surface, its original tint is replaced by the one you chose. However, materials like "Rusty iron" are naturally colored so tinting them would combine their built-in color with the one you pick.
When you have chosen your tint, you may want to adjust its saturation and/or luminosity. This is done independently and if you change the tint later, the saturation and luminosity stay the same. Using the saturation and luminosity is a good way to make a tint look more natural (like above in the pictures with the de-saturated green and blue tints) without having to calculate a custom tint and to enter it manually in with the "CUSTOM" button in the "Tints" sub-menu.
The cuffs and the collar are made of metal, that is a given. This means a lot of things when it comes to rendering, in particular how the shine changes when the surface is tinted. Unlike plastics which shine the same color as the lights around them, metals actually tint the reflected light due to their conductive properties. In fact, the more conductive a material, the more it tints the light it reflects. The human eye is good at telling a metal from a plastic posing as metal, and this is how it manages to do that.
This means that for all the materials except "Painted", "Plastic" and "Legacy", tinting the surface will also tint the reflected shine. However, since most metals also have a natural shine (steel is cold blueish while nickel is yellowish), the resulting shine is some kind of combination of the original shine and the set surface tint. The result is very nice and pleasing to the eye.
"Painted", "Plastic" and "Legacy" materials don't color the shine at all because their surfaces are not considered metallic, even though the core is always metal.
How to resize and adjust your cuffs
Every object has a single regular prim as the root, which contains all the scripts. The mesh objects themselves are generally not scripted, or just contain some slave scripts for the PoliceTex plugin, for example.
This means that in order to adjust your cuffs precisely, you need to edit the mesh parts individually. To do this, when you are editing an object with the SL tools, simply click on "Edit Linked" then on the particular part you want to edit (if you're using the original RLV, the shortcut to toggle this checkbox is Alt-W) :


Most of the parts are actually invisible, and even clicking on a visible part might be challenging sometimes because some other invisible parts are in front of it. To see invisible parts, press Ctrl-Alt-T and they will appear in red. If you are using the original RLV, press Ctrl-Alt-Shift-V after doing so to force a refresh of all the prims in the vicinity because invisible surfaces are not normally rendered on this viewer, and Ctrl-Alt-T does not refresh them automatically (at the time of this writing).

A good method is also to press Ctrl and one of the two keys to the right of the "M" key to cycle through all the individual parts of an object, making it easier to select them.
Since most of the objects are worn on limbs (arms and legs), it is easier to use the "Local" ruler instead of the "Attachment" one in this drop-down list (if you're using the original RLV, the shortcut is Alt-F) :


Lastly, it is a good idea to disable the camera constraints so you can cam inside your own body, because some cuffs feature additional hidden parts in case the ones you have are not enough. To do this, open the Advanced menu (Ctrl-Alt-D if you don't see it in your top menu bar) then select "Disable Camera Constraints" :

The quickest way to adjust your cuffs is this :
- Lock your arms in "H+E back" (that's the 6th lock, "Elbows only" being the 1st one and "U-Shape" the 8th and last one).
- Adjust your wrist cuffs so they match the rigged ring between your wrists. Please note that since this ring is rigged, you cannot move or resize it, so you have to move the cuffs instead.
- Adjust your elbow cuffs and the middle chain the way you like. If your shoulders are too wide, there are three additional pairs of links hidden inside the left elbow that you can move outwards (set your ruler to "Local" to make it easier to move them into position).

- Lock your arms in "Maid" and adjust the chain and rings. Do NOT adjust the cuffs again, you have already moved them in the step above. Notice that the elbows cuffs did not change at all, they use the same chain as the "H+E back" lock. Only adjust the parts highlighted in green in this picture :

- Lock your arms in "Belt" and adjust the chain belt to your liking. Notice that the padlock and the ring are not integrated in the belt, they are different parts so they need to be adjusted too. This is on purpose so the padlock doesn't deform when you resize the chain belt itself. Don't move anything else, the rest of the visible cuffs were already adjusted in the previous steps.
- Lock your arms in "U-Shape" (it's in the "More..." menu of the arms cuffs), adjust the horizontal chain and the two rings that are not in direct contact with the cuffs, since the others were already adjusted in the step above. Only adjust the parts highlighted in green in this picture :

- Lock your legs in "Taut" and adjust the cuffs and the rings to match the single chain that appears between your ankles. You won't have to do anything else for the legs.
- Lock your collar and adjust the mesh part of the collar the way you like.
- Notice that there are prims looking like pie slices when you highlight the invisible objects in red. Those prims are used by the Leash plugins and by the Lockguard and Lockmeister furniture to spawn particle chains. You may or may not want to adjust these too, knowing that the particles spawn from their tips.
You may think that this is a lot of parts to adjust. The truth is since some parts are rigged (hence cannot be adjusted) and others are not, the rings are there to act as "glue", as I call it, to give you more room for error and not force you to be too precise when it comes to adjusting your stuff between rigged and unrigged parts.
You may also wonder why the whole set is not rigged in the first place. If it were, what mesh body should it be rigged like ? Maitreya ? Slink ? Belleza ? Others ? All of them ? That would take way too long and would be too much work for me. Rigging an object to imitate a mesh body deformation is easy... as long as the object covers adjacent joints and bones, like a piece of clothing does. Restraints are different in the sense that by definition they link unconnected limbs (the wrists together, for example), and that changes everything when it comes to deforming the object both according to the animation and to the shape sliders. It works... ish, and not even all the time. So when we have the opportunity not to rig, let's not rig.
In fact, when designing the Maid wrist chain, I initially tried to make it rigged like the wrist ring. It never worked the way I wanted, even after a dozen of tries with different parameters. It is straight in Blender and stays straight regardless of the position -- not the rotation -- of the wrists, but it becomes curved and offset when uploading to SL, for a reason that eludes me. I still don't know what I'm doing wrong, but of course if one day I figure out a way to keep that chain straight, I will make a rigged version of it. But for now it is unrigged and that works just fine because the animations I made keep the forearms in the same plane. They only move up and down, and always in parallel.
Likewise, it would not make sense to rig the curved elbow chain you see when locked in "H+E front" and "Belt", because it would have to stretch according to the width of the shoulder (that's not a problem), stretch back according to the "Body Fat" slider (now that's a problem) and not clip through the back when bending backwards (I never managed that). Also it would have to stay above clothes if you are wearing any. This is why it is a better idea to keep it unrigged, hence under your control and not SL's.
Police Collar : The Zapper
The Police Collar is an independent restraint in itself, and does not need the cuffs to work. It is meant to look sturdy but light, and as it is meant to be put on dangerous prisoners, it does not have any sharp edges to keep it from being used as a weapon should it be forced open, and is rigid so the prisoner cannot hurt or hang themselves with it, voluntarily or not.
It also features an advanced shock device called a "Zapper". To use it, go to the Plugins page and browse until you find the Zapper plugin, and click on its button to get this menu :

By default the Zapper is inactive but by clicking on the "Zap low", "Zap medium" or "Zap high", you can deliver a powerful shock to the wearer's neck, ensuring compliance. There's even an RLV effect for the sub which will tint her screen in red and blur her vision for a bit, even after the shock is over, like on this picture :

You can also deliver shocks automatically through three types of monitoring :
* Speech : When active, the captive will be zapped every time she speaks on channel 0. If she is gagged and her chat is redirected to a private channel, the Zapper will punish her if the name of the object speaking for her either imitates her name or is in a list specified by the keyholder (see below). If a Tolerance is set other than 0, then she can say as many characters before being zapped, but the allowance increases with time, by a sixth of the Tolerance every 10 seconds. For example, if the Tolerance is set to 30, the captive can say 30 characters per minutes and gets back 5 characters every 10 seconds. However, if she gets zapped, she gets penalties that lower her Tolerance temporarily ! Check this link for more details as this feature was added after the release.
* Relative position to the keyholder : When active, the plugin monitors the distance between the captive and the keyholder (the person who holds the key to the collar). If that distance exceeds the maximum distance specified for as many seconds as the Tolerance, then the captive gets zapped. Please note that this does not take sim borders into account, but the maximum effective distance is 96 m. This is because a sensor is used when the keyholder is not found in the same sim and could be in a neighboring region.
* Absolute position : When active, the plugin monitors the distance between the captive and the set position (which is the one she is at when clicking on the "Set" button). If that distance exceeds the maximum distance specified for as many seconds as the Tolerance, then the captive gets zapped. Please note that this distance does not take sim borders into account, so you can literally allow the sub to walk through a number of regions before being zapped, if she is on mainland or on a cluster of private islands.

The "Options" button leads to a second page where you can switch the face modes (total, partial or none), switch the sound on and off, and use RLV effects when zapping or not (RLV effects being the screen being tinted red and blurry when punished). It also allows you to clear all the restrictions or all the registered punishments.
The "Face" button lets you choose between the types of "pain faces" when the sub is zapped. "Total" means the lips are animated, "Partial" means they are not (this is useful for mesh heads with extreme rigging for the lips like Catwa for example), "No" means the neck and head are still animated but not the face.


After a punishment, the sub's speech is suppressed completely (she still has 3 seconds to say something to comment on the punishment itself without being punished or suppressed). This means that whatever she says on the chat, or any emote longer than 20 characters ("/me" included) will be replaced with another random emote. Switching the "Repl. chat" button in the Options menu will remove the replacement but the speech will still be suppressed (this is useful if the sub is not using a RR gag but another brand, which cannot be superseded by the collar).
Trying to tamper with a locked collar (i.e. trying to struggle out) will punish the sub for every failed attempt. This can be deactivated with the "Monit. tamper." button in the Options menu.
More info on the speech suppression, renamer tracking, tampering monitoring and more here.
Police Collar : The LEDs
The three LEDs on the sides of the Police Collar indicate the following :
* The upper one is red when the Spy plugin is active and listening to the chat.
* The middle one is linked to the RR HUD status and to Mouselook. It is orange when at least one arm restraint is locked (like the arms cuffs but any other arm restraint from RR will do the same), therefore locking the RR HUD. It becomes pink when the sub is "Blocked" (i.e. unable to interact with the environment, this is done with the "Block" button in the "Special" menu of the arms restraints). It turns blue if the sub is not Blocked but is in Mouselook, and green when she is Blocked and in Mouselook (regardless of whether she is forced to stay in Mouselook or not). And it turns red if the RR HUD is not worn. Please note that the changes take some time, they are not immediate but take at most 10 seconds in the worst case.
* The lower LED is green when the sub is using the RLV, red otherwise.
Police Collar : The Screen
The screen on the front side of the Police Collar indicates some information about the status of the Zapper and the collar itself.

The first line indicates that the collar is locked or unlocked.
The second line is the activity of the Zapper. When the collar is unlocked, the Zapper is necessarily in standby mode.
The third line is the mode the Zapper is set to. Speech, Relative Position, Absolute Position or a mix of the three.
The color of the screen is arbitrary and is blue by default, but you can change it yourself if you prefer another color. There is no plugin to do that but you can do so manually and your color will stay.
To do this, edit the collar and switch to "Select Face" mode in the Edit window :

Then click on the screen of the collar, and nowhere else. Select the Texture tab in the Edit window and choose your color. Notice that the black screen stays black, only the text changes color.
The default color is RGB 121 164 188, which is a mildly saturated light blue.
A good golden color would be RGB 255 211 128 and I considered using that color before settling on blue (because police, blue, all that). I also like RGB 128 255 151 for a blueish green, like those old screens. Anyway this is your personal choice and you won't break anything by tweaking the color yourself.
This concludes the manual of the new Police set, I hope you'll enjoy it as much as I do.
Have fun !
Marine
PS : I would have liked to make a full set of handcuffs, elbow cuffs, legirons and collar, all in one box and sell it for the full price like the Vixen, Elegance and Serious sets. However, a lot of people prefer to be able to buy basic handcuffs first, and to later upgrade to full arms cuffs if and when they want to. Likewise, not everyone wants the collar. As a result, I must stick with the "basic product + addon" formula, which means a little more work for you but a lot more flexibility. There is now an automatic installer in the Elbow addon so you don't have to move the notecards and animations by hand anymore.
After nearly a month of work, I am proud to announce the update to the Police set !
An update ? What am I saying. This is a complete rework, that's what it is.


The first part of this blog post demonstrates the Police set and what you get in this update, while the second part is the actual manual for all the specific features.
The update
The Police set was my very first commercial product. The Police Handcuffs were released in January 2007, the Police Elbows addon, the Police Legirons and the Prisoner Transport Belt followed shortly after.
They were made with prims and generic textures (we didn't have mesh, sculpties and materials at the time, everything looked plain and kind of dull compared to nowadays), and although there were many updates just like the rest of my products, getting new animations and features over time, they never changed in looks. This update is meant to correct that.
This is how they used to look until now :

And this is how they look now :

The highlights of this rework are :
* The cuffs are now mesh instead of prims, they are designed from the Hiatts Police handcuffs I own in RL, down to the exact measurements and material. The only difference is that mine are hinged while the SL cuffs have a chain, because a hinge doesn't work well with the many differences in shape we can have in SL.
* Their textures look realistic and use materials for a nice dynamic shine. The shinier metals have a baked environment texture on top of it (although they also shine dynamically), this is to simulate a kind of mirror effect since SL cannot render mirrors or custom environments yet. They would look plain without it.
* There are a lot more animations to increase the quality of life, making the cuffs even more adaptable to any situation you could find yourself into. You can even pose the wrists independently or leave them unconstrained so you can actually use them to work. For example when dusting the place.
* Last but not least, there is a collar now, featuring a zapper for unruly prisoners. The collar is designed to match the cuffs in design and in textures, it is thin but looks robust and functional.
The update is free, but since the original Police set was divided in a pair of handcuffs and two addons (elbow cuffs and prisoner belt) plus independent legirons, what you get when you update your set depends on what you already have. Needless to say, you need to choose "replace" when presented with the option when updating your cuffs. A simple update won't give you the new mesh set.
Unlike the old set, the new set does not feature a "prisoner belt" (although it does contain a belt chain that looks more in line with the rest of the set), but a new Police Collar instead. I'll get into more details below but before I go further, please be aware that the replacement of the belt by the collar increases the total price of the set from L$870 to L$950.
The new pricing
If you don't already own the full set and want to know what the different parts will cost, read on :
- Police Handcuffs : L$250 like before. If you already only own the original basic handcuffs, this is what you'll get when you update your cuffs with a replacement.
- Elbow Cuffs addon : L$150 like before. If you already own the original basic handcuffs and the elbow cuffs addon, you will get the new Police Handcuffs and this addon when you update your cuffs with a replacement. Of course, the elbow animations and notecards must be installed in the right wrist cuff for the updater to recognize your set as such (there is now an automatic installer for that, no need to do it by hand anymore).
- Police Legirons : L$250 like before. If you already own the original Police Legirons, this is what you'll get when you update them with a replacement.
- Police Collar : L$300, it is meant to replace the original Prisoner Belt that costs L$220, and this is the reason for the price increase. If you already own the original Prisoner Belt and have installed its notecards and animations in your original Police Handcuffs, this is what you'll get when you update them, and you won't have to pay anything more even though you paid L$220 instead of L$300.
The Police Collar is independent from the rest of the Police set, actually, and can be bought separately. Its price is halfway between the Elegance Collar and the Vixen Collar, as it has a Zapper plugin, unlike both, but does not change shape like the latter.
How to update
Before going further, if you are eager to update your set already, simply go to one of these locations :
My Little Shop
Chorazin's store
Roper's Dark Playground
Dark Wishes
Once there, click on the updater and follow the instructions. You absolutely need to choose "REPLACE" on the menu instead of "UPDATE" since the objects are completely different. If you do not get a "REPLACE" option, contact me (Marine Kelley) to get a manual replacement.
Installation of the Elbow addon
If you get the addon for the Elbows cuffs (either from the update or by buying it later), simply rez your right wrist handcuff (the one labeled "MAIN" in your handcuffs folder), then the installer contained in the elbow addon, then drag and drop the "Police_Elbows_Request" script contained in the same folder into the right wrist cuff you rezzed in-world. Wait a little, and it's ready !
Please note that since the animations are moved from the installer object into the cuff, neither of these two objects can be worn, due to SL's permission securities. They have to be both rezzed in-world, and in the same sim.
Also it doesn't matter which order you rez both objects and when you drop the "request" script into the cuff. As soon as they are both rezzed and the "request" script is in the cuff, the installation starts.
For what it's worth, this installer does exactly what you used to do by hand before, when installing the elbow addon into the old style handcuffs. It just does it automatically now (and yes I know, I should have made this installer years ago :p).
New mesh design
As stated above, the whole set is now made with mesh instead of prims. I've reproduced my RL handcuffs using calipers, so the dimensions and proportions are exact to less than half of a millimeter. They are made to be easy to resize, and most of the set is unrigged so you can adjust the sizes regardless of the body you use, be it mesh or system. You will have to resize the parts individually though, but there are not many of them so it won't be a problem. The whole set is made so you can move rings and chains independently for more precision. This should satisfy even the most OCD among you. *snickers*
Also, the cuffs are now much easier to click on because their root prims are wide cylinders. No more having to pinpoint a tiny cuff on a squirming sub !

Materials
That's what gives the cuffs the realistic look they now have. There are 16 materials at your disposal, plus two variations for the Legacy material, exactly like for the Elegance set.

"Nickel clean"


"Nickel worn"


"Steel shiny"


"Steel brushed"


"Steel matte"


"Steel dirty"


"Steel old"


"Aluminium"


"Iron"


"Iron rusty"


"Paint clean" (tinted green here but white by default)


"Paint worn"


"Paint scratched"


"Paint distressed"


"Plastic clean" (tinted blue here but white by default)
(Note : the dark blue area on the top of the cuff is the shadow of a ring that happened to be nearby when I took the picture, it is not part of the texture)
(Note : the dark blue area on the top of the cuff is the shadow of a ring that happened to be nearby when I took the picture, it is not part of the texture)


"Plastic worn"


"Plastic distressed"


"Legacy low" (*)


"Legacy med" (*)


"Legacy high" (*)
(*) The legacy shine refers to the way SL renders a shiny surface without using materials. The "Legacy" materials are there for those among you who can't or don't want to see materials on their cuffs. After all, you probably bought the Police set at a time when materials in SL were not even an idea, and if your computer cannot render materials, your set would be broken by this update if not for these "Legacy" materials.
All these textures can also be tinted, you choose the color and you can adjust the luminosity and saturation afterwards. It works well and lets you choose a good look faster than if you had to enter RGB values yourself (which you can still do, before you ask). The PoliceTex plugin works exactly like the EleganceTex plugin in the Elegance set, so if you are familiar with the latter, you won't have any issues using the former.
You can also choose different materials for the main part of a cuff, another one for the single strand, yet another one for the rivets and yet another one for the key, and the same goes for tinting, so you can get looks like this :

Amethyst-tinted worn plastic on the Main surface, Azure clean plastic on the key, shiny steel on the rivets and single strand.
Police Collar
This collar is new and is the reason for the price increase of the whole Police set. Its purpose is to replace the old Prisoner Belt, which becomes a simple chain used to keep the wrists to the front of the belly without moving too much.
The collar itself is a shock collar, it comes with a Zapper plugin that allows the captor to manually or automatically punish the wearer with strong electricity shocks to the neck.

Bzzzzt !
It can be set to shock the sub whenever she speaks, or moves too far from the captor, or moves too far from a set location. If the latter is set, then the distance is measured globally, meaning you can actually restrict the sub from moving more than, say, 10 kilometers away from a location, so if she's on mainland she can go only a number of sims away before being punished. This option is good if you want to keep the captive inside some kind of facility that spans over several regions.
The shock animations cannot be turned off at the moment, but you can control the faces. Since the faces are Bento, if you find that they do not look good for your own mesh head (they are tested on Lelutka Simone), you can switch from the "total" faces to the "partial" ones, which animate fewer bones, hopefully limiting the deformation. This is especially good for Catwa mesh heads, which are rigged a lot differently from Lelutka, so what works on the latter may not work on the former. It is a matter of taste and shape, really.

Ouch !
It also comes with a Spy plugin that works exactly like the ones in the Elegance, Vixen and Serious collars. The Spy plugin is explained here and allows the captor to keep an eye on the captive's activities even when the former is offline.
Like the cuffs, the collar has 16 different materials (the same ones as the cuffs so it stays assorted) and can be tinted freely. You cannot choose different materials for the front box and the circular parts because they are the same surface, but you can set a material individually for the key. This is due to the fact that we only have 8 faces per mesh in SL, and all the others are already taken by the LEDs, the screen, the wires and the rubber.
The LEDs on the collar indicate if the wearer is using the RLV, if she's "Blocked" by any RealRestraint arm restraint (through its "Block" menu item), if she's currently in Mouselook and if her Spy plugin listener is active. This allows the new Police Collar to do what the old Prisoner Belt used to do, that way you don't lose features when you update.

Chains
The Police set does not use particle chains at all (except for its leashes, of course, and the chains going to furniture, as it is Lockguard and Lockmeister compatible). Instead, it uses mesh chains, some rigged and some not rigged. This allows for a more solid and realistic look than particle chains that are rather limited and plain.
More over, this allows for the vertical chain going from the ankle chain to the wrists to finally stay in the middle. If you noticed, the old Police Legirons used to spawn particle chains from a spot more or less halfway between the ankles, to the wrists when locked in "Taut". However, this worked only for a small number of standing animations. There is a technical reason for this limitation that I will explain below.
Unlike the rest of the chains in the Police set, the vertical chain must stay straight at all times, regardless of the animation of your avatar. This means that there can't be any vertex between its extremities or the chain would curve when you kneel or sit (there is no way around that because when the ankles rotate in relation to the wrists, or the other way around, for example when you bend the knees, the rigging interpolates between the two angles and that produces a curve instead of a straight line). As a result, that chain is a plane. A double plane making a cross, in fact, using a technique that is commonly used in video games, even contemporary ones, with a chain texture with materials on it. Don't worry, it shines dynamically as if it were 3D, you won't see the difference unless you look closely :

The vertical chain is 2D, the horizontal chain and the ring are 3D
A consequence, though, is that unlike the rest of the chains, this one cannot change texture when you change the materials, it can only change its tint. In practice this does not make much difference except when you use the "Iron rusty" material, making all the chains rusty except the vertical one that stays dark but not brown like the rest.
Speaking of the vertical chain, it has always bothered me that we could not choose between a "T" chain (one chain between the ankles, and the vertical chain going up to the wrists) and a single chain between the ankles. So now we have this option and you can finally use your Police Legirons independently from any restraint if you want, like the Elegance, Serious and Vixen legs cuffs.

Animations, locks
I have completely redone all the arms animations and changed the locks. The arms cuffs (with elbows) now feature 8 different locks, all of them featuring many variations for you to choose among, depending on the situation you're in.

Elbows only (in the back) : 18 variations

Maid (like the Deluxe Straps) : 16 variations


Hands cuffed on the front : 21 variations


Hands cuffed behind the back : 44 variations

Hands cuffed on the front and elbows cuffed behind the back : 16 variations


Hands and elbows cuffed behind the back : 20 variations

Hands cuffed on the front with the chain belt, elbows cuffed behind the back : 6x3 variations (*)

U-Shape : 8 variations
(*) There are 6 variations, but you also have the choice between freezing the chest and torso, or just the chest, or not freezing it at all (it depends on what stiffness you prefer for the upper body when you walk, stand or sit, to keep the wrists close to the front part of the waist chain).
This are a lot more variations for each lock than in any of my other restraints because I want to provide you as much control as possible over your arms while you are in cuffs.
I did not change the legs animations at all, they are still the same as before.
Hands and feet
All the arms animations are priority 6 and all the legs animations are priority 5, like in every RealRestraint product. However, the hands are set to priority 2 and the feet are set to priority 3, so those parts can be overridden by your AO. This is on purpose to give your avatar a more life-like stance and more variations. However, there are times when you may want to control the position of your hands yourself, for example when your wrists are cuffed behind your back, you may want to rest one hand over the other instead of clipping through each other because your AO moves them that way. Or you might want to support yourself with your hands if your arms are moved back enough.

Sitting on the ground, arms locked in "H+E back" with the "EBF" variation, Hands plugin active and set to "Support"
To do this, you simply use the Hands plugin in the arms cuffs and the Feet plugin in the legs cuffs. Those plugins allow you to override your hands and feet animations with specific poses. The poses are per-lock based so you can for example decide that the Kneel lock should have its feet frozen straight (which is not the case by default as the cuffs have no way to know if you are wearing high heels or if you are barefoot), or that when locked in "Maid" you should have your hands turned inwards. How to use these plugins is explained in the Manual section of this post.

Legs locked in "Kneel", Feet plugin inactive

Legs locked in "Kneel", Feet plugin active and set to "Straight"
Optional chains for armbinders
The old Police Legirons vertical chain used to be able to link to the tip of the RR Armbinder and the RR Highbinder, so the new Police Legirons are able to do the same, even though they don't use particle chains but rigged chains.
The Style plugin contained in the legs cuffs allow you to hide and show those alternate vertical chains so they don't go to the wrists anymore but further down the hands, beyond the fingers, to make them look like they are linked to the bottom ring of the Highbinder. For the Armbinder, same thing except the chains go way up because the RR Armbinder folds the upper arms up instead of hiding them with an alpha.
You are also provided two sets of full perms rings that you can use as a "glue" between the armbinder you are wearing and the tip of the rigged chain.
I haven't tested with armbinders from other brands, but with a little luck this should work as well if they are positioned and/or rigged correctly.

Legs chained to the RR Armbinder

Legs chained to the RR Highbinder
New RealKey design
The old RealKey object (the one given by the plugin of the same name) used to be made of prims, and its design was the same as the key in the original Police Handcuffs, so now that the handcuffs have a new design, it is normal that the RealKey gets one too.
The plugin does not change at all, only the object does, the protocol stays the same so your old RealKeys will still work. But if you get a new RealKey from the updated Police set, you get the new object with the original script, so new RealKeys will also work with older restraints.

The key is also embedded in a bigger transparent cube to make it easier to click on.

That's all for the quick demonstration of the new features of the Police set, the rest of this post is the manual explaining how to use and enjoy these new features.
Manual
The new features of the Police set are the Style plugin, the PoliceTex plugin, the Zapper plugin, the Spy plugin and of course the mesh design, materials, mesh chains and new animations.
Style plugin
The Style plugin lets you decide what parts you want shown and what parts you want hidden, depending on the lock, provided that you have the key and access to the cuffs. All the three parts of the set feature one : the collar, the arms cuffs and the legirons, with different styles for each.
To use it, go to the main menu of a cuff, click on Plugins, then Style (you might have to switch to the next page of the menu if you don't see it). The menu you then see depends entirely on the type of the restraint and on the lock it is set to. For example, the collar can only be "Visible" or "Invisible", while the arms cuffs have many more options, like the ability to hide and show some cuffs and chains to let the sub use the cuffs along with other restraints.
In the arms cuffs, you are given the choice to use the "3 rings" or the single ring for the wrists. This is entirely your choice and it depends on your taste and on your shape. If your shoulders are too wide compared to the length of your arms, you might want to switch "3 rings" on. When you turn it on, the single ring hides itself, and vice versa. This switch is not available for all locks because not all locks feature the wrist link between the wrist cuffs.


Single ring between the wrists, good if your shoulders are narrow

But if your shoulders are wide...

... you might prefer the alternate 3 rings instead
Likewise, in the legs cuffs, you have the ability to show and hide different alternate vertical chains, labeled "Highbinder" and "Armbinder" in the menu. If either of them is active, the normal vertical chain is hidden and replaced by the corresponding alternate version. You also need to choose a style that features the "Chain to hands" for this or you won't see any of those vertical chains at all. These switches are not available for all locks because not all locks feature the vertical chain.

If you use any of these alternate vertical chains to link to, say, an armbinder, you may want to wear one of the provided bonus rings attachments. Those objects are full perms and unscripted so you can modify them at will. The only difference between the two is where they attach. Being full perms does not mean being free to do anything you want with them, you are not allowed to sell them or to give them away.
Unwear what is not needed
At the time of this writing, the whole Police set contains 8 attachments, plus 2 bonus rings for the armbinders (they are not needed for the product to work, they're just here for the looks). That's 1 object for the collar, 5 for the arms and 2 for the legs.
Since we are limited to 38 attachment slots in total, it is a good idea to detach the parts that you don't need, and the RealRestraint system allows you to do that. For example, if your hands are cuffed behind your back but not your elbows, you are able to detach the elbow cuffs and the belt even if you are a RLV user, because those parts are not locked on your avatar until they are needed (i.e. when you are locked in "Elbows only", "Maid", "H+E front", "H+E back", "Belt" or "U-Shape").
Moreover, if your cuffs have changed in looks while some parts were not worn (like the elbows in the example above), therefore not able to register the changes when they occurred, then wearing them later will re-synchronize them so you don't have to apply the materials manually again. For example, if you are locked in "Hnd back", detach your elbow cuffs then switch your handcuffs from "Shiny steel" to "Painted clean" and paint them green, when you reattach your elbow cuffs later they will automatically become "Painted clean" and green without needing you to do anything.
This allows you to spare some attachment slots and to avoid rendering parts that are not needed. The Police belt is needed only in the "Belt" lock, so any other lock lets you detach it. Of course, the right wrist and right ankle cuffs are never detachable when locked, since they are the parts that contain the main scripts. Same for the Police collar which is the only attachment in its own set.
Attention, making a part invisible through the Style plugin does not make it detachable. For example, you cannot detach the elbow cuffs if you are locked in "H+E front" even if you turn them invisible in the Style plugin.
Animations
I highly recommend wearing the contained "RR Anim HUD", which is a HUD that allows you to choose the variations for the lock you are currently in, be it arms or legs. As stated above, the arms cuffs now contain a lot more animations than before, it would be a shame to use only one, right ?
The RR Anim HUD connects to the Anim plugin contained in the cuffs to switch the animations with the arrows. It is all very simple and is explained in detail here.
The Belt lock is special because it involves an unrigged chain belt around the waist as well as cuffs on the wrists and elbows. However, it is impossible in SL to make sure the wrists stay against the belly like this lock is supposed to do, as there is no inverse kinematics available (there used to be such a project but it was shelved by LL). As a result, if the upper body (torso and/or chest bones) moves, then the wrists move away from the belly, sometimes pretty far, and we don't want that. This is why you have 18 variations that look the same, when in Belt lock. The first six are the "ES" variations ("ESA" to "ESE" then "ESX" to "ESZ") that freeze the chest bone and reduce the overall movement of the upper body but not too much. If it is not enough, you have the next six variations labeled "ET" ("ETA" to "ETE" then "ETX" to "ETZ") which freeze both the Chest and the Torso bones, ensuring your arms stay close enough to your belt. But they also make you walk a bit funny, especially if your walk makes your pelvis sway a lot. So if you don't want to freeze the torso at all (for example when walking or sitting on something), you can use the third series of six variations labeled "EF" (like "Elbows Front", these are the same animations used by the "H+E front" lock) which do not freeze the upper body at all.
I tried to make a short rigged chain instead of relying on freezing the torso, but like the front Maid chain it ended up curved and offset and I have no idea why. Maybe when I figure this out I'll update this part.
A quick note about the names of the variations. They are all labeled with 3 letters because that's how I manage to cram so many of them in the Anim plugin, by shortening their names. I understand they are not intuitive but the only thing relevant to you is the last letter of each animation, going from A to something (E, G, P, that depends on the lock), then something else (U, X, once again it depends on the lock) down to Z. Then cycles back to A. Some letters are variations of 5°, others 10°, others are a completely different shape. This is all a bit arbitrary, I admit.
Most of the arms animations leave the hands to priority 2, which means your Animation Overrider will most likely override them. This may or may not be something you want so you can control your hands and feet through the Hands plugin in the arms cuffs and the Feet plugin in the legs cuffs respectively.

Hands plugin menu in the "Hnd back" lock

When not restrained, the AO moves your hand (and Bento AOs may even move your fingers as well)

When in cuffs, your hands are still moved by your AO, which may or may not be what you want

So the Hands plugin helps you set them straight

Or animate them in a way that is consistent with the cuffs
And support you when you need it

And when you want to use your hands for some tasks, just deactivate the Hands plugin to let them move !
The "Active" button lets you switch between three activation modes :
* Not active : the plugin does not animate your hands or feet at all.
* Active if AutoRefresh is active : the plugin only animates your hands or feet if AutoRefresh is on in the same restraints (it is on by default but you can turn it off manually through the RR Anim HUD and the "More" menu of the restraint itself).
* Always active : the plugin animates your hands or feet regardless of the AutoRefresh state, but only if the restraints are locked.
This means that if the plugin is set to "Active if AutoRefresh is active" and you want to deactivate it, you have to press the "Active" button twice.
All the locks have at least the "Straight" option available in the Hands and Feet plugins. For the hands, this means keeping the hands more or less parallel regardless of the lock, and for the feet this means keeping the system feet 90° from the shins. If you are using a mesh body with high heels (and most likely the feet set to "high" or "point"), then this is the setting for you in locks like "Kneel".
The gestures included in the box of legirons do the same thing, if you prefer using gestures than a plugin. Don't forget to activate them first then.
Please note that the "U-Shape" and some of the "Hands back" variations won't benefit from any of the Hands plugin settings since the hands are already priority 6.
By default, "Straight" is the animation set for all the locks, both in the Hands and Feet plugins. However, the plugins are not active by default, you have to activate them yourself.
Please note that the hands animations managed by the Hands plugin are NOT Bento so they won't move the fingers. This is on purpose because most mesh bodies have their own built-in finger poses so you can use that if you want to, say, close your fists in U-Shape.
Also please know that choosing an animation in the list automatically activates the plugin if it was not active before.
Lastly, only the wearer can access those two plugins, and nobody else.
Textures and materials
This is another big highlight of the new Police set, the ability to change the materials and to make the cuffs look realistic.
First of all, please ensure that your viewer is set to render materials. To do this, open your Preferences, go to the Graphics panel, then click on "Advanced" and activate "Advanced Lighting Model" :


If this is too taxing for your graphics card, you can turn the dynamic shadows off and still see materials :

To change the materials of your cuffs and/or collar, go to the "Plugins" menu of your cuffs or collar respectively then click on "PoliceTex".

Through this plugin you can :
* Change the materials
* Choose a tint to replace the built-in tint of the chosen material (like Aluminium which is grey)
* Choose the surface to change the material or tint of
* Adjust the saturation and luminosity
* Dull down the shine (you can't make it brighter since this modifies the shine color, not the glossiness) with the "Shine factor" button
* Deny access to the sub with the "Deny" button
* Choose to apply manually or automatically with the "Live" button
* Reset the tint, saturation and luminosity with the "Defaults" button
* Reset the materials back to "Steel shiny" with the "Reset" button
Some materials come pre-tinted, like "Aluminium" which is blueish by default whereas its texture is actually white. When you tint a surface, its original tint is replaced by the one you chose. However, materials like "Rusty iron" are naturally colored so tinting them would combine their built-in color with the one you pick.
When you have chosen your tint, you may want to adjust its saturation and/or luminosity. This is done independently and if you change the tint later, the saturation and luminosity stay the same. Using the saturation and luminosity is a good way to make a tint look more natural (like above in the pictures with the de-saturated green and blue tints) without having to calculate a custom tint and to enter it manually in with the "CUSTOM" button in the "Tints" sub-menu.
The cuffs and the collar are made of metal, that is a given. This means a lot of things when it comes to rendering, in particular how the shine changes when the surface is tinted. Unlike plastics which shine the same color as the lights around them, metals actually tint the reflected light due to their conductive properties. In fact, the more conductive a material, the more it tints the light it reflects. The human eye is good at telling a metal from a plastic posing as metal, and this is how it manages to do that.
This means that for all the materials except "Painted", "Plastic" and "Legacy", tinting the surface will also tint the reflected shine. However, since most metals also have a natural shine (steel is cold blueish while nickel is yellowish), the resulting shine is some kind of combination of the original shine and the set surface tint. The result is very nice and pleasing to the eye.
"Painted", "Plastic" and "Legacy" materials don't color the shine at all because their surfaces are not considered metallic, even though the core is always metal.
How to resize and adjust your cuffs
Every object has a single regular prim as the root, which contains all the scripts. The mesh objects themselves are generally not scripted, or just contain some slave scripts for the PoliceTex plugin, for example.
This means that in order to adjust your cuffs precisely, you need to edit the mesh parts individually. To do this, when you are editing an object with the SL tools, simply click on "Edit Linked" then on the particular part you want to edit (if you're using the original RLV, the shortcut to toggle this checkbox is Alt-W) :

Select "Edit Linked"...

... and click on a single part of the cuff (here the body of the left handcuff)
Most of the parts are actually invisible, and even clicking on a visible part might be challenging sometimes because some other invisible parts are in front of it. To see invisible parts, press Ctrl-Alt-T and they will appear in red. If you are using the original RLV, press Ctrl-Alt-Shift-V after doing so to force a refresh of all the prims in the vicinity because invisible surfaces are not normally rendered on this viewer, and Ctrl-Alt-T does not refresh them automatically (at the time of this writing).

Press Ctrl-Alt-T to see all the unrigged invisible parts
A good method is also to press Ctrl and one of the two keys to the right of the "M" key to cycle through all the individual parts of an object, making it easier to select them.
Since most of the objects are worn on limbs (arms and legs), it is easier to use the "Local" ruler instead of the "Attachment" one in this drop-down list (if you're using the original RLV, the shortcut is Alt-F) :

Trying to adjust the back elbow chain in "Attachment" mode is cumbersome, just look at how the arrows are oriented.

Switching to "Local" mode orients the arrows in a much better way to make it easier for you to move and resize the chain
Lastly, it is a good idea to disable the camera constraints so you can cam inside your own body, because some cuffs feature additional hidden parts in case the ones you have are not enough. To do this, open the Advanced menu (Ctrl-Alt-D if you don't see it in your top menu bar) then select "Disable Camera Constraints" :

The quickest way to adjust your cuffs is this :
- Lock your arms in "H+E back" (that's the 6th lock, "Elbows only" being the 1st one and "U-Shape" the 8th and last one).
- Adjust your wrist cuffs so they match the rigged ring between your wrists. Please note that since this ring is rigged, you cannot move or resize it, so you have to move the cuffs instead.
- Adjust your elbow cuffs and the middle chain the way you like. If your shoulders are too wide, there are three additional pairs of links hidden inside the left elbow that you can move outwards (set your ruler to "Local" to make it easier to move them into position).

- Lock your arms in "Maid" and adjust the chain and rings. Do NOT adjust the cuffs again, you have already moved them in the step above. Notice that the elbows cuffs did not change at all, they use the same chain as the "H+E back" lock. Only adjust the parts highlighted in green in this picture :

- Lock your arms in "Belt" and adjust the chain belt to your liking. Notice that the padlock and the ring are not integrated in the belt, they are different parts so they need to be adjusted too. This is on purpose so the padlock doesn't deform when you resize the chain belt itself. Don't move anything else, the rest of the visible cuffs were already adjusted in the previous steps.
- Lock your arms in "U-Shape" (it's in the "More..." menu of the arms cuffs), adjust the horizontal chain and the two rings that are not in direct contact with the cuffs, since the others were already adjusted in the step above. Only adjust the parts highlighted in green in this picture :

- Lock your legs in "Taut" and adjust the cuffs and the rings to match the single chain that appears between your ankles. You won't have to do anything else for the legs.
- Lock your collar and adjust the mesh part of the collar the way you like.
- Notice that there are prims looking like pie slices when you highlight the invisible objects in red. Those prims are used by the Leash plugins and by the Lockguard and Lockmeister furniture to spawn particle chains. You may or may not want to adjust these too, knowing that the particles spawn from their tips.
You may think that this is a lot of parts to adjust. The truth is since some parts are rigged (hence cannot be adjusted) and others are not, the rings are there to act as "glue", as I call it, to give you more room for error and not force you to be too precise when it comes to adjusting your stuff between rigged and unrigged parts.
You may also wonder why the whole set is not rigged in the first place. If it were, what mesh body should it be rigged like ? Maitreya ? Slink ? Belleza ? Others ? All of them ? That would take way too long and would be too much work for me. Rigging an object to imitate a mesh body deformation is easy... as long as the object covers adjacent joints and bones, like a piece of clothing does. Restraints are different in the sense that by definition they link unconnected limbs (the wrists together, for example), and that changes everything when it comes to deforming the object both according to the animation and to the shape sliders. It works... ish, and not even all the time. So when we have the opportunity not to rig, let's not rig.
In fact, when designing the Maid wrist chain, I initially tried to make it rigged like the wrist ring. It never worked the way I wanted, even after a dozen of tries with different parameters. It is straight in Blender and stays straight regardless of the position -- not the rotation -- of the wrists, but it becomes curved and offset when uploading to SL, for a reason that eludes me. I still don't know what I'm doing wrong, but of course if one day I figure out a way to keep that chain straight, I will make a rigged version of it. But for now it is unrigged and that works just fine because the animations I made keep the forearms in the same plane. They only move up and down, and always in parallel.
Likewise, it would not make sense to rig the curved elbow chain you see when locked in "H+E front" and "Belt", because it would have to stretch according to the width of the shoulder (that's not a problem), stretch back according to the "Body Fat" slider (now that's a problem) and not clip through the back when bending backwards (I never managed that). Also it would have to stay above clothes if you are wearing any. This is why it is a better idea to keep it unrigged, hence under your control and not SL's.
Police Collar : The Zapper
The Police Collar is an independent restraint in itself, and does not need the cuffs to work. It is meant to look sturdy but light, and as it is meant to be put on dangerous prisoners, it does not have any sharp edges to keep it from being used as a weapon should it be forced open, and is rigid so the prisoner cannot hurt or hang themselves with it, voluntarily or not.
It also features an advanced shock device called a "Zapper". To use it, go to the Plugins page and browse until you find the Zapper plugin, and click on its button to get this menu :

By default the Zapper is inactive but by clicking on the "Zap low", "Zap medium" or "Zap high", you can deliver a powerful shock to the wearer's neck, ensuring compliance. There's even an RLV effect for the sub which will tint her screen in red and blur her vision for a bit, even after the shock is over, like on this picture :

You can also deliver shocks automatically through three types of monitoring :
* Speech : When active, the captive will be zapped every time she speaks on channel 0. If she is gagged and her chat is redirected to a private channel, the Zapper will punish her if the name of the object speaking for her either imitates her name or is in a list specified by the keyholder (see below). If a Tolerance is set other than 0, then she can say as many characters before being zapped, but the allowance increases with time, by a sixth of the Tolerance every 10 seconds. For example, if the Tolerance is set to 30, the captive can say 30 characters per minutes and gets back 5 characters every 10 seconds. However, if she gets zapped, she gets penalties that lower her Tolerance temporarily ! Check this link for more details as this feature was added after the release.
* Relative position to the keyholder : When active, the plugin monitors the distance between the captive and the keyholder (the person who holds the key to the collar). If that distance exceeds the maximum distance specified for as many seconds as the Tolerance, then the captive gets zapped. Please note that this does not take sim borders into account, but the maximum effective distance is 96 m. This is because a sensor is used when the keyholder is not found in the same sim and could be in a neighboring region.
* Absolute position : When active, the plugin monitors the distance between the captive and the set position (which is the one she is at when clicking on the "Set" button). If that distance exceeds the maximum distance specified for as many seconds as the Tolerance, then the captive gets zapped. Please note that this distance does not take sim borders into account, so you can literally allow the sub to walk through a number of regions before being zapped, if she is on mainland or on a cluster of private islands.

The "Options" button leads to a second page where you can switch the face modes (total, partial or none), switch the sound on and off, and use RLV effects when zapping or not (RLV effects being the screen being tinted red and blurry when punished). It also allows you to clear all the restrictions or all the registered punishments.
The "Face" button lets you choose between the types of "pain faces" when the sub is zapped. "Total" means the lips are animated, "Partial" means they are not (this is useful for mesh heads with extreme rigging for the lips like Catwa for example), "No" means the neck and head are still animated but not the face.

"Total" mode : the lips are stretched to show the teeth

"Partial" mode : the lips are not stretched but the pain is still obvious
After a punishment, the sub's speech is suppressed completely (she still has 3 seconds to say something to comment on the punishment itself without being punished or suppressed). This means that whatever she says on the chat, or any emote longer than 20 characters ("/me" included) will be replaced with another random emote. Switching the "Repl. chat" button in the Options menu will remove the replacement but the speech will still be suppressed (this is useful if the sub is not using a RR gag but another brand, which cannot be superseded by the collar).
Trying to tamper with a locked collar (i.e. trying to struggle out) will punish the sub for every failed attempt. This can be deactivated with the "Monit. tamper." button in the Options menu.
More info on the speech suppression, renamer tracking, tampering monitoring and more here.
Police Collar : The LEDs
The three LEDs on the sides of the Police Collar indicate the following :
* The upper one is red when the Spy plugin is active and listening to the chat.
* The middle one is linked to the RR HUD status and to Mouselook. It is orange when at least one arm restraint is locked (like the arms cuffs but any other arm restraint from RR will do the same), therefore locking the RR HUD. It becomes pink when the sub is "Blocked" (i.e. unable to interact with the environment, this is done with the "Block" button in the "Special" menu of the arms restraints). It turns blue if the sub is not Blocked but is in Mouselook, and green when she is Blocked and in Mouselook (regardless of whether she is forced to stay in Mouselook or not). And it turns red if the RR HUD is not worn. Please note that the changes take some time, they are not immediate but take at most 10 seconds in the worst case.
* The lower LED is green when the sub is using the RLV, red otherwise.
Police Collar : The Screen
The screen on the front side of the Police Collar indicates some information about the status of the Zapper and the collar itself.

Notice the smudge and the fingerprints
The first line indicates that the collar is locked or unlocked.
The second line is the activity of the Zapper. When the collar is unlocked, the Zapper is necessarily in standby mode.
The third line is the mode the Zapper is set to. Speech, Relative Position, Absolute Position or a mix of the three.
The color of the screen is arbitrary and is blue by default, but you can change it yourself if you prefer another color. There is no plugin to do that but you can do so manually and your color will stay.
To do this, edit the collar and switch to "Select Face" mode in the Edit window :

Then click on the screen of the collar, and nowhere else. Select the Texture tab in the Edit window and choose your color. Notice that the black screen stays black, only the text changes color.
The default color is RGB 121 164 188, which is a mildly saturated light blue.
A good golden color would be RGB 255 211 128 and I considered using that color before settling on blue (because police, blue, all that). I also like RGB 128 255 151 for a blueish green, like those old screens. Anyway this is your personal choice and you won't break anything by tweaking the color yourself.
This concludes the manual of the new Police set, I hope you'll enjoy it as much as I do.
Have fun !
Marine
PS : I would have liked to make a full set of handcuffs, elbow cuffs, legirons and collar, all in one box and sell it for the full price like the Vixen, Elegance and Serious sets. However, a lot of people prefer to be able to buy basic handcuffs first, and to later upgrade to full arms cuffs if and when they want to. Likewise, not everyone wants the collar. As a result, I must stick with the "basic product + addon" formula, which means a little more work for you but a lot more flexibility. There is now an automatic installer in the Elbow addon so you don't have to move the notecards and animations by hand anymore.
Subscribe to:
Posts (Atom)

