Heya,
Here is the latest version of the RLV with many bug fixes (including a very annoying one about Bento attachments that deform in goofy ways), and up-to-date with the latest code from Linden Lab.
Here is the list of changes, I'll develop a little on a couple of them after that :
- fixed : While wearing a Bento-compatible attachment and detaching something else, the Bento attachment could get deformed. The fix is not really a fix but a workaround that resets the skeleton when receiving an appearance update message, which also solves other similar problems with attachments that deform the skeleton (Bento or not).
- fixed : When under @unsharedunwear, we couldn't detach clothes or physics even when they were in the #RLV folder.
- fixed : When @showinv is active, there was a way to get access to the inventory anyway (or rather a view of it) (thank you riejinno for the heads-up).
- fixed : @shownames_sec did not work at all (thank you Keiyra Aeon for the report).
- fixed : "Zoom In" defeated @camunlock (thank you riejinno for the heads-up).
- fixed : When blocked from changing group, being invited to a group changed to the new group anyway. The fix for this is to not allow to join a new group when under @setgroup, because otherwise the change is dictated by the server (thank you Aida Beorn for the report).
- fixed : When under @showloc, there was a way to still get the information about where we were (thank you riejinno for the heads-up).
- fixed : @shownames broke urls with spaces in them (thank you Chorazin Allen for the heads-up).
- fixed : When someone else wore a HUD imitating their name, when that HUD was speaking we would not see the chat in white as if it were a regular attachment (thank you sungim for the report).
- fixed : When under @sendim, don't allow attaching custom messages to payments (thank you riejinno for the heads-up).
- fixed : When under @recvim, don't allow seeing custom messages attached to received payments (thank you riejinno for the heads-up).
- fixed : When sitting and under @sittp or @standtp, don't allow moving the object we are sitting on, and only it (it used to be any object that anyone was sitting on, which was confusing).
The Bento bug was the worst one to track and fix, and the fix is not really one. The problem was when wearing at least one Bento attachment (like the VaJayJay vagina) and something else, and detaching that something else.
If that other attachment was not a HUD, not only you but any observer using the RLV would see the Bento attachment become stretched beyond reasonable, vertices going all over the place. If it was a HUD, only you saw the issue.
This bug occurs only in the RLV and any viewer that uses my code, so there is a good chance that it comes from a mistake of mine... but at the same time, it could come from another source. I've never actually found the real cause of this problem and not wanting to spend a week tracking it, I decided to code a workaround, something to fix the consequences of the bug instead of the bug itself. I know it's bad. Please don't tell anyone. But at least it works.
The "fix" is to force a "Reset Skeleton" action on the avatar that has just detached an object once the detach is confirmed by the sim... and that's it. It may actually also "fix" other problems like attachments that deform your skeleton in the first place.
About the @setgroup issue, for now it prevents you from joining a group (don't worry, it cancels the join before you pay so you don't lose money), but I know it is not ideal. I will keep working on it in the future and try to automatically switch back to the old group when joining the new one so you don't waste time.
One last thing, this viewer is the "hardcore" version of it, because over the past few months, the feedback I got was overwhelmingly in favor of it (like 10 against 1). So I pretty much think I'll take the hardcore route now.
You can grab the Windows version here :
http://www.erestraints.com/realrestraint/
If the link above doesn't work, here is an alternate one :
https://www.dropbox.com/sh/x1v83bas9f9884d/AABY9qB8DE_NHeuetNKQrlEMa?dl=0
The MD5 hash for the Windows executable is :
7f55ef493497cfd38b77ceaf111b523b
Have fun !
Marine
Monday, September 17, 2018
Sunday, September 9, 2018
Making Movies - Writing the Story
In this tutorial, we are going to talk about how to write a movie script to turn a series of still and animated pictures into a full story.
What is a movie script exactly ? You've certainly seen and read real life movie scripts before, those are documents containing all the dialogs in the movie, generally without any picture, and sometimes (but not always) with a few descriptions just to describe a scene before it begins, or to relate some important actions. But generally, a movie script only contains the dialogs between the different characters, scene by scene.
You are going to do exactly the same thing in Second Life, except that you will also add the references to the pictures (still and animated), sounds (if any), and all the timings. Sounds like a daunting task ? Maybe, but I have done my best to make it as painless as possible. It is time-consuming though, as you literally have to write a whole story up front, and to fill it with dialogs that hopefully convey the emotions well enough, with the help of the pictures.
Let me say right away that the movie script is the lifeblood of your story. If you don't take any pictures and don't include any sound, what you are left with is simply text, making your story a novel. But if you only have pictures and no text, it is more a slideshow than a story, unless the pictures follow up closely enough to build a story without needing to explain anything with text. It is not necessarily a bad thing but it is a risky gamble.
That's pretty much what I did with By A Thread, which has no text at all during the movie except in one picture at the very beginning and another one at the very end, both pictures explaining the whole story that unfolds in-between. Likewise, all the tapes included with RemVision do not have any text at all, although some of them have what looks like a short and silly story to them. That too is on purpose.
On the DeviantArt website, you can post drawings and pictures (most of the time erotic ones) and the most successful ones are the ones with a good story attached to them, so there's that. A good story beats a good picture (or 250), every time.
Some things to keep in mind
Before we begin, you should know the pitfalls to avoid.
Firstly, your dialogs have to be written with a proper spelling and grammar (whatever language you write them in), and in a manner consistent with the characters personalities. It sounds like a no-brainer, but making spelling mistakes screams amateurism and does not help getting into the story at all.
Every character must speak and act in a way that is consistent with their education (unless your plot specifies that a character is undercover or something like that). A street gang member will not speak like a book, and a politician will not use slang. An introvert will make short, to-the-point sentences while a salesman will never stop babbling.
Be careful of other kinds of inconsistencies, which may be as silly as "Look to your right" while the character is pointing at the other character's left, or more insidious like "Do you remember last year when we did X" while that event happened more than a two years before in another movie. Try to avoid contradicting yourself.
Also make sure your scenario makes sense. Write it as if you were preparing for a barrage of questions from nerds who want every single detail explained. If you can't explain a detail in your movie (even if nobody asked about it since you're still making it), then you certainly have a plot hole and you should plug it. You must be able to justify every single detail in your movie.
Most characters should be able to speak and therefore be heard by the spectator, but it is up to you to decide who the spectator will be able to hear think. For Gina's adventures, I took the decision of letting the spectator hear Gina's thoughts, and only hers. I surround her thought text with tildes ("~") and I make the text a little more grey to distinguish it from words spoken out loud. In some movies, I may shift the "thought language" from one character to another. In some other movies, I don't give access to any thought at all. It's really up to you.
Sketching the story
The first step when making a movie is to write some kind of draft to the story. Think of it as the general idea, what it will talk about, who the characters are and what their relationships will be. There are many tried and true patterns for writing good stories so I won't go there, I'm not going to tell you how to write a good story (because I don't know), but rather how to write a story and how to make it a movie for SL.
Ideally, you write the whole script first, with dialogs and scene descriptions, the works. That way you know exactly what to shoot and how your pictures and videos will look, and you know what props to buy if any, all of this ahead of shooting the movie. That's what I did with pretty much all the Gina movies.
The problem with that approach is that it is difficult to move away from it, should you have more inspiration and ideas while taking the pictures. I don't know about you, but my stories tend to write themselves. I just write some kind of backbone to the story, start shooting, sometimes I don't know exactly where I am going (I just know the general direction to take) and scenes unfold in my mind as I am shooting the ones before them. It works well when you're in the right state of mind, "in the zone" as you could call it.
So what I often do is write a few lines to describe what's going on in general as well as the key dialog lines, and immediately get to shooting the movie. I do it that way because it is easier to adapt the dialog to the faces the characters make, rather than the opposite. This is how I did it with Overworking Girl, Alis and New Life, for example. A text can easily be changed, but redoing a snapshot can require a lot of work, if at all possible.
For this tutorial, I'm going to write a very shot scene with a few dialog lines and a few pictures, and explain my train of thought and procedure as I go.
But first, let's talk about the characters.
The Characters
If the story is the lifeblood of the movie, the characters are the lifeblood of the story. They are what is the most important part of your movie, and the part that you should craft with as much attention as you can. Writing good characters is key, in my opinion. You define a character's personality and you try to keep their reactions consistent with it. It is easier said than done, though.
I generally give my characters a nature and an attitude. The attitude of the character may change but never their nature. Remember Vampire : The Masquerade pen-and-paper RPG ? That's where the idea comes from and it makes a lot of sense, even in real life.
So I give every character their own nature that is proper to them and that won't change. For example, Gina is hot-blooded and adventurous, the Marquise is devious but cares a lot about others, and both will stay that way whatever the story they feature in is and whatever happens to them. I give them an attitude too but that one may change over time. Gina is sarcastic at first but may become more assured and calm, the Marquise is snobbish at first but may open herself to others later, etc. The attitude may also change according to the character's mood, too. But the nature never ever changes.
As a spectator, as soon as you understand what the nature of a character is, you can start predicting their reactions. Successfully predicting a character's reaction is the sign of a successful identification to them, hence of a good character. It is very rewarding for the spectator when it happens.
Of course, the nature of a character itself is often not enough to explain their reactions and behavior. A character has interests, bias and relationships that complicate their personality. But making a personality complex does not mean making it unreadable. If you can't read a character you can't "own" them, therefore you can't really believe the movie. You must let the spectator build a picture of your characters in their mind and hope that picture will be close enough to the one you have in your own mind. If you and your spectators are on the same page, then your movie is a success.
In this tutorial, we're going to feature two characters who will be part of an upcoming series of movies that I'm still brewing in my mind at the moment (although a lot of dialogs and scenes are already written, but I haven't taken any picture yet).
The first character is Emily Stanford, a modern, fun and outgoing city girl, and Tiffany Giordano, a shy, sweet and introvert girl. Both are good friends and the scene will take place at Emily's apartment after she totaled her car. Emily's nature is to be cheerful, curious and outgoing, even if it sounds like an attitude, I decide to make it her nature because I want her to always be like this. Tiffany's nature is to be caring, helpful, sometimes to the point of putting herself in a bad position just to help a friend in need. She's also a loner, having only a few but loyal friends.
Emily's attitude depends a lot on her mood. She can be sarcastic, blasé, she tends to let her own flaws take the best of herself sometimes, and she smokes (that's an attitude since it may change in the future). Tiffany's attitude is to be shy, she tends to not impose herself on others, and she rarely has the last word even when she knows she's right, because she doesn't want to hurt anyone. Especially with Emily who is a good friend but also a loudmouth.
A scene
Now that the characters are sketched (you can't really say they're defined, they become more and more defined as the story unfolds), we can start writing scenes and even dialogs.
In this tutorial, the scene will take place in Emily's apartment in San Francisco during the evening, while the weather is very poor outside. Knowing this already tells us three things :
- We must make a Windlight setting that makes the outside weather look crappy, possibly foggy and rainy. I made one long ago so I'll use that. Here it is if you want to reproduce it :


- If the weather is poor, it is probably raining. Find something that looks like rain, either particles or animated rain. I personally use Best Weather by Xavier Novelli. The name is tacky but the product is quite good. That's what I used in the background of the "rain" snapshots in the When You're Hot blog post.
- We must have an apartment setting. This is the hardest part, building a whole stage for a movie. I did that for the upcoming movies I have hinted about above, and most of the snapshots I took for this series of tutorials actually take place in Emily's apartment (which I built for that purpose), so I will use it here too.
The entire scene will take place in Emily's living room.
Knowing all this, let's have a shot at it :

The ambient light is not bad, it is clearly nighttime outside and we can see the rain. Other shots, possibly closeups on the characters, will show the rain better.
Once the setting is ready, we can think of what happens in it. For this example, I want the two characters to sit down around the table after entering the apartment, running from the rain.
Now, the characters in the scene must be dressed a certain way that is consistent both with the movie and with their personalities. For example, I pointed out earlier that Emily is an outgoing girl, so she is most likely wearing a pretty dress and fancy heels. If she is coming back from work, chances are her outfit is business-like more than party-like. Tiffany, on the other hand, is more casual so a t-shirt and jeans will do. It's pouring outside so they both should be drenched. Bonus points if at least one of the avatars has access to wet hair.
Here is Emily :

And here is Tiffany :

We get the girls seated around the table, and we're ready to script.

Or are we ? We can already see that we have a few issues here.
Firstly, Tiffany's hair is parted the wrong way. She would look prettier seen from the other side, so I guess the two will have to switch seats.
Secondly, the flower and its pot look huge on the picture because they are on the foreground. But we don't care about the flower, it's distracting. It will surely get in the way of closeups. Sorry, huge flower, you're gonna have to go.
Thirdly, Emily's sweater looks good but is just not appropriate, and it clips through the hand during some poses, so she's going to have to wear something else.
Fourthly, I don't like the stark shadows on the side of the faces of the two characters. A soft light in the middle should fill them.
Oh, also a little depth of field would not hurt.
So, let's try again :

I like this a lot better. It is not a problem that they are both pretty far apart, this scene won't need shots including both of them in the same picture. Since it is a dialog, the camera will switch back and forth instead. Notice that the clothes are in the off-white and beige, to avoid clashing with the overall beige and brown style of the room. If Emily wore a pink blouse (which would make sense considering her personality), it would clash and constantly draw the eye away from her face. The colors chosen here allow to focus on the faces and not be distracted by anything else. Speaking of faces, I turned the small flower into a soft light (2 m radius, 0.75 falloff, golden color) to get rid of the ugly shadows. It makes the faces shine more because of the water droplets, but that can be arranged easily.
They are also seated here in a way that the rainy city will be in the background of most of the shots (except maybe the tightest closeups, who knows), making it almost a third character in the scene. It's always there, subtly reminding the spectator that the girls are getting shelter from the elements together, which strengthens the bond between them. It also serves to establish a stark contrast between the poor weather outside and the coziness and comfort of the room. The characters clearly prefer being here than outside, and the spectator should feel the same way too. For this, I have made it so the overhead lamp lights the room not with a white light, but with a yellowish light, making it feel warmer. I also made the table top tan and not white for the same reason. As for the flower in the front, it comes with an attached blue doily which would have totally clashed with the rest of the picture, so I simply moved the pot down a little to hide the doily under the table.
As you can see, every little detail matters.
Dialog
Ok, now we are ready to write the dialog. Let's not bother about how the pictures will be taken yet, nor with the body language, let's just write the dialog.
Here, the scene is about Tiffany and Emily rushing to Emily's apartment from the hard rain outside, after Emily has totaled her car on a street lamp. Tree. Wall. Whatever, it's not important what she crashed into. Emily is unscathed but her car is destroyed, she crashed precisely because the weather turned bad rapidly and the street became slippery in no time. After having her wrecked car towed and paperwork filled, her friend Tiffany came to pick her up and drive her home. Now they discuss the aftermath of this event.
You can guess that Emily must be pretty upset, even though the stress of the crash has worn off now. So let's write this short scene. To avoid repeating the names every time, I write a dash when the other character speaks, like in a novel. When a character speaks two lines in a row or more, the second and next ones will begin with a ">" sign. Sometimes I remind who's talking by writing the initial of the character so you're not lost. When a detail is important to know when shooting the picture, I write it after a "#" sign after the line of dialog (you'll see below why that sign and not another one).
Emily (pissed): Can you believe it? I bought a new car less than a month ago and it's already a wreck!
Tiffany (calm): You're not hurt, Emily, that's what matters.
- Thankfully. I owe that to the safety of my car, obviously not to my crappy driving skills.
- Well, seeing how bad the weather is and how quickly it turned to crap, I don't think your driving skills are to blame here. # looks out the window, concerned
> How much does your insurance pay you for the car?
- 5000. # looks down at the table or at her fingers
T: Huh? That's it? It has cost you more than 8000! # looks surprised
- Yeah. I'm what they call a "young driver". Code word for "public menace". Wait for my next car crash, they will surely pay me even less. Unless I pay more up front. # looks disgusted
> Crap. I don't have the money to buy another car, I'm gonna have to buy a piece of shit. # looks disgusted and distressed
- Can't your parents give or loan you the missing 3000? # looks at E, eyebrows up interrogatively
- My parents? I am so not looking forward to telling them the news. And no they don't have that money to spare.
> I'm gonna have to borrow money, while I'm still paying my student loan back. Or take a second job on the side. Shit.
- Not if I can help it. # subtle smile, eyes seductive
- You? What do you mean? # looks surprised and interrogative
- I could loan you the missing 3000. You'd pay them back later, no interests, no strings attached. That way you can buy a new car in a day or two and move on. How's that?
- But I... That's... I didn't expect that... I don't know what to say... Thank you, Tif! # looks surprised and happy at the same time
Ok. This is a short dialog for a short example scene, so don't expect some real inspiration here. lol. However, it suffices for an example and shows a few things.
Firstly, notice how the emphasis is put on the characters' facial expressions. A facial HUD like Lelutka Axis would really help here, but even if you only use the base HUD that comes with your mesh head (if you have one), you should be fine. The basic Lelutka HUD allows you to control the lips, eyelids and eyes independently, as well as choose moods and expressions, you can go pretty far with it already. I don't know about the other mesh heads, you might have noticed by now that I'm pretty partial to Lelutka.
Secondly, the dialog is written in a way that the camera goes from one character to the other all the time, but you don't really want to only take two pictures and alternate them one after the other, it would be boring. Plus there are expressions to show anyway. Ideally, each line of dialog should go with its own unique picture. It is more expensive but more natural that way.
Now, to turn this dialog into a movie script. Well, it is already a movie script but something is missing : the timings. During the movie, the lines of dialog will show as subtitles and they need to show long enough to be readable without distracting from the picture too much. You don't want the spectator to spend their time reading subtitles as fast as they can and not enjoy the movie. Also think of those whose English (or whatever language you write your story in) is not the native language.
Fortunately, you don't have to think about timings yourself, the tape scripts calculate them for you. All you have to do is decide how much time there is to spend between subtitles, because usually in a movie one subtitle does not replace the previous one right away, there's always a one second gap. This is what we'll do here. But first, allow me to explain a little theory.
The Theory
Every tape contains exactly four scripts. One is called "Master" and the other three are "Tracks". The Master script is in charge of providing the menu and communicating with the VHS player before insertion. The three Track scripts are all identical except for the parameter in their names (making them behave differently) and serve as the memory banks for the movie. Each track memorizes a different type of data. One memorizes the pictures and videos, another memorizes the sounds and musics, and the last one memorizes the subtitles, the text.
When you write a movie script, you write entries that are grabbed by each Track script depending on their nature. If an entry is a subtitle, it will go in the Subtitle track. If it is a picture, it will go in the Video track, etc. Here, we are going to write a script constituted solely with text for now.
+1! :: - Can you believe it? I bought a new car less than a month ago//and it's already a wreck!
+1! :: - You're not hurt, Emily, that's what matters.
+1! :: - Thankfully. I owe that to the safety of my car,//obviously not to my crappy driving skills.
+1! :: - Well, seeing how bad the weather is and how quickly it turned to crap,//I don't think your driving skills are to blame here. # looks out the window, concerned
+1! :: How much does your insurance pay you for the car?
+1! :: - 5000. # looks down at the table or at her fingers
+1! :: - Huh? That's it? It has cost you more than 8000! # looks surprised
+1! :: - Yeah. I'm what they call a "young driver". Code word for "public menace".//Wait for my next car crash, they will surely pay me even less. Unless I pay more up front. # looks disgusted
+1! :: Crap. I don't have the money to buy another car,//I'm gonna have to buy a piece of shit. # looks disgusted and distressed
+1! :: - Can't your parents give or loan you the missing 3000? # looks at E, eyebrows up interrogatively
+1! :: - My parents? I am so not looking forward to telling them the news.//And no they don't have that money to spare.
+1! :: I'm gonna have to borrow money, while I'm still paying my//student loan back. Or take a second job on the side. Shit.
+1! :: - Not if I can help it. # subtle smile, eyes seductive
+1! :: - You? What do you mean? # looks surprised and interrogative
+1! :: - I could loan you the missing 3000. You'd pay them back later, no interests, no strings attached.//That way you can buy a new car in a day or two and move on. How's that?
+1! :: - But I... That's... unexpected... I don't know what to say... Thank you, Tif! # looks surprised and happy at the same time
Here I copied the dialog from earlier, removing the names at the beginning, prefixing all the entries with "+1! ::" which means "this entry is text and must last as long as necessary for the spectator to read it". I kept the dashes and removed the ">". Every entry that begins with a dash will mean (for this scene) that the camera must move to the other character. If it doesn't begin with a dash, that means the same character is saying something more.
The "//" signs mean "go to the next line" so the long lines are cut in proper places.
Notice that I kept the parts after "#". This is because "#" for a Track script means "everything after the # is a comment and must be ignored". This means that the following entry :
+1! :: - 5000. # looks down at the table or at her fingers
is actually memorized by the Track.subtitle script as :
+1! :: - 5000.
completely omitting the "#" and what is after it. But your notecard will still have it so you can read it. Which is good because it contains information about how the picture should look once you take it, it is a reminder you write for your later self.
The part before "::" reads as "one second later, there is text that must stay on-screen for as long as necessary". The part after "::" is the actual entry, in this case the actual text.
You could have written "+1/+5 :: !- 5000." instead and it would have worked as well. It would mean "one second later, keep the following entry on-screen for 5 seconds, and by the way this is text". Notice that the "!" sign is after the "::" and not before this time. This is good when you want to control how much time a text must say visible, for example the title, or interludes like "One hour later", things like that.
I won't explain all the options here though, everything is explained in detail in the Director's Manual provided with the HD Video System. You can choose the color of the text and its position by appending options after the text itself (but before the "#", if any).
Your first movie script
Create a notecard and call it "*Track audio video subtitles", that way it can be read by all 3 Track scripts. Paste the movie script above inside it, then insert that notecard in the clear tape that comes with the HD Video System. Click on the tape and choose "Record all" on the menu, then wait a little. Once done, press "Insert" so the tape inserts itself into the nearest empty VHS player that you own (if any, if not you have to rez one with its screen), then press Play on the player. You will quickly see the text shown on the bottom of the screen with enough time to read each subtitle.
Congratulations ! You've written your first movie script.
Of course, to call it a movie there got to be pictures and videos (or at least pictures) as well, maybe sound too, so that's what we're going to do now.
Taking the pictures
Now that you have your script, at least the text version of it, you have a good idea what the pictures should look like. We won't make a video here, there would be no point in this scene and you already know how to make one if you've read the Video tutorial page.
Here, we're going to take one picture per entry. Well, I took the pictures for you and zipped the whole bunch, you can find them here. One of them is missing, Snapshot_004.jpg. This is because it is very similar to 005 except it had a problem with DoF so I didn't select it among the pictures to upload.
Let's talk briefly about some of the snapshots taken, and how I took them. First of all, most of them were taken at zoom level 8 since they are closeups to the faces, showing a little neck and not much hair, respecting the rule of thirds that way. I mostly used combinations of the moods, expressions and eyes and lips controls of the stock Lelutka HUD, except for Snapshot_005 where I had to move Tiffany's neck with the Lelutka Axis HUD (AnyPose and Animare are able to do that too). The expressions I used for Emily are "dislike", "snarl", "wow" etc. Emily's mood is mostly "irked" and "somber", becoming "pleased" near the end. I like to use "Part Lips A" and "Part Lips B" to override the mood and expression, making the character look surprised. For the chair animations (the chair is "Dining Chair Leeloo CHEZ MOI" by nanda Marjeta), I mostly used "Chat", "Waiting" and "Tension".
There's a lot of body language in them, too. In Snapshot_008, Tiffany has her head turned the other way, indicating disgust because she is badly surprised at the low yield of the insurance company. In Snapshot_010 and a few others, I have taken the picture from a little above Emily's head, to make her look a little more miserable.
Snapshot_014 is good too because there is no wall part in it, there is only the rain and Tiffany's face, most of her hair being out of the view, symbolizing that we don't know what she is thinking at the moment. She is touching her neck with her fingers, a sign of tenderness. Her smile and her eyes are seductive, almost as if she were hitting on her friend. Her eyebrows are relaxed, she is looking straight through the rain part of the picture, calmly, as if she didn't even notice it. She's up to something.
I think Snapshot_016 is the best of all because it conveys a lot (that's when Tiffany offers to loan the money to her friend). Firstly, I have taken the shot from a little below, at lip level, making her look more powerful since she has the power to solve her friend's immediate problem. Secondly, I shot her from the front while most other pictures are shot from one side or another, making her take more screen space, giving her more presence and breaking the rhythm, indicating a pivotal point in the story. She looks to her left but up, because she looks up to her friend, even though they are both sensibly the same size. And her head is literally what separates the rainy part on the left from the non-rainy part on the right, shielding her friend from the crappy weather and by metaphor from the trouble. Also her face is less wet than in the previous pictures, on purpose because things are looking up now.
Same for the next and last snapshot, where Emily is no longer facing the rain, which is behind her now while it was in front of her before, and her face and hair are less wet than before. She too looks upwards because she looks up to her friend, while before her gaze was more level, when she dared to look at her in the eyes at all (she looked the other way a lot, a sign that she was ashamed of herself).
As you can see, body language adds a lot to the mood with unspoken messages, even in still pictures.
Now that you have the pictures, it is time to integrate them into the script to make a real movie.
I like to leave two seconds after a subtitle disappears before switching to the next picture, then wait one second before displaying the corresponding subtitle. I find it works well, keeping a good pace without going too fast. So between each existing entry, I will add one like this ("xx" is a number) :
+2 :: $Snapshot_0xx
The "$" sign indicates that this is a picture entry (or video entry, which is the same thing since videos are animated pictures) and will therefore be read not by the Track.subtitle script but by the Track.video script. You could actually make one notecard for the subtitles and another one for the pictures but I think it is easier to mix them both.
The resulting notecard looks like this. The empty entries at the beginning and at the end are for clearing the screen. You can copy the contents of the linked file and paste it into the notecard you've created, and record again, then play the movie and you'll get the final scene on TV !
That was easy, wasn't it ?
Oh, right, you need to have the pictures in SL too, of course. Don't upload them and pay L$ for that though, I already did it for you and put them in the example tape in the gift box at my shop. They are full perms so you can literally put them in your own clear tape and record as if they were taken by you, their UUIDs will be available to the video track script since their permissions allow it.
Default Ratio
Remember when we talked about the default ratio of the pictures ? Now is the time to attach that piece of information to the tape so the VHS player and the TV screen know what the proportions of each picture is. For the snapshots I took, the proportion is 1.886. That's 1920 / 1033. Simply write that into the Description field of the tape :

Finalizing the movie
Once you have finished your movie and are ready to sell it, copy the tape to your inventory to keep a work version (a version in which the notecard and the textures are still present) and click on the tape in-world then press "Finalize" then "Yes" to confirm. This will wipe the tape from all the resources except the scripts which keep the data in memory. Set the permissions to Copy and Mod (that's very important or the tape won't link to someone else's VHS player), and now your tape is ready to sell !
Please don't forget to check the Modify bit on your tape after picking it up, as it becomes no-modify when it reaches the inventory. This is because the scripts inside are no-modify (this is an SL bug that has been around forever). If you do not do this, your tape will be no-mod and won't insert itself in a VHS player.
This concludes this tutorial about how to write a movie script and to put it all together. I hope you enjoyed this series of tutorials, and that you will enjoy making your own movies as well !
Marine
You can return to the menu page.
PS : Thank you to those who proof-read the tutorials and spent time to try to follow it, including the making videos themselves !
Making Movies - Video
So here we are. The HD Video System and RemVision are both capable of displaying an animated picture over several prims, from 1 to 25, allowing for long clips, much longer than what we can expect from a single prim. Think of those animated pictures as those animated GIFs you see on the internet. The best ones are smooth, have a good resolution and loop well, as in the break when we reach the end of the GIF and return to the beginning to play it again right away is barely noticeable, if at all.
This is the goal here too. Have a character play an animation (or engage two characters in a couple animation, or three characters... you get the idea), film the whole animation (or the two or three animations) with a capture software, then process the video with a special script to make it a video that the HD Video System and RemVision can display.
If this sounds complicated, that's because it is. Fortunately, I've done all the heavy lifting for you. All you have to do is point, shoot, cut, run a script then upload (and pay the price for the upload, which is L$10 per image so a single video can potentially cost you L$250 if you use 25 prims to display it, but I personally limit myself to 16 most of the time, which is enough to display a 30-second looped animation with enough resolution and smoothness).
In this tutorial, unlike the ones before it, I'm going to be very technical and explain from A to Z how to take a video, how to process it, how to check its integrity and what the result will be.
Please note that if you are not interested in taking your own videos in SL but rather in uploading existing videos from the internet to SL, there is another tutorial that is more suited for you (but parts of it link straight back here because there are some subjects it does not explain, and that are explained here instead, so you'll do a bit of back-and-forth).
Setting up the tools
First of all, you need tools to shoot more than one picture on your viewer. Before I go further, let me show you the list of tools you need and where to download them. They all are open-source, free, well-known and reliable :
- Python 2 or 3 to execute the scripts.
- VirtualDub to process videos (make sure to grab the 64-bit one).
- Xvid codec to compress the AVI files created by VirtualDub
- ImageMagick to process images. (the old link does not seem to work anymore, thanks Heidi Solo for the heads up). Make sure to tick the "Install Legacy Components" checkbox otherwise it won't install convert.exe and montage.exe, and you need those programs to process videos into textures.
- ShnTool to process sounds. (the old link does not seem to work anymore, thanks Heidi Solo for the heads up)
- AviToTextures.py to process videos into textures ready to upload to SL.
- HdTextureToSdTextures.py to cut a big picture into several smaller ones, ready to upload to SL.
- WavToSounds.py to turn a long sound or music into chunks of 10-second-long WAV files, ready to upload to SL.
- RenameWithDim.py to automatically rename all the JPG and PNG files in a folder with their dimensions. This is just for convenience so you don't have to do it all by hand.
- CreateTrack.py to automatically create a text file with a sample track from the files contained into the folder. This is just for convenience so you don't have to do it all by hand.
Don't be put off by this list of tools, I know it sounds geeky and if you don't have any technical knowledge it might sound like a difficult task but don't worry, those tools are there to help you and won't get in the way. Simply download and install them with the default parameters and you'll be fine. Just please make sure to install VirtualDub, ImageMagick and ShnTool in folders that do not have spaces in their names. You'll thank me later.
Also if you don't plan to use sounds, you won't need ShnTool at all, since it is used for cutting music into 10-second chunks in order to upload them to SL. Same thing for WavToSounds.py, and this tutorial won't cover HdTextureToSdTextures.py since it is about making videos, not HD pictures, so you don't need to use those two scripts either.
I used to use VirtualDub's built-in "Capture mode" which worked very well... until my laptop fried and I had to buy a new computer with Windows 10 and a new video card. Since then, VirtualDub stubbornly refused to let me use its capture mode again so I had to buy a License for Debut, another video capture software. It is not free (well it is for the first few days but then you have to pay) but the license is not expensive, like $30 or so. I also tried Bandicam which is good but I think its license is more expensive so I chose Debut after some debating and I'm not regretting my choice. Same thing for FRAPS.
There are other video capture software, like the free CamStudio that I used to use at work a decade ago. It works not too bad but it wants to install a lot of spyware along with it, so don't let it do that. If you really want to use it, follow this page to know how to install CamStudio in a clean way, avoiding all the shady stuff that comes with it. I did that once and was not infected with any malware, as CamStudio itself is clean.
Frankly, if VirtualDub's capture mode works for you, stick to it. It's free and easy to use and has no malware in it.
Since I'm talking about VirtualDub, this software will not only serve as the capture tool (if you can) but also as the convert tool (after you've trimmed the parts of the video you don't want) and as the process tool that will cut the video into squares that will later be processed by ImageMagick. It's there the whole time. I use VirtualDub 1.10.4 as well as the Xvid codec which is necessary for saving AVI files without eating all your hard drive space. When you have installed Xvid, run VirtualDub and go to Video > Compression..., choose "Xvid MPEG-4 Codec" and press "OK".


Once done, you want to add a filter to whatever video you will open with VirtualDub, that filter will simply trim the borders of the image so you only see what you are supposed to film.
To do this, go to Video > Filters...

Click "Add".

Then locate "Null transform" and press "OK".

Now that it is added, click on the "Null transform" filter on the previous window and press "Cropping...".

Enter the following numbers : X1=553, X2=553, Y1=139, Y2=87 (type "553", press TAB, "553", TAB, "139, TAB, "87") and press "OK" twice.

Now you're set, any video you load into VirtualDub (until you quit it) will be trimmed the way you want. Please note that the numbers I gave you work well for a 1920x1440 monitor with a SL viewer maximized, it lets you take 800x800 videos. You may want to test with different numbers but those are the ones that work for me.
And why do they work for me ? Because they match a simple HUD I've made that hides all my view except the area that will be taken on the video :

With this HUD on, I know exactly what I will see on the video. The rest is blackened almost opaque. This HUD also hides the name tags from the view so I don't see "Marine" over my head on the video, that would be silly. This HUD is available for free in a box at my shop so you don't need to make your own.
It is important that the video is square because it will be cut into squares by the processing script further down the line. It could in fact be rectangular and I think this would work (I did not actually test that) but it would certainly stretch each frame and look bad in the final textures, where every pixel (or more exactly texel) counts.
Taking a video
Now that whatever video capture tool you'll use is ready, you can start taking a video. There can be a number of differences between your setup and mine, for example the number of monitors you use and their resolution. I move my viewer to my 1920 monitor to get more FPS (frames per second) while Debut is on my 4k monitor, and it is configured to capture a specific area on the smaller monitor (-2880, 917 ; 2880, 1620, those are the numbers that work for me and represent the full screen on monitor 2 which is the smaller one). Of course if you use another video capture tool, it may be configured differently.
In a nutshell, here is what will happen. You will start the video capture mode with a key press and the video capture tool will capture the whole screen where your SL viewer is located. Let it capture what you want to capture, then when you're done you will press another key to end the capture. Depending on the tool you use, it will either save the video directly where you want or keep it in memory until you save it manually.
Since you have captured the whole screen while wearing the video frame HUD, only the area in the middle will not be blackened and that's the part that will be part of your video after trimming it with VirtualDub.
I'll lead you through the whole process, from video capture to processing the video into textures.
First, let me take a video of me doing a silly dance. I don't exactly know how long that dance animation lasts, probably 30 seconds, and my goal is to take it in a video that will be looped as well. In other words, the video will have to be exactly as long, to the frame, as the animation.
The very first thing to do is check the background, the scene where the video will take place. In particular, you want nothing else to move or change lighting or appearance in any way. This includes choosing a fixed Windlight setting so the sun does not move while the video is shooting. Here I'll be in a bedroom with no moving parts and no change in lighting :

Zoom level is 2 because I'm taking myself full-length, but I'll move the camera later to make sure the whole dance is properly focused and I don't move out of the frame.
Next I wear the video frame HUD and start the animation to make sure I'm centered correctly in the video. I let the animation run a few times to make sure I do not go out of frame too much (some dances make you move around a lot but this one does not). I also want to shoot with the camera a bit low, lower than the crotch, to exaggerate the length of my legs. While the animation plays, I familiarize myself with its noticeable parts and for any break that would give away the moment when it ends (this one has no such break).

Don't mind how the text on my Sublimator looks, this is due to me having dragged my viewer from my 4k monitor to my other one, which resizes it and changes the font size at the same time.
I must also check that nothing crosses the dashed line of the black HUD, including whatever window is open in the viewer (I did not let them show in this snapshot but there are a few windows and menus visible as well on the video).
There's another thing I change when I take a video, I don't want to let the viewer notify me when a friend logs on or off. My inventory is so big that whenever such a notification occurs, there's a micro-freeze and I don't want that to happen in the video, so I go to the Preferences, Notification tab and turn off "When my friends log in or out" :
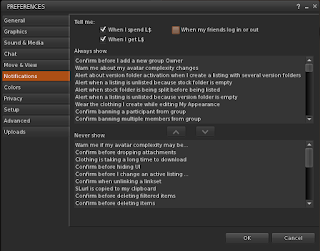
Now we are finally ready to take the video ! Animations in Second Life are normally no longer than 30 seconds, but I have seen some taking longer than that. Maybe we can do 60 seconds now but I haven't seen any yet. Let's assume this dance is no more than 30 seconds long. What we want is a looped video of this dance without any break so we need at least 30 seconds of footage, of course. However, to err on the safe side I usually shoot two or three times the estimated duration of an animation because the recording FPS and the rendering FPS are different so frames are not always smoothly recorded, there may be freezes and jumps which complicate the task of finding good looping points later (you'll see what I mean below).
For now, let's record.
This is the raw video (converted to FLV for the blog post but the original is in AVI format and a lot more crisp, see below for the link). It lasts 1:11 to be sure the dance animation plays at least twice, assuming it is no more than 30 seconds long. Don't mind my Winamp bar playing over the viewer window, I wanted to keep the location and L$ balance hidden. Notice there is no name tag over my head, this is due to the black video frame HUD using a RLV command to do that. It's much quicker than to turn the name tags off in the preferences every time you want to shoot a video.
For the rest of this tutorial, I will demonstrate how to cut and process this video so I recommend you download the original file from my dropbox (it is zipped but it doesn't make a big difference in size). That way you can do the same steps yourself, which is the best way to learn.
There are few things to say about this video. First, the dance makes me move around a lot and most of the time I simply tap my feet on the floor. But there are a few noticeable moments when I move my arms above my head, for example. Those landmarks are what we'll use to make sure to loop properly.
Now that the raw video is taken, let's process it.
Processing a video (step 1)
There are two steps to process a video. The first step is to cut the parts you don't want while trimming the areas of the screen that are blackened by the HUD at the same time (the trimming is done automatically by the Null Transform filter you've added earlier in VirtualDub, but the cutting is done manually by you), and the second step is to run the resulting video through the "AviToTextures" Python script. The result is a set of textures that you will upload into SL and put in your tape for the VHS player and/or RemVision to play as an animated picture.
First, you need to cut and trim the raw video. Load it into VirtualDub (it should already be open if you have already added the Null Transform filter), you should see something like this :

The left part is the current frame in the raw video in input, the right part is the same frame but gone through the filters (here there is only one filter, "Null Transform", which crops the input frame into something smaller). This is the output you'll get. Notice how all the black parts including the HUDs are not part of the output, only what's inside the video frame is kept. This is the reason for the numbers in the Null Transform filter, and the size of the video frame HUD itself.
The bottom part is the scrubber and the entire length of the video, numbered in frames.
This is where the creative part takes place. First, we need to find a noticeable frame where the movement of the body is slow, practically immobile. The best candidates are when the arms and/or the body change direction. From my experience I know that it is best to select a frame where the body is in a tense position, ready to expand. In this dance, that means when the body is the lowest and is about to spring back up. For example, this frame 62 here :

This frame is a good candidate because the arms are up (which is not the case during most of the dance so this position is easy to recognize) and the body is down, ready to change direction so it moves slowly. Let's mark it down with the "Home" key to set it to be the beginning of our selection.
Now we scrub the video until we stumble on the next moment where my arms are up like that, after having played the whole animation exactly once. Playing with the scrubber a little, watching myself dance until I finally turn around and move my arms up again like the first time, signalling that I'm close to reaching the same position as before, I find that frame 826 matches well with frame 62, so I mark it down with the "End" key to set it to be the end of the selection. Notice that there are 25.5 seconds separating the two frames, because frame 62 is 2.067 s in the video and frame 826 is 27.533 s in, meaning the animation itself is very close to taking 25.5 seconds in time. It is not far off my 30 seconds estimate.

To compare both frames, use the "[" and "]" keys to switch back and forth between the first and last frame of the selection. In this video, while doing that notice that both positions are very close to each other, but not exactly, there is a slight movement of the right leg. Honestly I could be satisfied with this but I prefer two exactly identical frames, so let's keep searching. But before changing frame, let's ask ourselves, why are the two frames not exactly the same ?
This is because the recording rate (30 FPS, set in Debut) and the rendering rate (which varies, the SL viewer does not have a fixed rendering rate, but in my case, on this 1920 monitor and in this skybox wearing these clothes, my rendering rate is around 80 FPS average) are different and not a multiple of each other. This means that since the recording rate is so much lower than the rendering rate, there are frames that are not recorded. This is the case here, the frame we want has not been recorded as the viewer goes too fast for the recorder. It used to be the other way around on my laptop which was less powerful, the recording rate (30 FPS there too, set in VirtualDub back then) was higher than the rendering rate which was around 20 FPS, sometimes less, so I had a lot of repeated frames in the video.
Anyway, now we know the theory, but what do we do about it ? We need to choose other frames. It just so happens that moving one frame to the right both the beginning and the end of the selection works a lot better, so we choose frames 63 and 827 instead of 62 and 826. The duration is the same but those two frames are a lot more identical so the loop will be a lot more seamless.
That's it, the creative part is done, now what's left is the straightforward, automatic processing. We're going to cut and save the video now. Go to "Edit", select "Crop to Selection"

We get this, a video with exactly 764 frames (it begins at frame 0 but frame 764 is grey, the last frame is always grey) :

Save it to AVI by pressing F7 or going to "File" > "Save as AVI..." :

If you have correctly installed and selected the Xvid codec in the Video > Compression menu, you should get a file that is a lot smaller than the original one. Firstly because it is less than half as long, and secondly because it is not the same compression. Raw AVI are big, Xvid makes AVI files that are a lot smaller. In my case, I get a 4.55 MB file, compared to the initial 36.0 MB file. You can download it here if you want to work on processing an already cut video instead of cutting it yourself. You can notice while playing that video that there is no break when it comes to its end and loops, you don't notice it unless you look at the timeline of the video in whatever player you use (Windows Video Player, VLC or anything you want).
Processing a video (step 2)
Now, all that is left is to process it, which means making textures out of it. There are a few choices that are up to you and they basically revolve around choosing between smoothness and resolution, or making a compromise to get something in-between.
First, you want to make sure that the "AviToTextures.py" file is correctly configured. Open it in a text editor like Notepad, Notepad++, SCite or whatever your favorite editor is and locate these lines, near the beginning of the file :
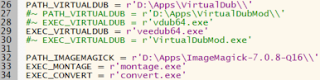
I have taken the habit of installing my programs in D:\Apps\ instead of C:\Program Files because I try not to put anything of value on the C: drive, should I need to reinstall Windows at some point (I'm old school, coming from a background when we had to reinstall Windows 95 and 98 often, and kept that habit ever since). Chances are you have installed VirtualDub and ImageMagick in different places than me, so you need to change the paths as well. Please install the two tools in a folder without spaces in it, it confuses Python big time. Simply modify the lines 26 and 32, replacing the "D:\Apps" part with the place you have installed your tools.
Save and close the file, you won't need to edit it anymore.
It is a good idea to copy the AviToTextures.py file where your video is, so you don't have to write the whole path to it (normally Python has added its own path to the system Path variable of your Windows upon installation so you don't need to worry about that). I'll assume that this is what you do here.
Open a command prompt (type "cmd" from the Windows Start menu) and go to the folder you have both the AviToTextures.py script and the cut video. For the sake of this tutorial, let's assume that folder is in D:\Video, so type :
D:
cd \Video
Once in the right folder, type dir to make sure you are in the right folder (aka directory) you should see both the video and the script in the list.

Now, before you run the script, you must know a few things :
- How many FPS did you set your video capture tool to. My Debut is set to 30 FPS but your setting might be different. The video I am using for this tutorial was shot at 30 FPS, so that's the number we'll use.
- What is the number of the last relevant frame in the cut video. You can find this out by opening the cut video in VirtualDub and looking at the last number on the right of the timeline. In the video we are working on right now, the last number is 764, this is the number you seek... except that this is a grey frame, an empty one. The number you want is actually one unit lower, i.e. 763.
Then, you must determine whether you want more resolution or more smoothness, or something in the middle. Before I explain that one, let's just run the script once.
For this test we are going to run the script with "naive" parameters. Let's say you only want one texture (because you know you will have to upload it afterwards and you don't want to spend too much money on this), with as much smoothness as you can, i.e. 30 FPS. Therefore you write :
python AviToTextures.py "Video 206 cut" 30 1 *
The first parameter is the name of the video, here "Video 206 cut.avi", which must be written between quotes since there are spaces in the name.
The "30" part is simply the frame rate with which you recorded your video, it doesn't change unless you change that setting in your video capture tool. You can get this information either by right-clicking on the file in your explorer and looking at the "Frame Rate" field in the "Details" tab, or by adding the "Frame Rate" column in the Details view of the explorer window.
The "1" parameter means "1x1 texture". You can set it to 2, 3, 4 or 5, generating 4, 9, 16 or 25 textures respectively, giving you much more resolution. That's what makes a video "HD".
And the "*" at the end means "reduce the number of frames to the greatest square number below 764". You could have written any number between 1 and 764 to force VirtualDub to decimate to that number, or a decimal number between 0 and 1 (both excluded) to indicate a factor, for example 0.25 to tell VirtualDub to remove 3 out of 4 frames. The smaller the number the lower the FPS, but also the bigger the output resolution. Everything is a matter of compromise.
The last two parameters are optional, if the frame rate is omitted it will take 10.0 by default (but I don't recommend you omit that parameter) and if the last parameter is omitted it will take the number of frames by default, i.e. it won't decimate at all and you won't drop any frame.
In fact, the number of columns is also optional, if you omit it, the script will determine the lowest number that allows for an acceptable output quality (around 55% average).
The output of the script on the command prompt looks like this :
File : Video 206 cut
Screens : 1 x 1 prims
Layout : 27 x 27 frames per texture
Ratio : 1.0
Video dimensions : 814 x 814 px
Tile dimensions : 37 x 37 px
Output quality : 5% x 5% => Might be too blurry, consider adding screens or lowering the frame rate.
Nb frames : 729 / 763 (All filled)
FPS : 28.6631716907 / 30.0
All these data are very informative. First you see the file you are processing and the number of screens it will span over. Ok, not very informative there, but the rest is more interesting.
It tells you the layout, i.e. how the frames are organized in the output texture(s) -- here you get only one texture since it will span over 1x1 prim, which makes 1 prim -- it is 27x27 frames in our example. The ratio of the width over the height of the input video is 1.0, meaning it is square, but the script is perfectly able to manage non-square textures over a non-square number of frames (square videos used to be a requirement but it isn't the case anymore, the script is much more powerful now).
The initial dimensions of the video are 814x814, then you have the dimensions of each tile, here 37x37 pixels, which means a yield of 5% in both dimensions. That's very poor, hence the remark saying it "might be blurry" (well duh, you'll see how blurry it is in a moment).
The "Nb frames" line indicates the number of frames in the output texture(s) (here 729, which is the greatest square number below 764, the number of frames you specified) and the number of frames in the input video minus one (here 763). It also tells you that all the frames are filled in the output texture(s), meaning that there is no black frame at all. It is not a problem if there are some black frames at the end, the screen is able to play a video over just the correct number of frames so you don't see a black break when it loops. If it doesn't and you see black frames, it is time to update your HD Video System and/or your RemVision.
Finally the FPS after decimation is output, as well as the specified FPS. Since we asked to reduce the number of frames to 729 down from 763 (not 764 because the last frame is always removed), this makes a factor of 0.955, and 30 * 0.955 is equal to 28.663.
So you get this texture as a result :

You can download the corresponding AVI video here. This video is the copy of the "tmp.avi" video created by the Python script during its work. It does not delete the video afterwards so you can check the result before uploading anything. I recommend to always play tmp.avi after running the script so you see if there's a problem with the frame rate, the resolution (or both), or if there's a break at the end when it loops, because what you see in tmp.avi is what you'll get in-world if you upload the corresponding textures.
As you can see, the resulting texture is 27x27 frames of 37x37 pixels each, giving 729 frames that can be played at 29 FPS. The name of the texture contains all those parameters (except it specifies the original dimensions instead of the dimensions of the frames, which could have been stretched in the case of a non-square video). The video is very blurry, you can barely distinguish a thing, but at least it's smooth.
It may be a result you want, but if you want more resolution, you only have two options. Either you reduce the frame rate to get fewer frames hence more space for each frame, or you span the video over 4, 9, 16 or 25 textures. We will do the latter here and see where this gets us.
You can see the whole texture is covered by the mosaic of frames, there is not one empty texture. This is because we specified that we wanted to reduce the number of frames to the highest square number possible, and since the video itself is square, everything is solved nicely. It is not actually the case most of the time, because you may have to deal with non-square videos (for example animated GIF files) with non-square numbers of frames, so in the end, since the frames have to be organized as a mosaic inside a square 1024x1024 texture, it is bound to leave some frames empty (but the script never loses any frame unless you instruct it to).
Let's play a little challenge. You see on the raw video (and the cut one) that I am smiling while dancing. It's always better to smile when dancing. I want the resulting video to let my smile show as well. Think we can do that ? :)
This video is supposed to show a dancing animation, so we'll favor smoothness over resolution (while still showing a smile). Let's keep the frame rate factor to 1.0 and span it over 4 textures, i.e. 2x2 :
python AviToTextures.py "Video 206 cut.avi" 2 763 30 1.0
Notice that the only parameter that changes is the first one, becoming "2".
The results are these pictures and this video :


As you can see, the result is better, the resolution is 75x75 pixels per frame (there are still 729 frames in total) and the video would span over 2x2 prims, hence 4 textures to upload.
But you still can't see me smile while dancing. Do you see where this is going ?
After a couple tests, I think the following parameters are good enough for what we want :
python AviToTextures.py "Video 206 cut.avi" 814 814 4 763 30 529
With these parameters, we span the video over 4x4 = 16 textures, the frame rate becomes 21 FPS (you can change that yourself in the name of the first texture), each frame is 178x178 pixels and this time there are 529 frames in total, which is a square number but not the greatest below 764, so I chose it manually to be sure to fill all the textures.
Please note that the quality is still very poor with 22% x 22% and the script keeps telling you to increase the number of prims or lowering the frame rate, but for the sake of the example I will be content with this result.
The result video is here and the result textures are here, that's 16 textures in total. If you wanted to upload them, it would cost you L$160. Making a movie can be costly ! Since a single tape can hold around 250 textures (video textures included), you can expect to spend L$2500 per tape just for the production, if you are making a full movie.
But with this amount of data, you can see me dance clearly and smoothly enough and what's more, you can see me smile :)
Challenge completed !
Please note that in the uploaded textures, the dimensions are not 814x814 but that's not a problem. This is because they were made with an older version of the script which could only handle square videos and that meant it did not stretch the frames, which remained square as well. Now it can handle non-square videos and it even stretches the frames inside a texture to take as much space as possible and avoid black borders, but this means it can no longer rely on the dimensions of a single frame to know how to stretch the prims it displays the video on. So instead it uses the dimensions of the input video, which is 814x814 here. It really does not make a difference for you, especially not with this example since both the input video and the frames are square.
Now all you have to do, once the textures are uploaded, is to put them in the tape and to add the name in the tape's notecard (more on that in another page). For this video here, the entry would be "$Video 206 cut".
Fortunately, I have uploaded them for you and made the video in an example tape so you see the final result. You can find it in the box of free tools at my shop. Feel free to open the tape and see what's inside to get a good idea. And of course to play it, the same dance will play for an hour so you have time to see it loop and to compare it both to the tmp.avi file and to the original video.
Always check the generated "tmp.avi" video before uploading, because what you see in it is what you get in-world after uploading the generated textures. You want to check the resolution, the frame rate and the break at the end if you intend the video to loop seamlessly. If it doesn't satisfy you enough, run the script again with different parameters.
When writing your movie script, try to reserve as much time as you can to let a big video preload. Textures are preloaded by the VHS player or RemVision 16 textures in advance, but it may take time for a viewer to download all these textures, because they may take like 1 MB each. This is not a problem with still pictures which stay on screen for 8 to 10 seconds (or more if you want), but for a 4x4 video you want the 16 pictures to be displayed at the same time so you want them all to be already downloaded by the viewer by the time the video starts. This means that once the video is started, not only it should have had enough time to preload (or you get grey or blurry parts on the video), but the following textures only start to preload now. If the next entry in your movie script is another video, you must make your first video stay on screen long enough to let the next one preload itself entirely. This is why I often separate animated pictures with still pictures in my movies, to give time to preload and avoid getting grey textures.
What about sounds ?
We did not talk about how to turn long sounds (for example music) into 10-second chunks that SL can read and play. The procedure is pretty easy.
First of all you need to modify line 26 in the WavToSounds.py file to write the path to ShnTool. Once again, avoid spaces in the path because it confuses Python :

Save and close the file.
Open a command prompt like you did for the video, type
python WavToSounds.py "my looped music.wav" 77 1
Where "my looped music" is your sound or music to cut in chunks, "77" is to be replaced by the duration of your big sound in seconds and "1" indicates that it must be looped.
Once done, a certain number of WAV files are generated and you can upload them directly to SL. The first one is named in a way that the HD Video System understands how to play it (for example, how many sounds constitute your big sound).
To have it played in the movie, simply write its name after a "%" sign instead of "!" or "$". See the next tutorial to find out what this means. It is also explained more clearly in the Director's Manual.
This concludes this (very long and technical) tutorial about how to make a video for the HD Video System and RemVision, the next one is about how to write the movie itself.
Or return to the menu page.
Marine
This is the goal here too. Have a character play an animation (or engage two characters in a couple animation, or three characters... you get the idea), film the whole animation (or the two or three animations) with a capture software, then process the video with a special script to make it a video that the HD Video System and RemVision can display.
If this sounds complicated, that's because it is. Fortunately, I've done all the heavy lifting for you. All you have to do is point, shoot, cut, run a script then upload (and pay the price for the upload, which is L$10 per image so a single video can potentially cost you L$250 if you use 25 prims to display it, but I personally limit myself to 16 most of the time, which is enough to display a 30-second looped animation with enough resolution and smoothness).
In this tutorial, unlike the ones before it, I'm going to be very technical and explain from A to Z how to take a video, how to process it, how to check its integrity and what the result will be.
Please note that if you are not interested in taking your own videos in SL but rather in uploading existing videos from the internet to SL, there is another tutorial that is more suited for you (but parts of it link straight back here because there are some subjects it does not explain, and that are explained here instead, so you'll do a bit of back-and-forth).
Setting up the tools
First of all, you need tools to shoot more than one picture on your viewer. Before I go further, let me show you the list of tools you need and where to download them. They all are open-source, free, well-known and reliable :
- Python 2 or 3 to execute the scripts.
- VirtualDub to process videos (make sure to grab the 64-bit one).
- Xvid codec to compress the AVI files created by VirtualDub
- ImageMagick to process images. (the old link does not seem to work anymore, thanks Heidi Solo for the heads up). Make sure to tick the "Install Legacy Components" checkbox otherwise it won't install convert.exe and montage.exe, and you need those programs to process videos into textures.
- ShnTool to process sounds. (the old link does not seem to work anymore, thanks Heidi Solo for the heads up)
- AviToTextures.py to process videos into textures ready to upload to SL.
- HdTextureToSdTextures.py to cut a big picture into several smaller ones, ready to upload to SL.
- WavToSounds.py to turn a long sound or music into chunks of 10-second-long WAV files, ready to upload to SL.
- RenameWithDim.py to automatically rename all the JPG and PNG files in a folder with their dimensions. This is just for convenience so you don't have to do it all by hand.
- CreateTrack.py to automatically create a text file with a sample track from the files contained into the folder. This is just for convenience so you don't have to do it all by hand.
Don't be put off by this list of tools, I know it sounds geeky and if you don't have any technical knowledge it might sound like a difficult task but don't worry, those tools are there to help you and won't get in the way. Simply download and install them with the default parameters and you'll be fine. Just please make sure to install VirtualDub, ImageMagick and ShnTool in folders that do not have spaces in their names. You'll thank me later.
Also if you don't plan to use sounds, you won't need ShnTool at all, since it is used for cutting music into 10-second chunks in order to upload them to SL. Same thing for WavToSounds.py, and this tutorial won't cover HdTextureToSdTextures.py since it is about making videos, not HD pictures, so you don't need to use those two scripts either.
I used to use VirtualDub's built-in "Capture mode" which worked very well... until my laptop fried and I had to buy a new computer with Windows 10 and a new video card. Since then, VirtualDub stubbornly refused to let me use its capture mode again so I had to buy a License for Debut, another video capture software. It is not free (well it is for the first few days but then you have to pay) but the license is not expensive, like $30 or so. I also tried Bandicam which is good but I think its license is more expensive so I chose Debut after some debating and I'm not regretting my choice. Same thing for FRAPS.
There are other video capture software, like the free CamStudio that I used to use at work a decade ago. It works not too bad but it wants to install a lot of spyware along with it, so don't let it do that. If you really want to use it, follow this page to know how to install CamStudio in a clean way, avoiding all the shady stuff that comes with it. I did that once and was not infected with any malware, as CamStudio itself is clean.
Frankly, if VirtualDub's capture mode works for you, stick to it. It's free and easy to use and has no malware in it.
Since I'm talking about VirtualDub, this software will not only serve as the capture tool (if you can) but also as the convert tool (after you've trimmed the parts of the video you don't want) and as the process tool that will cut the video into squares that will later be processed by ImageMagick. It's there the whole time. I use VirtualDub 1.10.4 as well as the Xvid codec which is necessary for saving AVI files without eating all your hard drive space. When you have installed Xvid, run VirtualDub and go to Video > Compression..., choose "Xvid MPEG-4 Codec" and press "OK".


Once done, you want to add a filter to whatever video you will open with VirtualDub, that filter will simply trim the borders of the image so you only see what you are supposed to film.
To do this, go to Video > Filters...

Click "Add".

Then locate "Null transform" and press "OK".

Now that it is added, click on the "Null transform" filter on the previous window and press "Cropping...".

Enter the following numbers : X1=553, X2=553, Y1=139, Y2=87 (type "553", press TAB, "553", TAB, "139, TAB, "87") and press "OK" twice.

Now you're set, any video you load into VirtualDub (until you quit it) will be trimmed the way you want. Please note that the numbers I gave you work well for a 1920x1440 monitor with a SL viewer maximized, it lets you take 800x800 videos. You may want to test with different numbers but those are the ones that work for me.
And why do they work for me ? Because they match a simple HUD I've made that hides all my view except the area that will be taken on the video :

With this HUD on, I know exactly what I will see on the video. The rest is blackened almost opaque. This HUD also hides the name tags from the view so I don't see "Marine" over my head on the video, that would be silly. This HUD is available for free in a box at my shop so you don't need to make your own.
It is important that the video is square because it will be cut into squares by the processing script further down the line. It could in fact be rectangular and I think this would work (I did not actually test that) but it would certainly stretch each frame and look bad in the final textures, where every pixel (or more exactly texel) counts.
Taking a video
Now that whatever video capture tool you'll use is ready, you can start taking a video. There can be a number of differences between your setup and mine, for example the number of monitors you use and their resolution. I move my viewer to my 1920 monitor to get more FPS (frames per second) while Debut is on my 4k monitor, and it is configured to capture a specific area on the smaller monitor (-2880, 917 ; 2880, 1620, those are the numbers that work for me and represent the full screen on monitor 2 which is the smaller one). Of course if you use another video capture tool, it may be configured differently.
In a nutshell, here is what will happen. You will start the video capture mode with a key press and the video capture tool will capture the whole screen where your SL viewer is located. Let it capture what you want to capture, then when you're done you will press another key to end the capture. Depending on the tool you use, it will either save the video directly where you want or keep it in memory until you save it manually.
Since you have captured the whole screen while wearing the video frame HUD, only the area in the middle will not be blackened and that's the part that will be part of your video after trimming it with VirtualDub.
I'll lead you through the whole process, from video capture to processing the video into textures.
First, let me take a video of me doing a silly dance. I don't exactly know how long that dance animation lasts, probably 30 seconds, and my goal is to take it in a video that will be looped as well. In other words, the video will have to be exactly as long, to the frame, as the animation.
The very first thing to do is check the background, the scene where the video will take place. In particular, you want nothing else to move or change lighting or appearance in any way. This includes choosing a fixed Windlight setting so the sun does not move while the video is shooting. Here I'll be in a bedroom with no moving parts and no change in lighting :

Zoom level is 2 because I'm taking myself full-length, but I'll move the camera later to make sure the whole dance is properly focused and I don't move out of the frame.
Next I wear the video frame HUD and start the animation to make sure I'm centered correctly in the video. I let the animation run a few times to make sure I do not go out of frame too much (some dances make you move around a lot but this one does not). I also want to shoot with the camera a bit low, lower than the crotch, to exaggerate the length of my legs. While the animation plays, I familiarize myself with its noticeable parts and for any break that would give away the moment when it ends (this one has no such break).

Don't mind how the text on my Sublimator looks, this is due to me having dragged my viewer from my 4k monitor to my other one, which resizes it and changes the font size at the same time.
I must also check that nothing crosses the dashed line of the black HUD, including whatever window is open in the viewer (I did not let them show in this snapshot but there are a few windows and menus visible as well on the video).
There's another thing I change when I take a video, I don't want to let the viewer notify me when a friend logs on or off. My inventory is so big that whenever such a notification occurs, there's a micro-freeze and I don't want that to happen in the video, so I go to the Preferences, Notification tab and turn off "When my friends log in or out" :

Now we are finally ready to take the video ! Animations in Second Life are normally no longer than 30 seconds, but I have seen some taking longer than that. Maybe we can do 60 seconds now but I haven't seen any yet. Let's assume this dance is no more than 30 seconds long. What we want is a looped video of this dance without any break so we need at least 30 seconds of footage, of course. However, to err on the safe side I usually shoot two or three times the estimated duration of an animation because the recording FPS and the rendering FPS are different so frames are not always smoothly recorded, there may be freezes and jumps which complicate the task of finding good looping points later (you'll see what I mean below).
For now, let's record.
This is the raw video (converted to FLV for the blog post but the original is in AVI format and a lot more crisp, see below for the link). It lasts 1:11 to be sure the dance animation plays at least twice, assuming it is no more than 30 seconds long. Don't mind my Winamp bar playing over the viewer window, I wanted to keep the location and L$ balance hidden. Notice there is no name tag over my head, this is due to the black video frame HUD using a RLV command to do that. It's much quicker than to turn the name tags off in the preferences every time you want to shoot a video.
For the rest of this tutorial, I will demonstrate how to cut and process this video so I recommend you download the original file from my dropbox (it is zipped but it doesn't make a big difference in size). That way you can do the same steps yourself, which is the best way to learn.
There are few things to say about this video. First, the dance makes me move around a lot and most of the time I simply tap my feet on the floor. But there are a few noticeable moments when I move my arms above my head, for example. Those landmarks are what we'll use to make sure to loop properly.
Now that the raw video is taken, let's process it.
Processing a video (step 1)
There are two steps to process a video. The first step is to cut the parts you don't want while trimming the areas of the screen that are blackened by the HUD at the same time (the trimming is done automatically by the Null Transform filter you've added earlier in VirtualDub, but the cutting is done manually by you), and the second step is to run the resulting video through the "AviToTextures" Python script. The result is a set of textures that you will upload into SL and put in your tape for the VHS player and/or RemVision to play as an animated picture.
First, you need to cut and trim the raw video. Load it into VirtualDub (it should already be open if you have already added the Null Transform filter), you should see something like this :

The left part is the current frame in the raw video in input, the right part is the same frame but gone through the filters (here there is only one filter, "Null Transform", which crops the input frame into something smaller). This is the output you'll get. Notice how all the black parts including the HUDs are not part of the output, only what's inside the video frame is kept. This is the reason for the numbers in the Null Transform filter, and the size of the video frame HUD itself.
The bottom part is the scrubber and the entire length of the video, numbered in frames.
This is where the creative part takes place. First, we need to find a noticeable frame where the movement of the body is slow, practically immobile. The best candidates are when the arms and/or the body change direction. From my experience I know that it is best to select a frame where the body is in a tense position, ready to expand. In this dance, that means when the body is the lowest and is about to spring back up. For example, this frame 62 here :

This frame is a good candidate because the arms are up (which is not the case during most of the dance so this position is easy to recognize) and the body is down, ready to change direction so it moves slowly. Let's mark it down with the "Home" key to set it to be the beginning of our selection.
Now we scrub the video until we stumble on the next moment where my arms are up like that, after having played the whole animation exactly once. Playing with the scrubber a little, watching myself dance until I finally turn around and move my arms up again like the first time, signalling that I'm close to reaching the same position as before, I find that frame 826 matches well with frame 62, so I mark it down with the "End" key to set it to be the end of the selection. Notice that there are 25.5 seconds separating the two frames, because frame 62 is 2.067 s in the video and frame 826 is 27.533 s in, meaning the animation itself is very close to taking 25.5 seconds in time. It is not far off my 30 seconds estimate.

To compare both frames, use the "[" and "]" keys to switch back and forth between the first and last frame of the selection. In this video, while doing that notice that both positions are very close to each other, but not exactly, there is a slight movement of the right leg. Honestly I could be satisfied with this but I prefer two exactly identical frames, so let's keep searching. But before changing frame, let's ask ourselves, why are the two frames not exactly the same ?
This is because the recording rate (30 FPS, set in Debut) and the rendering rate (which varies, the SL viewer does not have a fixed rendering rate, but in my case, on this 1920 monitor and in this skybox wearing these clothes, my rendering rate is around 80 FPS average) are different and not a multiple of each other. This means that since the recording rate is so much lower than the rendering rate, there are frames that are not recorded. This is the case here, the frame we want has not been recorded as the viewer goes too fast for the recorder. It used to be the other way around on my laptop which was less powerful, the recording rate (30 FPS there too, set in VirtualDub back then) was higher than the rendering rate which was around 20 FPS, sometimes less, so I had a lot of repeated frames in the video.
Anyway, now we know the theory, but what do we do about it ? We need to choose other frames. It just so happens that moving one frame to the right both the beginning and the end of the selection works a lot better, so we choose frames 63 and 827 instead of 62 and 826. The duration is the same but those two frames are a lot more identical so the loop will be a lot more seamless.
That's it, the creative part is done, now what's left is the straightforward, automatic processing. We're going to cut and save the video now. Go to "Edit", select "Crop to Selection"

We get this, a video with exactly 764 frames (it begins at frame 0 but frame 764 is grey, the last frame is always grey) :

Save it to AVI by pressing F7 or going to "File" > "Save as AVI..." :

If you have correctly installed and selected the Xvid codec in the Video > Compression menu, you should get a file that is a lot smaller than the original one. Firstly because it is less than half as long, and secondly because it is not the same compression. Raw AVI are big, Xvid makes AVI files that are a lot smaller. In my case, I get a 4.55 MB file, compared to the initial 36.0 MB file. You can download it here if you want to work on processing an already cut video instead of cutting it yourself. You can notice while playing that video that there is no break when it comes to its end and loops, you don't notice it unless you look at the timeline of the video in whatever player you use (Windows Video Player, VLC or anything you want).
Processing a video (step 2)
Now, all that is left is to process it, which means making textures out of it. There are a few choices that are up to you and they basically revolve around choosing between smoothness and resolution, or making a compromise to get something in-between.
First, you want to make sure that the "AviToTextures.py" file is correctly configured. Open it in a text editor like Notepad, Notepad++, SCite or whatever your favorite editor is and locate these lines, near the beginning of the file :

I have taken the habit of installing my programs in D:\Apps\ instead of C:\Program Files because I try not to put anything of value on the C: drive, should I need to reinstall Windows at some point (I'm old school, coming from a background when we had to reinstall Windows 95 and 98 often, and kept that habit ever since). Chances are you have installed VirtualDub and ImageMagick in different places than me, so you need to change the paths as well. Please install the two tools in a folder without spaces in it, it confuses Python big time. Simply modify the lines 26 and 32, replacing the "D:\Apps" part with the place you have installed your tools.
Save and close the file, you won't need to edit it anymore.
It is a good idea to copy the AviToTextures.py file where your video is, so you don't have to write the whole path to it (normally Python has added its own path to the system Path variable of your Windows upon installation so you don't need to worry about that). I'll assume that this is what you do here.
Open a command prompt (type "cmd" from the Windows Start menu) and go to the folder you have both the AviToTextures.py script and the cut video. For the sake of this tutorial, let's assume that folder is in D:\Video, so type :
D:
cd \Video
Once in the right folder, type dir to make sure you are in the right folder (aka directory) you should see both the video and the script in the list.

Now, before you run the script, you must know a few things :
- How many FPS did you set your video capture tool to. My Debut is set to 30 FPS but your setting might be different. The video I am using for this tutorial was shot at 30 FPS, so that's the number we'll use.
- What is the number of the last relevant frame in the cut video. You can find this out by opening the cut video in VirtualDub and looking at the last number on the right of the timeline. In the video we are working on right now, the last number is 764, this is the number you seek... except that this is a grey frame, an empty one. The number you want is actually one unit lower, i.e. 763.
Then, you must determine whether you want more resolution or more smoothness, or something in the middle. Before I explain that one, let's just run the script once.
For this test we are going to run the script with "naive" parameters. Let's say you only want one texture (because you know you will have to upload it afterwards and you don't want to spend too much money on this), with as much smoothness as you can, i.e. 30 FPS. Therefore you write :
python AviToTextures.py "Video 206 cut" 30 1 *
The first parameter is the name of the video, here "Video 206 cut.avi", which must be written between quotes since there are spaces in the name.
The "30" part is simply the frame rate with which you recorded your video, it doesn't change unless you change that setting in your video capture tool. You can get this information either by right-clicking on the file in your explorer and looking at the "Frame Rate" field in the "Details" tab, or by adding the "Frame Rate" column in the Details view of the explorer window.
The "1" parameter means "1x1 texture". You can set it to 2, 3, 4 or 5, generating 4, 9, 16 or 25 textures respectively, giving you much more resolution. That's what makes a video "HD".
And the "*" at the end means "reduce the number of frames to the greatest square number below 764". You could have written any number between 1 and 764 to force VirtualDub to decimate to that number, or a decimal number between 0 and 1 (both excluded) to indicate a factor, for example 0.25 to tell VirtualDub to remove 3 out of 4 frames. The smaller the number the lower the FPS, but also the bigger the output resolution. Everything is a matter of compromise.
The last two parameters are optional, if the frame rate is omitted it will take 10.0 by default (but I don't recommend you omit that parameter) and if the last parameter is omitted it will take the number of frames by default, i.e. it won't decimate at all and you won't drop any frame.
In fact, the number of columns is also optional, if you omit it, the script will determine the lowest number that allows for an acceptable output quality (around 55% average).
The output of the script on the command prompt looks like this :
File : Video 206 cut
Screens : 1 x 1 prims
Layout : 27 x 27 frames per texture
Ratio : 1.0
Video dimensions : 814 x 814 px
Tile dimensions : 37 x 37 px
Output quality : 5% x 5% => Might be too blurry, consider adding screens or lowering the frame rate.
Nb frames : 729 / 763 (All filled)
FPS : 28.6631716907 / 30.0
All these data are very informative. First you see the file you are processing and the number of screens it will span over. Ok, not very informative there, but the rest is more interesting.
It tells you the layout, i.e. how the frames are organized in the output texture(s) -- here you get only one texture since it will span over 1x1 prim, which makes 1 prim -- it is 27x27 frames in our example. The ratio of the width over the height of the input video is 1.0, meaning it is square, but the script is perfectly able to manage non-square textures over a non-square number of frames (square videos used to be a requirement but it isn't the case anymore, the script is much more powerful now).
The initial dimensions of the video are 814x814, then you have the dimensions of each tile, here 37x37 pixels, which means a yield of 5% in both dimensions. That's very poor, hence the remark saying it "might be blurry" (well duh, you'll see how blurry it is in a moment).
The "Nb frames" line indicates the number of frames in the output texture(s) (here 729, which is the greatest square number below 764, the number of frames you specified) and the number of frames in the input video minus one (here 763). It also tells you that all the frames are filled in the output texture(s), meaning that there is no black frame at all. It is not a problem if there are some black frames at the end, the screen is able to play a video over just the correct number of frames so you don't see a black break when it loops. If it doesn't and you see black frames, it is time to update your HD Video System and/or your RemVision.
Finally the FPS after decimation is output, as well as the specified FPS. Since we asked to reduce the number of frames to 729 down from 763 (not 764 because the last frame is always removed), this makes a factor of 0.955, and 30 * 0.955 is equal to 28.663.
So you get this texture as a result :
Video 206 cut.00.814x814.27x27.729x28.1x1.png
You can download the corresponding AVI video here. This video is the copy of the "tmp.avi" video created by the Python script during its work. It does not delete the video afterwards so you can check the result before uploading anything. I recommend to always play tmp.avi after running the script so you see if there's a problem with the frame rate, the resolution (or both), or if there's a break at the end when it loops, because what you see in tmp.avi is what you'll get in-world if you upload the corresponding textures.
As you can see, the resulting texture is 27x27 frames of 37x37 pixels each, giving 729 frames that can be played at 29 FPS. The name of the texture contains all those parameters (except it specifies the original dimensions instead of the dimensions of the frames, which could have been stretched in the case of a non-square video). The video is very blurry, you can barely distinguish a thing, but at least it's smooth.
It may be a result you want, but if you want more resolution, you only have two options. Either you reduce the frame rate to get fewer frames hence more space for each frame, or you span the video over 4, 9, 16 or 25 textures. We will do the latter here and see where this gets us.
You can see the whole texture is covered by the mosaic of frames, there is not one empty texture. This is because we specified that we wanted to reduce the number of frames to the highest square number possible, and since the video itself is square, everything is solved nicely. It is not actually the case most of the time, because you may have to deal with non-square videos (for example animated GIF files) with non-square numbers of frames, so in the end, since the frames have to be organized as a mosaic inside a square 1024x1024 texture, it is bound to leave some frames empty (but the script never loses any frame unless you instruct it to).
Let's play a little challenge. You see on the raw video (and the cut one) that I am smiling while dancing. It's always better to smile when dancing. I want the resulting video to let my smile show as well. Think we can do that ? :)
This video is supposed to show a dancing animation, so we'll favor smoothness over resolution (while still showing a smile). Let's keep the frame rate factor to 1.0 and span it over 4 textures, i.e. 2x2 :
python AviToTextures.py "Video 206 cut.avi" 2 763 30 1.0
Notice that the only parameter that changes is the first one, becoming "2".
The results are these pictures and this video :


As you can see, the result is better, the resolution is 75x75 pixels per frame (there are still 729 frames in total) and the video would span over 2x2 prims, hence 4 textures to upload.
But you still can't see me smile while dancing. Do you see where this is going ?
After a couple tests, I think the following parameters are good enough for what we want :
python AviToTextures.py "Video 206 cut.avi" 814 814 4 763 30 529
With these parameters, we span the video over 4x4 = 16 textures, the frame rate becomes 21 FPS (you can change that yourself in the name of the first texture), each frame is 178x178 pixels and this time there are 529 frames in total, which is a square number but not the greatest below 764, so I chose it manually to be sure to fill all the textures.
Please note that the quality is still very poor with 22% x 22% and the script keeps telling you to increase the number of prims or lowering the frame rate, but for the sake of the example I will be content with this result.
The result video is here and the result textures are here, that's 16 textures in total. If you wanted to upload them, it would cost you L$160. Making a movie can be costly ! Since a single tape can hold around 250 textures (video textures included), you can expect to spend L$2500 per tape just for the production, if you are making a full movie.
But with this amount of data, you can see me dance clearly and smoothly enough and what's more, you can see me smile :)
Challenge completed !
Please note that in the uploaded textures, the dimensions are not 814x814 but that's not a problem. This is because they were made with an older version of the script which could only handle square videos and that meant it did not stretch the frames, which remained square as well. Now it can handle non-square videos and it even stretches the frames inside a texture to take as much space as possible and avoid black borders, but this means it can no longer rely on the dimensions of a single frame to know how to stretch the prims it displays the video on. So instead it uses the dimensions of the input video, which is 814x814 here. It really does not make a difference for you, especially not with this example since both the input video and the frames are square.
Now all you have to do, once the textures are uploaded, is to put them in the tape and to add the name in the tape's notecard (more on that in another page). For this video here, the entry would be "$Video 206 cut".
Fortunately, I have uploaded them for you and made the video in an example tape so you see the final result. You can find it in the box of free tools at my shop. Feel free to open the tape and see what's inside to get a good idea. And of course to play it, the same dance will play for an hour so you have time to see it loop and to compare it both to the tmp.avi file and to the original video.
Always check the generated "tmp.avi" video before uploading, because what you see in it is what you get in-world after uploading the generated textures. You want to check the resolution, the frame rate and the break at the end if you intend the video to loop seamlessly. If it doesn't satisfy you enough, run the script again with different parameters.
When writing your movie script, try to reserve as much time as you can to let a big video preload. Textures are preloaded by the VHS player or RemVision 16 textures in advance, but it may take time for a viewer to download all these textures, because they may take like 1 MB each. This is not a problem with still pictures which stay on screen for 8 to 10 seconds (or more if you want), but for a 4x4 video you want the 16 pictures to be displayed at the same time so you want them all to be already downloaded by the viewer by the time the video starts. This means that once the video is started, not only it should have had enough time to preload (or you get grey or blurry parts on the video), but the following textures only start to preload now. If the next entry in your movie script is another video, you must make your first video stay on screen long enough to let the next one preload itself entirely. This is why I often separate animated pictures with still pictures in my movies, to give time to preload and avoid getting grey textures.
What about sounds ?
We did not talk about how to turn long sounds (for example music) into 10-second chunks that SL can read and play. The procedure is pretty easy.
First of all you need to modify line 26 in the WavToSounds.py file to write the path to ShnTool. Once again, avoid spaces in the path because it confuses Python :

Save and close the file.
Open a command prompt like you did for the video, type
python WavToSounds.py "my looped music.wav" 77 1
Where "my looped music" is your sound or music to cut in chunks, "77" is to be replaced by the duration of your big sound in seconds and "1" indicates that it must be looped.
Once done, a certain number of WAV files are generated and you can upload them directly to SL. The first one is named in a way that the HD Video System understands how to play it (for example, how many sounds constitute your big sound).
To have it played in the movie, simply write its name after a "%" sign instead of "!" or "$". See the next tutorial to find out what this means. It is also explained more clearly in the Director's Manual.
This concludes this (very long and technical) tutorial about how to make a video for the HD Video System and RemVision, the next one is about how to write the movie itself.
Or return to the menu page.
Marine
Making Movies - Poses and Animations
Poses and animations are what makes your movie lively... unless it is all about landscapes and buildings, of course. But if you have characters in a scene, you will want them to look alive and natural.
What you already have
Most people use an Animation Overrider (AO, not to be confused with Ambient Occlusion) loaded with animations to make themselves look prettier. Nobody likes the stock stands and walks every new SL avatar comes with. My preference goes to Vista (now with Bento support) and Oracul, but there are many other good brands out there. Good AOs make your character look more natural, less robotic, but when taking snapshots it is not important to be well animated, all that matters is to be well posed.
Some AOs now use Bento, meaning they also animate the fingers and the face. You may or may not want that but it contributes to a more realistic look overall.
The latest Vista AOs also come with accessories such as a cigarette and/or a phone, those are very well animated and add to the personality of the character.
Furniture often come with animations as well. Even the simplest chair animates you when you sit on it. Some are Bento, like the chairs in the living room of the apartment in which I shoot most pictures in this tutorial.
If you want to play one particular animation that is not in your inventory, simply edit the object that contains it (for example your AO), go to the Content tab and look for the animation. Double-click on it to open its popup with the "Play Inworld" and "Play Locally" buttons and voila, you can play it at will.
A good trick to use is to rez a poseball (you can find many poseballs on the Marketplace, they're inexpensive) and to insert an animation in it. I used one of Sylva Petrov's poseballs for By A Thread while in the cage, to make it easier for me to position myself inside that tiny cage. This allows total control over your positioning and keeps you from moving inadvertently and ruining the shot since you're sitting on the ball instead of standing (regardless of the animation you make it play).
All this to say, you probably already have a ton of animations at your disposal without even knowing it so start experimenting :)
Synchronizing and restarting the animations
If you are a RLV user and your viewer uses my RLV code instead of RLVa (so for example the original RLV that I make and maintain, or Kokua, or Cool VL, or any of several others), there is a handy shortcut to restart all the currently playing animations of every avatar around yours, and yours as well. That shortcut is Ctrl+Alt+Shift+A. I use it all the time. Careful though, it may be a problem if you have several animations of the same priority animating the same body parts. For example, if your AO is priority 4 and you are using AnyPose or Animare, which tweak your animations with priority 4 poses for each individual joint, chances are the tweaks won't show after restarting the animations and you will have to refresh on the corresponding HUDs manually afterwards, which can be a pain.
I'm told that Firestorm also has this feature (taken from the RLV in 2013 but they didn't see fit to credit me for the original code) and its shortcut is Ctrl+S.
Waiting for the right time
Every photographer will tell you that to take a good photo takes a lot of patience and good reflexes. The same goes in SL because your character is most likely animated (for example by the AO they use, or by the furniture they are sitting on) so the time window is short to take the picture you want. If you miss the opportunity, you have to wait until the animation goes back to the same frames before trying again.
Fortunately there is a trick for that. Open the Develop menu (if you don't see it, press Ctrl+Alt+Q) and go to "Avatar" > "Animation Speed" and click on the top of that menu (the area with the double bar, highlighted orange in the following picture) to tear it off so it stays visible even after you close the Develop menu :

With this menu you can accelerate and slow down the animations of everybody around you (the effect is visible only to you and it doesn't slow down other stuff like moving objects, particles and all), reset the speed of all the animations, and slow down only your own animations. This menu allows you to take the photo at the right time without having to constantly restart the animations because they are going too fast.
The tools to own
With all this in mind, you need tools because you cannot always rely on the animations you have. Here are the tools I use to animate myself and other avatars, with links to where to get them when applicable :
- The HUD that comes with your mesh head : Most mesh heads come with a HUD that allows you to animate it. You can also often buy more animations and moods.
- The HUD that comes with your mesh body : Most mesh bodies come with a HUD that allows you to animate the hands. Maitreya does, with it you can animate each hand individually with predefined poses (victory, point, hold, give the finger etc).
- The Sublimator : This is a HUD I make and sell that includes a lot of poses (not animations, although nothing keeps you from adding your own), this is a good start when you want your avatar to be in a position close to what you want, and to tweak it afterwards to get the final pose for the shot.
- AnyPose : This HUD is the one I use the most, it allows you to tweak the rotation of any limb with priority 4 animations. It can also save and recall poses, and animate another avatar than yourself, with their permission. The free version works only with a pose stand, but the most expensive version is the one I use since you can animate anyone with or without pose stand. It can also move your eyes and animate your face if you're not using a mesh head. I've been using it since Gina's Debut so you can see it's been a faithful companion for a long time
- Animare Plus : Like Anypose, this HUD allows you to tweak your current pose on a per-joint basis. Unlike AnyPose, every joint has 3 degrees of rotation (AnyPose has only 2 and it can be limited sometimes). The downside is that Animare is less precise than AnyPose. I chose to use the Plus version because with it I can animate another avatar, and I can save and recall poses as well.
- Lelutka Axis : This HUD allows you to tweak the face of your mesh head in any way you can think of (it can also move the head and neck, as well as the eyes). Although it is primarily made for Lelutka mesh heads, it uses Bento animations so any Bento mesh head (Catwa and others) will be affected by it. It works very well and although it is a bit pricey, it is really worth the money spent on it. My only regret is not to have found out about it sooner, I could only use it in the Ebony & Ivory tapes, which I made last. Although at the time of this writing, it is very new and was likely released only a couple weeks ago, so I would not have been able to use it on any other prior movie anyway.
- Lelutka Orchidea : This HUD is a set of predefined erotic expressions for Lelutka mesh heads. I don't know how good it looks on other mesh heads, but on my Lelutka Simone it looks quite good. I often use it as a starting point and tweak afterwards, either with the Lelutka HUD or with Axis.
- Black Tulip full perms animations for hands (hold and sexy) : Those animations animate the hands specifically (provided you are using a mesh body that includes Bento-compatible hands like Maitreya does). They are good when the HUD for your mesh body is not enough for your needs. Like Lelutka Axis, I found out about it very late and only the Ebony & Ivory tapes make use of the Black Tulip animations.
- Chrysantemum's adjustable facial pose HUDs : I used the Smiles and Surprise HUDs in New Life and Alis, combining with other facial animations with good results (that's how I made Sam Ryder's hilarious "I'm cumming quietly" face, combining Lelutka's Sad expression with a subtle smile, all with a red face and a lot of sweat). Honestly though, if you have Lelutka Axis you won't need these HUDs.
I'm sure there are more tools around, but these are the ones I use. You don't need to own all of them of course, it could be costly for you, but at least a few of them, Animare for example.
Positioning
Just like a good framing, a good positioning is key to a good photograph. It is easy when you are sitting on something since you can move that "something" (for example a poseball, as explained above), but a lot harder when you are simply standing and relying on your AO. Moving with the arrow keys makes you take long strides and moves you way too far for the precision you most likely need. However, you don't want to always change the animation in a poseball when you're simply standing, you want to rely on your AO, so how do you position yourself precisely when you're not sitting on anything ?
For the movement, simply hold the Page Down key to crouch, and walk like that, it makes your avatar much slower and easier to position.
For the rotation, it is a bit trickier. By default, the avatar rotates only when the camera rotates by more than 60° while locked to the avatar (it doesn't rotate if you rotate the camera around something it is focused on, obviously). But that angle threshold is often way too big and you want finer precision. To do this, open the debug settings and change :
- AvatarRotateThresholdSlow = 5
With that value, every rotation of more than 5° will rotate your avatar, making you a lot more precise.
Body Language
Aha ! There is so much to say about this subject, entire studies have been done to decipher the body language to find out, for example, if somebody is lying. Some people consciously try to hide or blur their body language so they are harder to see through, others are open books.
Here, we are doing it the other way around, we want to add body language to an avatar that otherwise has none. When someone speaks, their body follows, adding meaning to the words in a subtle manner. You want to reproduce that with your own characters to give more credit to what is being said.
For example, suppose this character says "Aww ! That kitten is so cute !" with this picture to illustrate it :

The face expression is not bad (I'm sure it could be better but that's not the point), but the body language is not there. Firstly, her head is turned the other way, which is a sign of disgust, inconsistent with the emotion we are trying to convey. Secondly, where are her hands ? It looks like her body is not following her thoughts.

This is better, her head is turned correctly, the lips look better and more importantly, the hands are touching the cheek softly, conveying a feeling of tenderness. Even without any text you can guess the girl is looking at something cute. Ok the hands are positioned a little weird but I did not take the time to tweak them precisely, I chose an animation from my AO where the hands are near the face just to make a point without having to spend 15 minutes positioning the arms and the hands :p
There are many details that convey an emotion through the body language, I could not enumerate them all here even if I wanted to, so instead I'm going to point you to this site.
Something to keep in mind though, someone who is dominant will stand and move in a different way than someone who is submissive. I have several AOs for both modes in order to emphasize my state of mind or relationship to the other party. Likewise, a fighter stands and moves differently from someone who is not skilled in combat. Keep all these details in mind when creating a character. You don't want a dominant character like an executive to constantly keep her hands behind her back, looking down or keeping her legs together.
Clothing language
Like the way you move, the way you dress speaks volumes about you. It depends heavily on the gender of course, but a good way to convey a mood and a social level is to dress your character appropriately. Don't put your female character in a sexy tube dress unless she is about to go to a party. Don't dress your male character in track pants and hoodie if he's an executive. Some executives might dress like that, but this is too far from the stereotype to be believable (unless there's a good reason for it, that the story explains, of course). If your character is a woman of low education and social skills, don't dress her chic and fancy, make her look like she has no fashion taste and/or she can only afford discounted clothes. It might hurt your eyes but it is better for consistency.
I know that this is Second Life and we all look and dress sexy but if you want your movie to be believable, you need to keep a firm control over how the actors and actresses are dressed.
Also pay attention to jewelry. Women like good jewelry, men almost never wear any.
Eyes
The eyes are the window to the soul. It is even truer in movies, where the eyes are often what we focus on, and what indicates what the spectator should look at.
A character naturally looks at whoever is speaking to them, unless the induced emotion is too strong. This is where DoF (Depth Of Field) can get in the way because if you focus on the speaking character with your own avatar, but want to shoot your own avatar listening, chances are the face will be blurry.
A good way to avoid that is to focus on yourself instead, and to tweak the gaze with any HUD you have at your disposal, like your mesh head HUD or Axis. That way you can use DoF and focus on yourself while pretending to look elsewhere.
The gaze is also a good way to draw the attention of the spectator to a detail in the photo. Like I said above, the spectator will first look at the characters' eyes, then will follow their gaze when appropriate. A clever use of the gaze will immediately make them focus on what you want in no time. One thing to remember is that the gaze tends to go to the center of mass of whatever object or object part they are focusing on. In case the object of the attention is the character, they usually focus on the eyes. Or the lips if they want to kiss them.
I personally like to occasionally break the fourth wall (i.e. look directly at the camera), most of the time for a comical effect, especially when the character is surprised. It's a bit cartoonish but it makes me laugh.
Oh, speaking of eyes. Don't let your characters blink, like ever. They always blink at the worst time. Turn off that "Blink" switch in your mesh head HUD.
Off-balance
When shooting a moving character, try to not make her look like she is off-balance. For example, when walking, don't do this :

Prefer this :

Of course, if she's supposed to fall, do shoot your character off-balance.
This concludes this tutorial about poses and animations while shooting movies. Or rather, taking photos as videos are another story, which will be covered in the next tutorial...
Or return to the menu page.
Marine
Subscribe to:
Posts (Atom)

