Shortly after releasing the Env Box and the Env Probe, I decided to work on improving the latter... a lot.
The point of the Env Probe is to make your own SL environments, which means it is best used for static env boxes, i.e. boxes that you rez somewhere and don't expect to move. What you do expect from them though is to make the shiny surfaces inside it reflect its own projections, like this :

But although that works fine with one room, problems start to arise when you put two env boxes close to each other, like in the next room for instance. The problem is that some of the projections of one env box overlap with the projections of the next, like this :

In case this picture isn't clear, you see the reflection of the kitchen (on the left) overlapping that of the study room, because the shiny ball is located close the kitchen and therefore within its projection radius.
In this post, I will liberally use the term "Env Box" to designate static env boxes that you rez in a room and that stay where you've rezzed them, instead of the Env Box product that features 20 different environments that you wear. So please don't be confused, when I use the term "Env Box" here, I refer to one that is rezzed inside a room and projects six pictures of it to allow it to reflect on whatever shiny surface is located inside it. When I do refer to portable env boxes, I explicitly say so. Whenever there may be a confusion, I use the term "static env box" to refer to a box you've rezzed in a room and "worn env box" to refer to a box you're wearing.
So to work around this issue, I have created what I call an Env Box Controller, which is an additional object and the subject of this big update. Its role is mainly to activate only the Env Boxes in which an avatar is located, and deactivate all the others. It does other things too, but this is what it is meant for in the first place. It is mainly a "rez and forget" kind of tool, but you can control its parameters easily when you want.
This is a big update because the Env Box Controller could very well be its own product, but instead I chose to make it part of the Env Probe, because its point is to manage Boxes created by using the Probe.
Feeling lost ? Let me recap, hopefully making things clearer.
You have the Env Box product that lets you wear an Env Box that shines around your body, making your latex or armor attachments shine in a better, more realistic way (knowing that we don't have actual real time reflections in SL yet, and probably won't ever get them). But those Env Boxes are real life environments, they are not taken in SL locations so they don't actually project what's around you. They project pretty panoramas to add fine details to your shiny clothes. This update here does not concern that product except for one thing : worn Env Boxes are deactivated when you step inside a static Env Box, but you have to update them to get this new feature if you haven't already.
Then you have the Env Probe that allows you to make your own environments inside SL and make sure what you see in the shine is what you see in the area you're in. And to sell your own environments if you wish. It is still a lot of manual actions because you cannot automate the taking of a snapshot or the upload of the resulting picture to SL, nor the linking of the pictures into a projector, it has to be done by hand. What the Env Probe does is position your camera correctly and let you take snapshots in the easiest manner possible, considering all the technical limitations. It is still a lot easier than to do it all by hand from A to Z.
But then, when you have your static Env Box with the pictures of the room it is in, you'll probably want to do the next room as well. And then the next room, and so on. And since the rooms are adjacent, you will get overlapping like I showed above unless you use the Env Box Controller.
In this blog post, I will explain how to use the Env Box Controller and the Env Box Static object which are now both contained in the Env Probe product. Brace for a long post, as there is much to say about this new controller. But if you are a photographer, or if you need to take good pictures for your products, or if you want to equip your own house with env boxes, or if you want to make and sell your own environments, you'll want to read it all.
Installation
First of all, let me reiterate how to install a static Env Box (not how to take the pictures, flip them, upload them and put them in the projector, this is already explained here). Let's assume you use the "Env Box Static (rez me)" object, which is a blank but scripted env box, you can rename it what you want but please do not change the description field yet (it should show "^env 0 1 0.75 w" for now). We'll discuss later about what the description field is used for.
Just rez the object named "Env Box Static (rez me)" somewhere near you. It looks like a glowing white semi-transparent cube, it is in fact 7 prims (one root and six child prims) and takes 4 LI. It will remain visible until it is set to its final location or you click on it.
You can either resize it yourself with the white handles of the SL tools or use the Env Probe to resize it to the exact dimensions you want. I recommend using the Env Probe as it gives you more control over the shape of your box.
If you step inside this box all your shiny attachments will show a bright white reflection, to really insist on the fact that it is blank. You can then set all the six white projected pictures with the six pictures you've taken while using the Env Probe (see the blog post explaining how to do it).
Once you have set all the pictures, you can position the "Env Box Static" object to its final location.
To do this, rez your Env Probe somewhere near you then position, rotation and resize it to fit the room. Since it is a single prim, unlike the "Env Box Static" object, you can resize it in any direction. Once done, wear your Env Probe HUD if you haven't already, then click on its "Position" button to make your static Env Box take the position, rotation and dimensions of your probe. You can then derez the probe or move it elsewhere. The Env Box Static object becomes invisible after it was moved and resized, and if a controller is already rezzed and uses the same prefix (see below), it is told to scan for all boxes to update its own knowledge of the topology. If you later need to click on the Env Box, press Ctrl-Alt-T to see it in red (as well as all the invisible stuff around you).
If the controller is not rezzed yet, do it now. Rez the Env Box Controller somewhere in the parcel, it has to be in the same parcel as the Env Boxes you want it to control. It looks like a shiny sphere with "ENV BOX CONTROLLER" embossed on its surface :

That's all. You may go back to making more Env Boxes now.
First usage
If you have made several Env Boxes, let's say one per room in your house, you will quickly notice that only the ones in which an avatar is located will be active, the others will be inactive (i.e. they won't project anything). This means that if you are alone in your house, the reflections will be the ones of the room you're in. If someone else is in another room next door, since the Env Box located in their own room will be active too, there is a chance you will see its projections overlap yours, just like on the picture above. That cannot be helped.
And when you move from room to room, you will notice that as soon as you leave a room its own Env Box deactivates itself, and the one you're entering will activate itself at the same time, keeping the reflections around you accurate and avoiding overlapping.
It does not sound like much but it makes a whole lot of difference, and I will demonstrate it now.
This is my house :

You probably recognize it from my movies, most were shot here, and this house is where the name "Maison De La Marquise" comes from.
Let me show you a few rooms with accurate reflections. Not all the rooms, but those that feature enough landmarks to see them reflected on the surface of my dress.

The hallway with the stairs
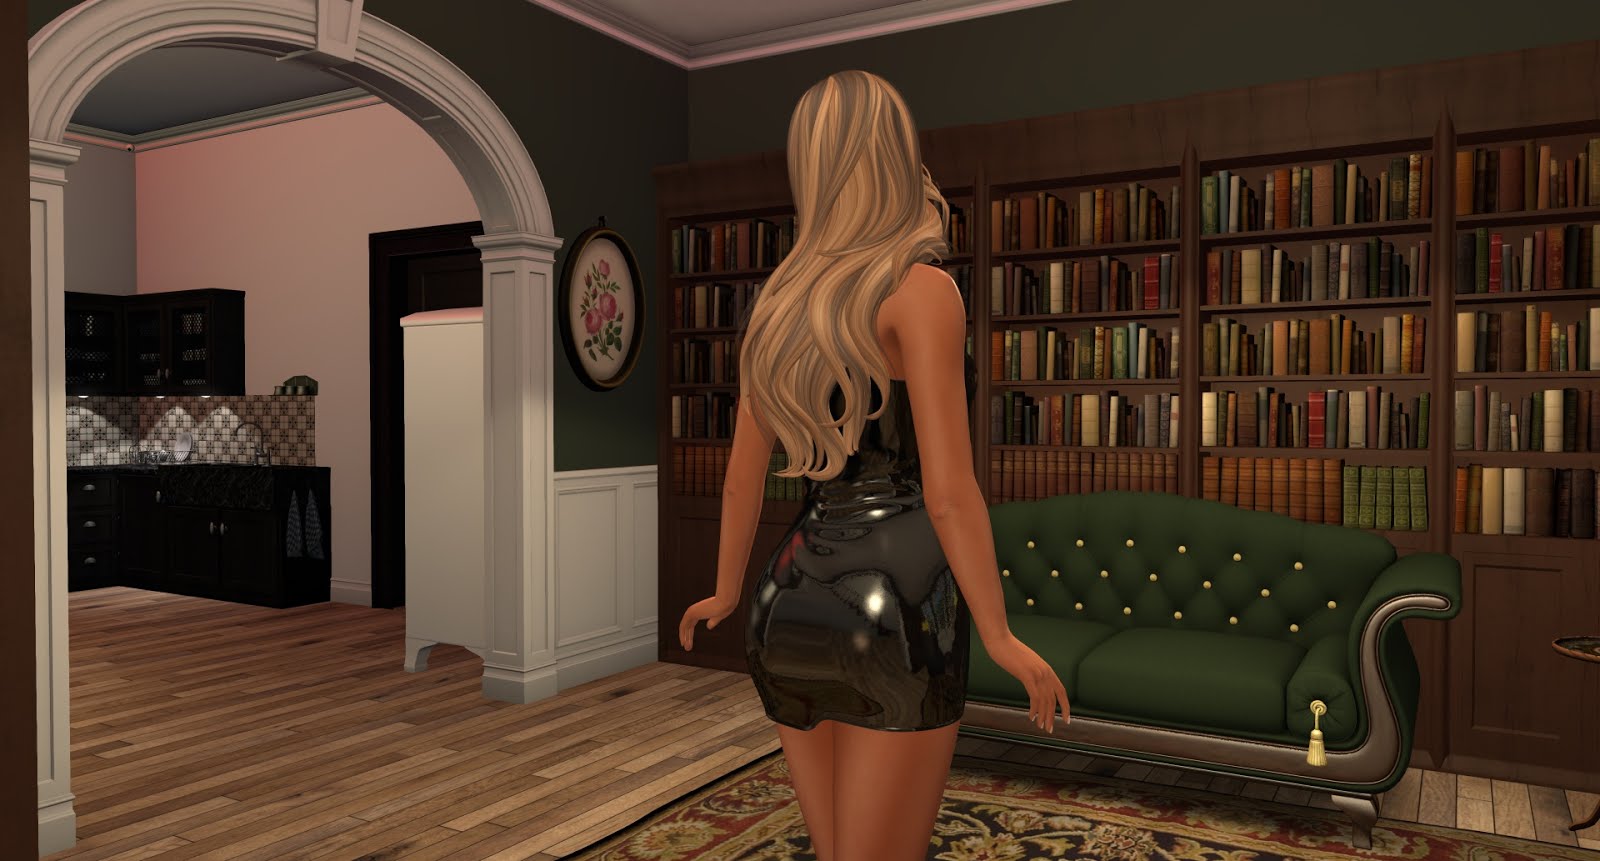
The study room that you already know, you can see the stairs of the hallway from here even though the hallway's Env Box is deactivated, this is because of the point of view I took when I made the Env Box of the study room

The kitchen, the study room is visible from here but its own Env Box is deactivated otherwise it would overlap

The training room with a big mirror (and you can see the local Env Box reflecting on its surface, the big specular shine comes from a local light, it has nothing to do with the Env Box). Of course, this is not an actual reflection so I do not reflect in the mirror.

The living room

Upstairs, notice the painting reflecting on my dress

The rubber room with its red checker rubber-padded walls
That rubber room will be of special interest to us, as you will see later on.
The fact that only the Env Box of the room I'm in is active, is all due to the Env Box Controller rezzed somewhere in the house.
In the rest of this post, I will sometimes mention the controller's "service volume". This means the total volume occupied by all the static Env Boxes it controls. Usually that means the volume taken by your house, if all your rooms are set with Env Boxes. If an avatar is inside one of its boxes, then it is inside the service volume, otherwise it is outside of it.
Worn Env Boxes
If you are wearing an Env Box with a real life setting, for example Panorama, Corsica, Tokyo or any one you want, you don't want it to be active while you're inside an Env Box controlled by an Env Box Controller. Otherwise, both projections would overlap.
If you haven't done so, please update your Env Box product and your worn Env Boxes will automatically deactivate themselves when a controller takes over, and reactivate when you leave its service volume, TP out, relog or rez them, or when you switch their Active state off and on again.
If you don't update them, you need to detach your Env Box every time you enter the controller's service volume and reattach it when you leave.
Carving
This is the second most important purpose of the Env Box Controller. Some boxes might be inside other boxes, and since you don't want overlapping projections the controller has to be smart and to know which box to activate.
Suppose you're inside a cage and... oh look, what a coincidence, there's a cage in the rubber room :

While inside the cage, you might want the prisoner to reflect the bars around her, and not the cage as seen from the middle of the room (which is what the projections look like when outside the cage).
In other words, you want to see this :

Instead of this :

And certainly not both at the same time :

This is the same sphere at the same location inside the cage, but in the first picture I am with it so it reflects the projections sent by the env box contained inside the cage, in the second picture it reflects those sent by the env box contained inside the room (hence outside the cage), which is bigger. And in the third picture it reflects both which is even worse.
To do this, you need to have an env box inside the cage, obviously, one that projects pictures that were taken from inside the cage, and that's it. The controller handles the rest automatically. In its standpoint, the smaller env box (the one in the cage) carves a hole into the bigger env box (the one occupying the whole rubber room). Therefore, when you are inside the cage, the controller knows that although you are technically inside the rubber room, it must act as if you were only in the cage and not in both.
This works for boxes inside boxes inside boxes, by the way. And boxes inside boxes inside boxes inside boxes... and so on. You get the point.
There is an exception to this rule. If the volume of the smaller box is 90% of the bigger one or more, then the controller won't consider the former to carve the latter, and will instead decide that those two boxes should be mutually exclusive. This is decided by conditions put inside the box parameters, and I will develop this later on because that's an advanced trick.
One word of advice. When you place two static Env Boxes next to each other, for example in two adjacent rooms, please don't make the boxes overlap. If you do and one of them is sufficiently smaller than the other (the 90% I mentioned above), the controller will believe it carves the other one, and it will slow down the periodical checking process (see below) for no real gain.
Menus
Although you can let the controller do its job automatically and never bother tweaking it, you still have a lot of control over its behavior thanks to its menu and the description field of each Env Box under its responsibility.
Simply click on your Env Box Controller to get its menu. Only the owner of the controller can do this.
The menu is fairly simple. The main page looks like this, and from there you can open any of the secondary pages (brightness, time of day...) and return to the main page.
Clicking on "Active" switches the controller on and off. When off, all the env boxes under its responsibility are turned off as well, even those that are set to be "always active" (see below).

Main menu
Each page shows some information about the Env Boxes and the controller itself.
- Region time : It is the local time between 0:00 (aka 12 AM) and 23:59 (aka 11:59 PM). The time is NOT a real time but the time calculated from the sun angle. FYI each SL day lasts 4 hours, 3 of which are day time and 1 is night time. In this picture, "5:23" means early morning so the light of the env boxes will be tinted pink.
- Set time : You can set a time manually in the "Time of day" menu, either by clicking on the corresponding button (see below) or by typing it manually. If set, this supersedes the "region time".
- Brightness : From 0.0 to 1.0, it is simply the global brightness which you set the controller to, knowing that each env box has its own factor to apply to it and calculate its own final brightness (see below).
- Optimal gloss. : From 0 to 255, this number represents the glossiness that will look best with the projections of all the boxes (this is a global setting, not a per-box setting). To make it simple, if a surface has a glossiness set to a different number than the optimal glossiness here, the reflections will have gaps or overlaps because the edges of the projected pictures will be blurry. This works exactly the same way than the worn Env Boxes and will be demonstrated later on.
- Prefix : By default "env", you can change it by modifying the description field of the controller. The controller and env boxes containing the EnvBoxClient script (like the "Env Box Static" object) all talk on the same channel, each command being prefixed by this prefix (here "env"), and any object that uses another prefix will simply ignore those commands. This way you can decide what controller controls what boxes by setting them to the same prefix and exclude others by setting their own prefix to something else.
- Boxes : Indicates the number of boxes detected by the controller that use the same prefix.
- Vars : Shows the number of user variables known by the controller. There is always at least the hour of the day and that's why there is a "1" displayed here. If you add more variables manually (see below), this number increases.
- Avg. check time : Indicates how much time is taken during each check, in average. A check occurs every 30 seconds and every time someone collides with one of the Env Boxes, and is meant to scan all the boxes and decide which ones must be active and which ones must be inactive. This is a rather long process (which grows like the number of avatars multiplied by the number of boxes) and this number shows how much time it has been taking since the last reset of the controller's script. Right now, with two avatars in the house and 17 boxes in a relatively healthy sim, it takes about one second per check. If this is too long for you, you can divide and conquer by rezzing more copies of your controller, each one being given a different prefix, and attribute some of the boxes to one, some to another etc. As long as a box from one controller does not carve into a box from another controller, it will work just fine and the controllers will all work in parallel.
- Last check time : This is the time taken by the latest check, just for reference.
Time of day menu

Time of day menu
If the region you're in uses the normal SL day cycle, then the controller is able to capture the right lighting and apply it to the reflections to make them look even more accurate. This is needed because you took your pictures at a certain time of the day, which means the room was lit a certain way when you took them, which might be different at different times of the day. When the sun is rising, you may want your room to be lit with a very slight pink hue, and when the sun is setting you might want a slight orangeish tint as well. That's what the controller does and this menu lets you decide whether to let it decide of the lighting (by selecting "DYNAMIC") or set the time of day yourself (either by choosing one of the buttons or by clicking "CUSTOM" and entering an hour).
Now... this is all good and well but not all Env Boxes must react to the time of day light equally. Some boxes may be outdoors, others may be in rooms with lights and windows, others may be in rooms with lights and no windows. There is a way to set each box individually so that it is more or less impacted by the light of day depending on the setting you think is best. In practice it is just a factor between 0 and 1 that tells the box "apply all the light of day" and "completely ignore the light of day" respectively. More about that below.
Brightness menu

Brightness menu
Not much to say here, except that the brightness (which is 1.0, or 100% by default) is compounded with the brightness factor of each box to find out how bright each box must be.
The brighter, the more visible the reflection on a surface, but increasing the "environment" value of the surface yields the same result. It's entirely your choice what brightness suits you and your guests best.
Personally I like 50% because in the real world the light does not bounce completely off the walls, a part of it is absorbed so setting to 100% is too much, it is like saying the walls emit light, which they don't. As for the lights themselves, they have their own specular shine that makes like a halo around their picture.
Optimal glossiness menu

Optimal glossiness menu
Not all surfaces shine the same way. Some are glossier than others. Glossy surfaces have sharp reflections, less glossy ones have blurry reflections.
Problem is, a blurry reflection means blurry edges, which means gaps between the different projections of an env box. Changing the optimal glossiness to match that of the surface you want to look at corrects the projections so there is no gap nor overlap.
For example, here are three reflective spheres. The left one has a glossiness of 50 (which is quite rough), the middle one has a glossiness of 150 (so like latex or plastic) and the right one has a glossiness of 255 (the max, it is like a polished mirror) :
Here is how they look when the optimal glossiness is set to 255 :
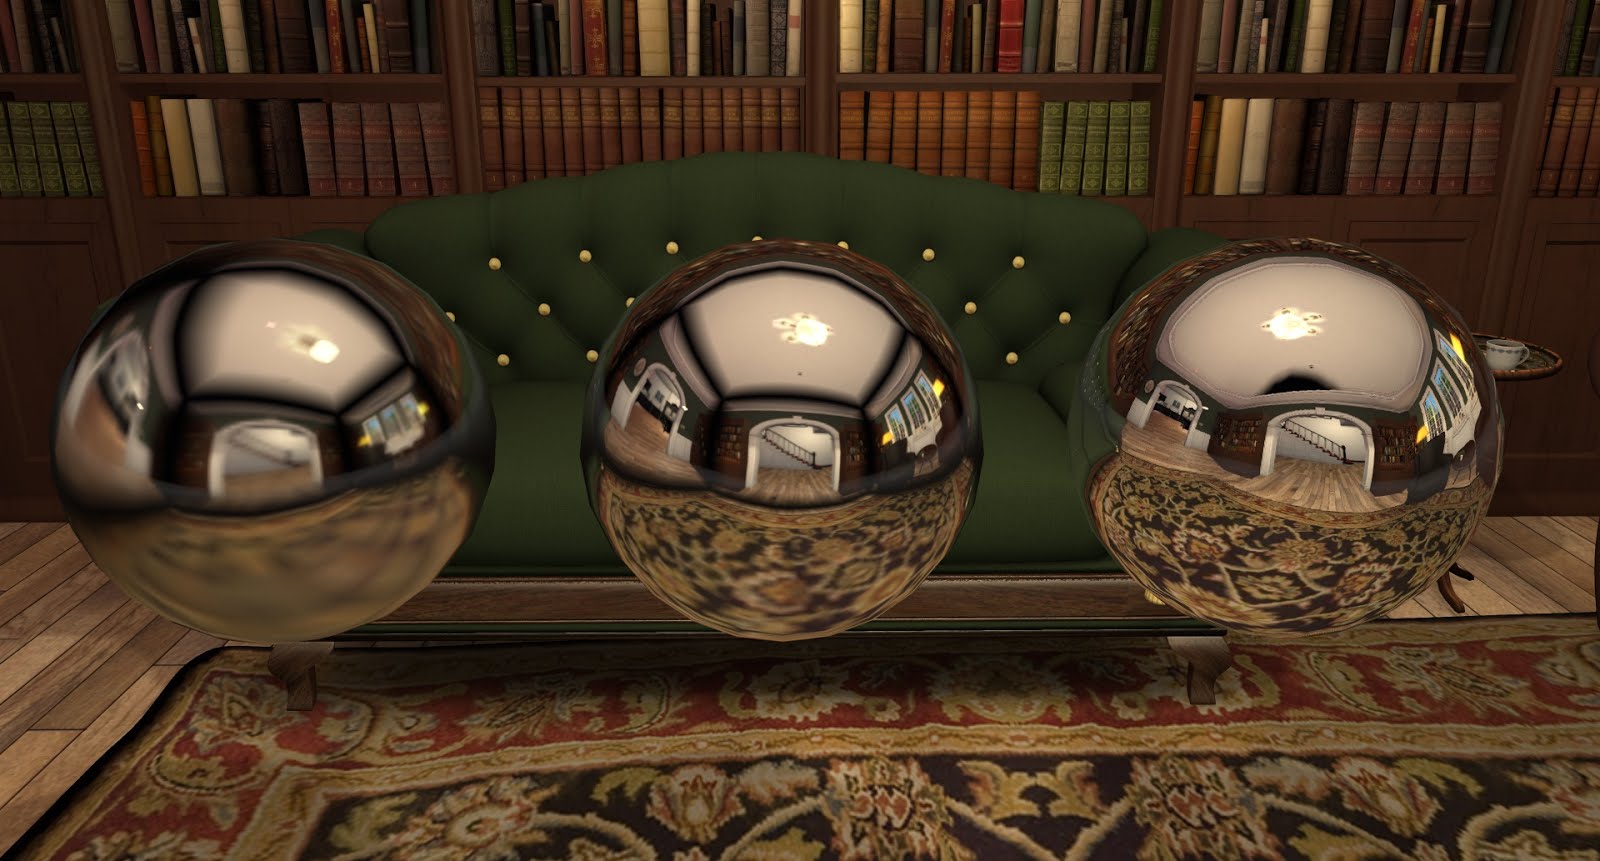
As you can see, there are black gaps on the two spheres on the left, while the right one has crisp reflections.
Now if you set the optimal glossiness to 150, which matches the glossiness of the middle sphere, you get this :

No more gap on the middle sphere, slightly visible gaps on the left sphere, and overlaps (i.e. projections that overlap each other) on the right sphere.
And if you set the optimal glossiness to 50 to match that of the left sphere, you get this :

The left sphere looks good and rough, its reflections are very blurry as expected, the middle sphere has some overlaps but they're not very visible in this room, the right sphere still has crisp reflections (as expected) but obvious overlaps.
For the fun of it, let's give the left sphere 0 glossiness and set the optimal glossiness to 0 :

The left sphere shows how rough you can make a surface (i.e. how blurry its reflection can be). Since the environment value of this sphere is still 255, it looks like a very rough mirror. But you can make it look like shiny plastic if you prefer by lowering its environment value down to 10 or 20 and giving the sphere a tint :

If you wanted actual plastic or rubber, you would set its environment value to 0, but then you wouldn't need any env box at all since the surface wouldn't reflect the projections in the first place. Env Boxes are only useful for shiny surfaces that are supposed to reflect details, not just the specular projections of the local lights. In other words, env boxes are for polished or wet surfaces with an environment value (latex, polished plastic, patent leather, varnished wood, metal, oil...), all the other surfaces (plastic, wood, rubber, leather...) don't need them and won't look different with or without them.
As you can see, there is no ideal number for the optimal glossiness, it all depends on the glossiness of the surface you are most interested in, for example the one you are taking a picture of.
For reference, the surface of the controller changes its glossiness to match the optimal glossiness you chose, so you see what it looks like when inside an env box (you can put the controller anywhere in the parcel, it doesn't matter whether it is inside an env box or not, but in case it is inside one, you then see the reflection change on its surface due to the change in glossiness.
Options menu

Options menu
- "Highlight" will make your env boxes visible (transparent and glowing, the active ones will be white and the others black) in order to make them more easily found.
- "Scan boxes" will force a scan of all the boxes around, in case you just deleted one (rezzing and positioning one will trigger a scan automatically).
- "Get positions" is a useful button to get the physical location of all the boxes controlled by this controller, each location being the position, the rotation and the dimensions of the box. Each message looks like this :
[2019/02/06 06:41] Env Box ~ Office (root): dim <218.56360, 48.02089, 33.68668>^<7.71000, 5.73320, 5.04680>^0.000000
The "dim" part is the command, the first vector is the position of the center of the env box in the sim, the second one is the dimensions in meters, and the third one is the angle around Z in degrees. Simple. If you copy this text to a text file, you can later paste it into the chat in order to set the location of any box (or even a probe) right where this box is.
I will explain below how to position an env box with a "dim" command.
- "Set var" allows you to add or set a user variable into the controller, which will be dispatched to all the boxes so they know whether to hide or show. You enter a variable and a value under the form [variable] = [value] and it will be added into the controller. For example, if you type "x=1" (or "x = 1", spaces are not a concern), then a new variable named "x" will be added to the controller's memory and its value will be "1". If later you enter "x=some_value" then the variable "x" will take the value "some_value" (which is not a number but a string literal, but works just as well). Please don't put spaces in the name of the variable or in the value, as this would not work when writing conditions to test them (see below). Attention, "H" or "h" is reserved for the hour of day. You can change it but it will change back less than 30 seconds later.
- "List vars" : Shows the list of the currently known variables on the chat. There is always at least "h" which is the time of day.
- "Clear vars" : Clears all the variables except "h", the hour of day.
- "Reset" : It just resets the controller. I don't see a real need for it but hey, it's there.
Individual parameters
Now we're getting into the nitty-gritty stuff.
You can actually modify a few parameters in each box individually. Those parameters are contained in the description field of the root prim of any box and look like this :

That's the "^env 0 1 1 w" part. So what does that mean ?
First, the "^" sign is necessary to tell the EnvBoxClient script inside that the description field contains parameters, otherwise it won't read whatever is written there, as a safety.
Second, the script reads what's in the description field (as long as it begins with "^"), but never writes into it, so you are free to enter the parameters you want.
Third, those parameters concern only that env box, if you want to use the same parameters in another one you need to copy the description field of this one to the other one manually. Env Boxes do not talk to each other, only to the controller.
Fourth, each parameter is separated from the others by a space (make sure there's only one space between parameters and not two or more).
Fifth, some additional parameters can be added after the last one ("w" in this example). They are conditions for the activation of the box and they will be developed later on.
Let's review each parameter one by one, from the left to the right.
- Prefix ("env" here) : This value makes the box communicate with any controller (or controllers) which prefix is set to the same word, which cannot have spaces in it. As a reminder, the prefix of the controller is written in its own description field.
- Always active ("0" here) : This value can be either 0 or 1. If set to 1, the box will always be active unless the controller itself is deactivated. This is useful for example if your room is supposed to feature shiny objects (such as animesh avatars, i.e. NPCs) and must reflect on the shiny surfaces even if nobody is in it. If you want the box to always be active regardless of the activity of the controller, well, you can set it to another prefix or remove its EnvBoxClient script altogether.
- Brightness factor ("1" here) : This value can go from -1 to 1 and can be decimal. Remember the Brightness setting of the controller ? If the value is between 0 and 1, it multiplies it to find the final brightness of the projections, so for example 50% and a factor of 0.3 will make a final brightness of 0.15. If the value is between -1 and 0, it sets the brightness to the negative of that value without taking into account the brightness of the controller. In other words, make it negative for absolute, positive for relative.
- Color factor ("1" here) : This value can go from 0 to 1 and can be decimal. This is the factor that is applied to the "time of day" color sent by the controller. It is actually a very important value to consider, because this is the one that determines whether the room is completely outdoors with no artificial lights, or completely indoors with no windows, or anything in the middle. Good values are 0 (completely outdoors without lights, meaning the time of day color will be completely applied to the projections), 1 (completely indoors with no windows, meaning the time of day will not be taken into account by the box at all), 0.5 (indoors with big windows) and 0.75 (indoors with small windows).
- Color ("w" here) : This value is either a RGB vector or "w" which means "white". If your room has a particular color and its projections are tintable, you can change this value but "w" is good for pretty much all boxes. If you do set a custom color, write it like this :
<R,G,B>
Where R, G and B are the Red, Green and Blue values respectively, each one from 0 to 1. Do not write spaces (as they are separators for the parameters) before or after the numbers. One example of a custom color would be <1,0,0> for a bright red.
If you want to know everything, when the box receives a command from the controller it checks the time of day color and combines it with its own color, attributing the "color factor" value to its own color and 1 minus "color factor" to the time of day color, to determine the final color of the projections. This is why "0" means "outdoors" and "1" means "indoors", it's easier to remember that way.
For example, with a factor of 0 the time of day factor will be 1 and the final color of the projections will be that of the time of day. With a factor of 0.5 (room with lights and big windows), both colors will be combined equally, so if the base color is white (the "w" symbol), then the final color will be a lighter version of the time of day since it is combined 50/50 with white.
This works well for subtly changing the color of the shine indoors depending on the light outside without overdoing it.
Validating the parameters
Whenever you change the parameters of a box, click on it to validate them (otherwise nothing tells it to re-read its parameters, it doesn't do it periodically since most of the time they don't change at all, it would be a waste of resources).
When you click on the box, it also forces a scan of all the boxes in the parcel (in case you just moved or resized it and want to update the controller's knowledge of what boxes carve what other boxes), and allows you to send a "dim" message to it (see below).
The "dim" message
Clicking on a box also opens a listener on channel 456 so you can enter a "dim" message on that channel to reposition the box.
To do this, simply copy one of the "dim" messages you've saved in a text file or anywhere you want, into your clipboard. For example this one :
dim <218.56360, 48.02089, 33.68668>^<7.71000, 5.73320, 5.04680>^0.000000
Remember this line ? This is the "dim" message we got from the "Office" Env Box when we clicked on the "Get positions" button in the Options menu. Let's say you want to position another Env Box at this exact location, maybe after making a mistake and deleting a box you shouldn't have.
Click on the box you want to reposition to open its listener, then say the following line :
/456 env dim <218.56360, 48.02089, 33.68668>^<7.71000, 5.73320, 5.04680>^0.000000
That's "/456 env " followed by the dim message you copied. The "env" part is necessary because like any message received by a box, it must begin with its own prefix, otherwise it will be ignored. Of course, if your box uses another prefix, replace "env" with its prefix.
After 10 seconds or if you click again before that delay, the listener is turned off again.
Attention, clicking on two boxes and sending a "dim" message will reposition both to the same location !
You can use the "dim" message another way too, by sending it to a probe instead of a box. The principle is a little more subtle but works the same way.
Rez your Env Probe if you haven't done so and wear your Env Probe HUD.
Then say the dim message on channel 789 instead of 456, and you do not have to prefix with "env" or anything (but if you do and the HUD uses that prefix, it will work anyway). No need to click on anything. So you say :
/789 dim <218.56360, 48.02089, 33.68668>^<7.71000, 5.73320, 5.04680>^0.000000
... and the probe will take the location and dimensions of those parameters. This is useful if you want to put your probe back where it was after mistakenly derezzing it.
Of course these dim messages are examples, your numbers will be different.
Conditions
If the parameters section were the nitty-gritty stuff, now we're getting into the thick and hairy.
Are you ready ?
You can add more parameters after the color, and those are additional conditions for the activation of the box.
Instead of writing a long-winded abstract explanation, I will show you an example of when those could be useful.
The gazebo does not have an Env Box, but suppose I want to make one for it :

So let's make one real quick.
First I rez a probe and I wear the HUD.

I resize the probe so it is roughly the same size as the gazebo, like this (it doesn't have to be exact) :

I get out of here to avoid being on the pictures and I start shooting, following the procedure I explained in the Env Probe blog post. After the pictures are taken and flipped, I upload them and set all six to a newly rezzed Env Box Static object that I rename "Env Box ~ Gazebo". I also set the "color factor" to "0" to make it behave like it is outdoors (that's an important part, as you'll see below).
Then I click on that object then on the "Position" button of my Env Probe HUD and the new Env Box goes right where the probe is, ready for use. The controller immediately detects it and starts controlling it. All is well.
I totally did not follow my own advice and let Casper (the cat) get in the way. Cats always get in the way.
In the end I get this reflection :

So, all is well, yes, but what happens when it's night time ? This happens :

The color of the projections becomes a very dark blue, darkening the shine. Since the color factor of the box is 0, the whole time of day color is applied.
This may or may not be what you want, but let's assume this is not what I want because the reflected sky is too bright and the rest is too dark. Let's assume during the night I want a clearer decor with a black sky, like it actually looks in-world at that time.
For this, obviously, I need to make a second env box and position it at the same spot, and I need only one of them to be visible at any time, at most.
To do this, after creating the second env box and placing it where the first one is (it is a good idea to stretch the env probe a little to make the second env box a tad bigger so it is easier to select when you want to tweak it), I need to change its parameters, because right now both boxes will show when I step inside as they are both almost exactly the same volume, so the controller will decide there is no carving, hence no exclusion.
In those parameters, I need to tell one box to be active only from 6 am to 9 pm, and the other one to be active only from 9 pm to 6 am. And I need the latter to not react to day light at all because otherwise it will be tinted dark blue by the controller and I will barely see any shine at all.
Let's go.
In the day Gazebo Env Box, the one I made first, I change the parameters in the description field to :
^env 0 1 0 w H>=6&H<=21
Notice the conditions that weren't there before : "H>=6&H<=21". This means "hour is 6 am or more AND hour is 9 pm or less". The "&" part means "AND" and there is no space before or after that sign.
With these parameters, whenever the time of day broadcast by the controller is outside 6 am and 9 pm included (in other words, when it is night time), the box will remain inactive even if someone is inside it.
Now I modify the other box, the night Gazebo one, and I write this in its description field :
^env 0 1 1 w H<6 h>21
Notice there is no "&" sign this time, but a space instead. This is because you can add several conditions (here there are two : "hour less than 6 am" and "hour greater than 9 pm") and if any one of them is true, then the whole condition is considered true. In other words, if "&" means "AND", a space (" ") means "OR".
Also notice the "1" number before "w", which means "do not take the controller's time of day color into account at all, act like we are indoors" to avoid having the projections tinted by the controller during night time (which, as I pointed out above, would be very dark and we would barely see a thing in the reflections).
Finally, I commit the changes to the description fields by clicking on both boxes so they re-read their parameters.
After all this work, here is the result :

At sunrise, the projection is tinted pink

At noon, the projection is not tinted

At sunset, the projection is tinted orangeish

And at night, the first Gazebo Env Box is deactivated and the second one is activated instead, not tinted at all due to the "1" color factor in its parameters.
So, to recap :
You can add conditions after the color part of the parameters, those conditions are of the form [variable] [operator] [value]
The "variable" part is sent by the controller and by default there is only "H", which means "hour of the day" and its value goes from 0 to 23 included (0 being midnight and 23 being 11 pm). There may be other variables later because the controller is made to aggregate all the variables sent by other devices to help choose the right env box to activate. The Options menu also lets you set variables manually.
The "operator" part is simple, it can be any of those six :
"=" means equality
"!=" means inequality
"<" means "less than"
">" means "greater than"
"<=" means "less than or equal to"
">=" means "greater than or equal to"
And the "value" part is a number or a string literal. For example, "6" or "garage_door_open" or "rainy" or whatever you can think of.
If ANY of the conditions is TRUE, then the test is valid and the env box will be active if someone is in it. If ALL of them are FALSE, the env box will remain inactive no matter what. You can link two conditions or more so they have to be valid all at the same time, by replacing the spaces between them with "&" signs.
For example, you might have a room that may change its appearance significantly enough for you to want to show a different reflection when it does. Maybe you're in a garage and you want a version of the reflection with the main door closed and another one with the main door open. In fact, I will demonstrate this very example so thing are perfectly clear for you.
First of all, here is the garage, and let's assume I will open only the door on the left (given the size and shape of the garage, it would be best to make two adjacent env boxes, but for the sake of the example let's say the door on the right is jammed and cannot be opened).
Here is how it looks with its left door closed :

And here it is with the left door open :

You already know the procedure so I'll make it quick.
Set time to "Midday". Wear Env Probe HUD. Rez Env Probe. Resize Env Probe to the size you want. Move the car out of the way (because it is right in the middle). In fact, move the carts out of the garage too as those are vehicles and they can move. You don't really want them in the reflection since they may or may not be there in the future. And check that the cat is not in the garage. And get out of there as well.

Notice I did not make the probe go all the way up to the ceiling, this is because I want the yellow cross to be about hip-level, since this is where the camera will be when I'll take the snapshots. The reflections will look more natural that way.
Now let's take the snapshots.
Create "Garage" folder. Drag and drop a copy of "flip.bat" in it. Click "Next" on the Env Probe HUD. Set snapshot dimensions to 512x512, take the snapshot, save it as "Garage_F" in the "Garage" folder on the hard drive. Do this five more times for "Garage_R", "Garage_B", "Garage_L", "Garage_U" and "Garage_D" respectively. Yes, "Front" is where the workbench is and "Back" is where the door is. It should be the other way around, but it totally doesn't matter. I just didn't bother to rotate the Env Probe, that's all.
Run "flip.bat" once. Upload all six pictures.
Rez "Env Box Static". Edit it, change its name to something relevant (for example "Env Box ~ Garage (closed)" and add a relevant condition after the parameters in the description field, like "garage_door=closed", like this :

Then modify all its six child prims by dragging and dropping the corresponding texture into their respective projector texture slots, one by one.

Once done, click on the "Position" button on the Env Probe HUD, and the first env box is complete.

Now open the door and do all this again. Notice that only the "GarageOpen_B" picture is different from its counterpart, all the others are the same because the shadows do not change inside the garage. So that allows us to upload only this one (after flipping it) and use the other five pictures we've already taken without having to upload them again. Yay, we've saved L$50 in the process.
Before positioning the second env box, stretch the probe a little so it is not exactly the same size as the first one. That way, the env boxes will be easier to select or click on individually.
Edit the second env box and give it a different name (like "Env Box ~ Garage (open)") and more importantly, a different parameter, like "garage_door=open" :

And click on the "Position" button on the Env Probe HUD, and the second env box is complete.
Now what happens after the controller updates all its boxes ? First thing you notice, is that neither of those two boxes is active :

The reason for this is simple : the "garage_door" variable does not exist, and if a variable does not exist, its value is considered to be equal to the name of the variable. Since the word "garage_door" is not equal to the word "open" nor "closed", both boxes stay inactive.
If you're a programmer you must be jumping through the roof right about now... as most interpreted programming languages set a default value to "0" or to an empty string, or raise an error, but none that I know actually pretends that the value of an unknown variable is the very name of that variable.
I made it this way for another simple reason : "garage_door=closed" is interpreted as "Is the value of the variable named 'garage_door' equal to the value of the variable named 'closed' ?". Because "closed" could be the name of another variable after all so this allows dereferencing a variable. Of course, I could have required putting a string literal between quotes and it would have been a lot more consistent with existing languages, but let's not forget that we have only 64 characters in the description field, so every character is precious.
Now, how do we make one of the boxes show and not the other ? Let's test by setting the "garage_door" variable to "closed" in the controller. Click on the controller, go to "Options...", then click on "Set var" and write "garage_door = open" :

And click "Submit".

Tadaa ! There is only one reflection and that's the one with the door open.
Now do the same but enter "garage_door = closed" as the variable :

And here is the result :

This time, the "garage door closed" env box is active, the other one is inactive.
When one box is active, the other is inactive. They are said to be mutually exclusive.
Now, something more fun and that will show you that you seldom have to create several env boxes for the same room.
The three parameters "always active", "brightness factor" and "color factor" are actually expressions, not fixed values. This means that they are evaluated not when they are read in the description field, but when the box status is set by the controller.
In other words, you can write variables instead of numbers in those three fields, and that can prove very useful at times.
For example, let's assume I want the Study Room to be lit the way it is now when the lights are on, but to depend on the light of day when they're off. How do we do that without having to make two env boxes for this room ?
Right now the reflection in the study room during the day looks like this :

At night with the lights on it looks like this :

At night with the lights off the room looks a lot different from the reflection on the sphere :

The overall ambiance is darker but the reflection is just as bright as before, which is to be expected since the projections are barely darkened by the controller because the color factor is 0.75 :

This means that at any time, the final color of the projections is 25% the one decided by the controller and 75% white. So it's mostly always bright.
Wouldn't it be nice if we could condition that factor with the state of the lights in that room ? If we turned the lights off, wouldn't it make sense to darken the room at night ?
Well, it is very easy to do. Replace the "0.75" part with "study_lights*0.75", like this :

Then click on the study room's env box to take these new parameters into account.
And now the projection is much darker :

The calculated color factor is now 0 because "study_lights" does not exist as a variable yet, so the box interprets the expression "study_lights*0.75" as "study_lights converted to a number" (which is 0) multiplied by a 0.75, which gives 0.
Now if you set the variable "study_lights" to "1" in the controller :
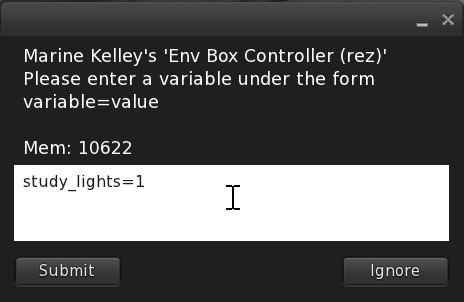

Voilà, the projections are bright again even though it is dark outside. I turned the actual lights of the room on to look better, but for now the controller and the box don't react to them. Yet.
If you set the "study_lights" variable to 0, the projections color will be back to whatever the controller says according to the time of day.
You must be thinking "I don't want to have to enter variables names and values manually in the controller", and you're right, it would be tedious. How about writing a script that does it for you ?
Let's write a script that switches an internal variable between 0 and 1 every time the object it is in is touched by someone. It is, frankly, a trivial script to write, any programmer can do that. If you're not a programmer, don't panic, I will write the source code for you below.
Of course, changing an internal variable when touched is good, but that variable must be exported to the controller when it changes, right ? That's what the script will do.
Let's go.
First thing first, make sure the light is OFF because the script will initially begin with a "0" value in its "light" variable, and we want to make sure it stays in sync with the state of the actual light (since there is no communication between this sample script and the actual script managing the lights).
Here is what the study room light switch looks like when edited :

The "A.E." scripts are not my work but the "Light" script is (I wrote it long ago to control the lights the way I want). We're not going to modify that script now, instead we will create a new one by clicking on the "New Script" button :

Then double-click on that new script to open its source code :

Now copy the following code and paste it over the existing code of the script you've created :
integer nLight = 0; // 0 is off, 1 is on
default {
state_entry () {
}
touch_start(integer num_detected) {
nLight = 1 - nLight; // 0 becomes 1, 1 becomes 0
llRegionSay (-0514220319, "env^set^study_lights^" + (string)nLight); // tell the controller about the change
}
}

This script is very crude but it gets the job done. Now whenever someone clicks on the light switch, the study room env box switches between "make the projection bright" and "make the projection take the controller's color".
You can verify at any time the value of "study_lights" in the controller by clicking on "List vars" in the Options menu.
The operation is done by sending the line "env^set^study_lights^" followed by the value of the lights (0 for off, 1 for on), on the channel -0514220319, which is a special channel the controller listens to.
If the controller's prefix is not "env" but something else, replace "env" in the script with that something else.
The string is constructed like this :
prefix^command^parameter^parameter^parameter...
And it must be sent on channel -0514220319.
The "^" character is the separator. It is a personal preference of mine as it makes it easier to read when debugging, and it is a character we seldom use ^_^.
In our script the prefix is "env", the command is "set" and there are only two parameters : "study_lights" and the value of the nLight variable.
Of course this script is just an example, but now you know that you can set variables into the controller remotely and automatically, and you know how to do that. There is a copy of it in the product box in case you want to take a look and make your own.
Limitations
There are some limitations to this product that come from SL and that cannot be circumvented.
Firstly, the projections are deformed if your Env Box is too flat in one dimension, they look best when the Env Box is a cube. Naturally, not all rooms are cubes so you do what you can, and the resulting reflections will not look too bad anyway, but do expect a stretch when you make your Env Box too flat.
Secondly, as pointed above, since an Env Box activates itself (unless specified otherwise) when an avatar is inside it, two adjacent Env Boxes may be active at the same time if there is an avatar in each one of them, resulting in overlapping projections on one side.
Thirdly, the maximum distance for a projection is 20 m, so you cannot make your Env Boxes much bigger than that, so forget about making an Env Box that surrounds your whole sim, it won't work. What does work is take pictures of your sim and make a worn Env Box with them, and asks your guests to wear a copy of it when they're in your sim. It's not ideal, but it does the job.
Updating your Boxes and Controller
At some point in the future there might be an update for the Env Probe, the static Env Boxes and the Env Box Controller. If you update your Env Probe you will get a whole new package... but what about all the boxes you've already rezzed and tweaked carefully ?
Don't worry, you won't need to redo all this work again, the Env Probe product comes with an "Env Box Client Updater" object which looks like a shiny black ball with drops of water all over its surface :

This sphere contains two scripts : the updater script and the new EnvBoxClient script, the same one (but the updated version) as the one in each one of your static env boxes.
Simply click on it and wait, and it will update all your static Env Boxes one by one.
Once again, if you use another prefix than "env", please change the description field of the updater to match, because it only updates the boxes which use the same prefix.
The controller itself will likely have to be replaced, but it is just a matter of derezzing the old and rezzing the new in its stead. And perhaps changing its prefix if you need, but nothing more complicated than that.
Whew ! That was a long post. I hope you will have fun creating your own environments !
Marine

