Let me introduce you to the latest product in the RealRestraint line : the Highbinder !


The Highbinder is a particular kind of armbinder that goes high up on the arms and which straps cross on the front, ensuring a higher security. Good luck struggling out of that one !
This armbinder is not meant to replace the sculpted one that you know, as its features are different, but to offer a new, more modern design. Instead of changing shape (the sculpted one has different shapes, some covering the shoulders), its focus is on having a very realistic look, being easily customizable, to allow for more angles for the arms (up to a strappado), and using lots of straps to pin the arms together and against the body. It has been a lot of work, a lot more than I anticipated at first, but I must admit I am very proud of the result.
It is entirely made of both rigged and unrigged mesh, most of it being unrigged and easy to resize. The main part is a single mesh object and can be resized in any direction.
It also makes extensive use of materials, so please make sure that you have materials-capable viewer with "Advanced Lighting Model" activated in the Graphics Preferences.

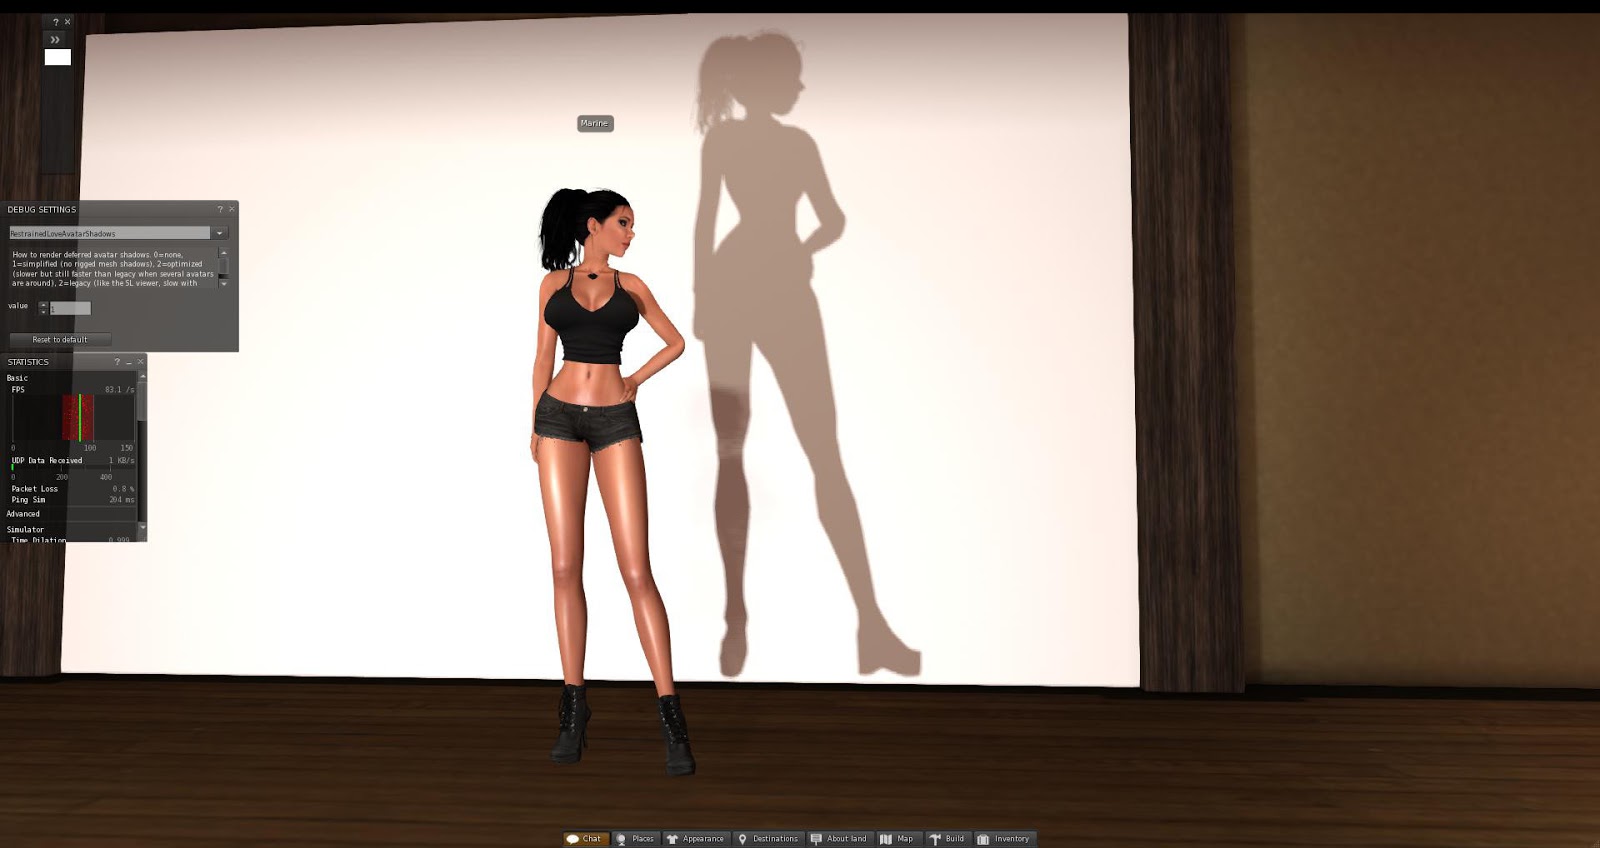
Optionally, if your computer isn't powerful enough to handle ALM, you can turn the shadows off manually to see the dynamic shine without having the FPS drop :

Fashion with the HighBindTex plugin
Its prime focus is on its realistic look, it is skintight and even has creases at the joints. Its design comes from the one I own in RL, the straps crossing on the front, the back going high up on the upper arms with two straps holding the leather up from the outside instead of one from the inside... It's a serious piece of bondage gear ! I bought mine in San Francisco a few years ago, a couple days after saying hi to the Lindens in Battery Street. Good times !
The Highbinder uses the same textures and light components as the Deluxe Gag and the Body Harness, so it is perfectly suited to be worn with them. However it is not limited only to leather... It actually can be set to 9 different materials !

Rough leather

Regular leather

Patent leather (a polished leather)

Blue jeans ! What, you've never seen a denim armbinder before ?

Cordura, a very resilient fabric used by the military

Reinforced spandex

Rubber

PVC

Latex
To change the color and material of the Highbinder, simply use the HighBindTex plugin :

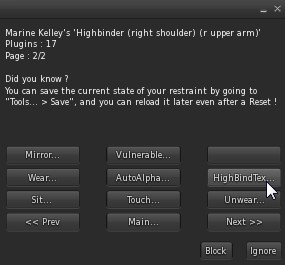

Sections menu : used to specify which prims are to be modified.
- Horizontals : Main part and horizontal straps (the ones that go around the arms and the body).
- Verticals : Vertical or oblique straps (the X ones on the front, plus the armpit ones and shoulder buckles).
- Diamond : Diamond on the front.
- Chest : Whole chest piece.

Surfaces menu : this menu is meant to specify which surface to modify in the selected sections.
- Main : Fabric covering the arms (the glove itself plus the small strap holders on the sides).
- Strap : Front side of the straps.
- Side : Small sides of the straps.
- Lace : Laces only.
- Front : Equal to "Main" + "Strap".
- Trim : Equal to "Side" + "Lace".
- Whole fabric : Equal to "Main" + "Strap" + "Side".
- Whole strap : Equal to "Strap" + "Side".
- Whole metal : Holes, buckles and rings.

Pattern menu :

Tint menu :

Materials menu :
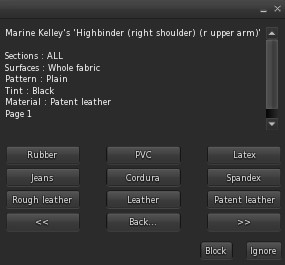
And finally the presets (there are 2 pages of them) :


If you have some basic knowledge on how to make and import textures into SL, and if you are interested in making your own patterns, read on. Otherwise, jump to the next section.
You've seen several examples of customization above, but you can also create your own textures if you like. The textures contained inside the Highbinder are full-perms so they can serve as examples for your own, but you are also provided the UV map of the straps :

This texture is a sort of template that indicates how the whole image is "wrapped" around a strap, like paper wrapped around a gift.
As you can see, the UV map is simple... just write or draw what you want in the middle of the texture, between the two horizontal lines. The two orange strips above and below it represent the trim.
There is a thing to know, though. You might have noticed that the horizontal and vertical straps may or may not share the same pattern (that depends on the pattern). For example, the pattern "You command W&B" will display "YOU COMMAND" on the horizontal parts and "I OBEY" on the vertical ones :

This is because the pattern "You command W&B" is in fact composed of two textures : "You command W&B" and "You command W&B V".


Notice the letters are rotated 90° to the right on the second texture. This is what you will have to do too if you want your textures to be different when the straps are horizontal or vertical : simply name them exactly the same, but add a space and a capital "V" at the end of the vertical one. Also make sure the name does not go beyond 23 characters, which is the limit for a button on the menu.
Some patterns do not have a "V" texture but a "W" one (but they can have both), this is the case for the Seam textures (W&B and B&W). The "W" means "apply this on the diamond and glove prims". In the case of the "Seams" textures, it will simply not display any seam on the glove and diamond, because it would look bad.
Once your textures are done, drop them inside the main object (the one named "Highbinder"). No need to reset, it will reset itself and rebuild its lists right away. Be advised that the textures need to be full-perms as well, or they won't be used by the two HeadHarnessTex plugins.
End of the technical part
Please note that the patterns are not exactly the same as the ones in the Body Harness and the Deluxe Gag & Blindfold. The ones contained in the Highbinder are not painted over leather, since it can change materials, a feature that the Body Harness and the Deluxe Gag do not have yet. But I'm thinking of upgrading them both with material-changing capability in the future. I even want to give them the ability to look like transparent plastic, which the Highbinder won't allow (since it hides the arms underneath), but I digress.
By the way, the 3 stitches textures (diffuse, normal and specular) and the lace texture (diffuse only) are included in the box, full perms. You don't need them, but in case you try to modify a texture manually and mess up, at least you can recover without having to update. They are only for personal use, though, even if they are full-perms because of SL reasons you are not allowed to transfer them to anyone or to include them into any product but your own Highbinder. Thank you for your understanding.
The Highbinder, like the sculpted armbinder, has 6 locks, organized in two groups of three. In each group, you can have straps pinning the arms against the body, above the breasts and below them, and at the belly. When locked to the tightest setting, you can be sure the captive won't move much if at all !

And when the arms are "free" (read : tightly wrapped and maybe strapped together, but still able to move away from the body), you can move your arms high up to a strappado :


This is very useful in some bondage furniture, for example in a BH hook :

There are 6 free animations included in the box to help you simulate a strappado the way you want (bent 45° or 90°, with your legs together, parted at chain-length or widely spread), useful when your captor leashes you Highbinder to the ceiling and you are supposed to remain there, without being actually locked to a piece of furniture. They can also be used standalone, as they are priority 3 and the arms rest on the thighs, so they look good even when you are not bound. A good idea is to add them to your Sublimator so you don't have to play them manually or to make a gesture for each one of them.

Bent 45°, legs together

Bent 45°, legs parted

Bent 45°, legs spread

Bent 90°, legs together

Bent 90°, legs parted

Bent 90°, legs spread
It isn't allowed to resell these animations or to include them into a commercial product, they are only for personal use. You are allowed to give a copy to your friends, though, even if they don't own a Highbinder themselves. That's fair use.
The arms can also be kept really close to the body, even when the body is bundled up, by using the RR Anim HUD (included in the box) :

Not using the RR Anim HUD

Using the RR Anim HUD
How to resize and use the Mirror plugin
The Highbinder has been made with high customization in mind. We are in the era of mesh bodies now, which means there are now many more different body shapes out there than before. Some people use a Maitreya, others a Belleza, others a Slink, others stick to their system shape, and so on. So it is important to be able to resize all the prims individually, but without taking all day to do this.
For this reason, the parts have been cut with care and a plugin has been created to lighten your workload, by allowing you to mirror the size, position and rotation of some of the straps after you are done with one side.
The Highbinder is divided into 3 objects (I purposely left the rigged parts invisible there, to avoid confusing you) :
- The root item containing the main glove (with its own straps and laces, it's all one single "prim") :

Main glove, exploded to show all the prims
- The chest straps forming the X on the front, with its diamond :

Chest straps

The same, exploded to show every prim
- The belly strap, composed of only the horizontal strap and its cinch :

That one's easy
As you can see, that's not many prims to adjust.
The root item and the belly part both contains some rigged straps :


Those straps are rigged because they need to deform across joints when the body moves, and they cannot be resized, moved or rotated (that's an SL limitation). They are however Fitted Mesh, meaning they change shape according to your shape sliders. But since they are parts of straps instead of complete straps (since those straps need to be resized to your shape, as Fitted Mesh cannot do it for you, especially for mesh body users), they are supposed to look seamlessly linked to the rest of the contraption, like this :


... and not like this :

Seam between the unrigged upper chest strap and the rigged upper chest link

Seam between the unrigged buckle and the rigged shoulder strap
The four rings on the X straps, the buckles on the back and the small loops at the end of each horizontal chest strap are there to act as "glue", to give you more margin for error when you connect the unrigged straps to the rigged ones :


In these pictures, the green parts are unrigged and can be adjusted manually, while the red parts are rigged and cannot be resized or even moved. The lighter green ones are those in direct contact with the rigged parts, those are the ones that need extra attention to position in order to appear seamless.
It's all a bit technical, I know. But it will really make your life easier and you'll get a really tight fit in the end, no matter what body you're using. The bottom line is that the "glue" parts will spare you a seizure if you are OCD with the fitting like me. By the way, the Highbinder was designed on a standard SL shape (what is known as the "Ruth" shape), but my shape is far from that standard, and I use a Maitreya mesh body on top of it. Notice how it fits me well on the pictures, and it took only minutes to fit it right. Fortunately, because I had to fit it quite a few times during the development and testing of this product.
The diamond on the chest parts is there to act as "glue" as well, but this time between 4 unrigged parts, to give you some leeway over their positions, rotations and sizes. It is also there for another reason : the real life counterpart has some kind of square-ish pad of leather at the crossing, to avoid the straps from scissoring against your throat. I have tried both with and without this leather piece, believe me, you want it there. On the Highbinder, it hides the cut between the straps and it looks good, as you can have it display a pattern :

To finish with the adjusting, once you have adjusted one side of the body, you can use the Mirror plugin to mirror to the other side instead of doing the same thing twice :


That plugin is a very simple one (at least its menu is, under the hood that's another story), it lets you mirror from left to right and from right to left at will. It works for the chest straps and rings, and for the two buckles on the main part. Attention, there is no Undo feature, so be careful what you click on !
Adjust one side...

Those left straps are a mess...
... use the Mirror plugin...

... and see the result :

Fixed !
Addendum : Adjusting to your breasts size
After the release, I realized that not every girl was able to adjust her Highbinder to her own shape, if she was using the system body and having a rather ample chest, as the two horizontal rigged chest parts would clip through her body and there was no way to avoid that.
So I have added a plugin called "BreastSize", which is in charge of letting you choose the best adjustment for your horizontal rigged straps according to your chest.
But you might be thinking "Wait, aren't those straps supposed to be Fitted Mesh ? If my breasts are bigger, then those straps should follow, right ?". And you would be right, in part. I tried to do that at first then quickly noticed that although the straps would indeed move away from the body when the breasts grew bigger, they would also jiggle along with the breasts when walking ! But not the unrigged ones, of course ! It looked silly so that's why they are not rigged to the Breast Size shape slider of your body, but only to the Torso Muscles one.
And that's why, despite being Fitted Mesh, those particular straps still need several sizes. This is what the BreastSize plugin is for, it lets you choose among Breast Size 50 (and less), 66, 75, 85 and 100 :


Please note that the BreastSize plugin is nothing else than a renamed Style plugin, and as such, it follows the same design : every style is proper to one lock only. This means that you will have to choose your breast size on this plugin once for every lock (hence six times). I'm sorry, I know it is annoying but it must be done only once when fitting your restraints. I'll try to make a variant of it that makes the style (i.e. the breast size setting) common to all locks, when I have more time, to avoid surprises. This was a quick fix, really !
If you have bought your Highbinder before August the 8th, 2015 around 4 am SL time, and you couldn't resize to your system shape, you might want to get an update (a replacement, in fact) from any of my updaters. You can find one at my shop, the slurl is written at the end of this post. If you have bought it after that time, then your Highbinder should already have the BreastSize plugin included.
Hiding the arms with the AutoAlpha plugin
As mentioned above, the Highbinder is tight, very tight. So tight that it would actually let your skin clip through if your arms weren't hidden underneath. And once again, you might be using a mesh body, or you might not. And you might be using mesh hands, or you might not. To account for that, the Highbinder features the AutoAlpha plugin that will hide your arms for you whenever you're tied, and show them when you're freed. Please note that you need to use a RLV for that, it wouldn't work on a non-RLV viewer and you'd have to hide your arms yourself :


The purpose of the AutoAlpha plugin is to know what to attach and detach, and when. To do this, you specify several paths (absolute or relative) to the folders of your choice :
- The folder(s) to attach when locked and detached when unlocked. It is called "Alpha" as it usually contains the alpha layer included in the box, but it will typically contain the Maitreya auto-hide object too, if you are a Maitreya user (in which case you wouldn't need the alpha layer at all, since your system body would already be hidden by a bigger one).
- The folder(s) to detach when locked, it is called "Detach" and usually contains mesh hands. When locked, the folder and all its sub-folders are detached.
- The folder(s) to attach when unlocked, it is called "Attach" and usually contains mesh hands as well. When unlocked, the folder (but not its sub-folders this time) is attached.
The reason why the "Detach" folder may be different from the "Attach" one is because you may want the Highbinder to detach whatever hands you are wearing without knowing exactly what they are (the Slink hands, for example, do not have the ability to change shape themselves, unlike the Belleza ones, so you might be wearing the casual version, the fist version, the bag version, whatever) but they may all be located under the same parent folder, which is the one that will be detached. Conversely, since the Highbinder did not know which hands you were wearing when locked, it won't know which ones you want it to make you wear when unlocked, so that's why the folders can be different.
It doesn't really matter what's inside each folder. When visible, it will attach whatever is in the "Alpha" folder and detach all the contents of the "Detach" one (as well as its sub-folders). When invisible, it will detach whatever is in the "Alpha" folder and attach what is inside the "Attach" folder. It doesn't even check whether there's something in those folders or if they actually exist or are even specified, it doesn't have to.
To specify a folder, simply click on "Alpha ?", "Detach items ?" or "Attach items ?". The question mark ("?") is there to remind you that there will be a question asked to you after you click on that button. That question takes the form of a text box in which you will write the path to a folder, or several paths to several folders (one per line) :


A path is like a filesystem path on MS-DOS, a Linux shell, a Mac terminal, even a url, it's fairly standard geek stuff. For example, my mesh hands are located in "Body/Hands/Left" and "Body/Hands/Right":

As you can see I have a lot of hand shapes in there.
Suppose I want my Highbinder to attach my Casual left and right hands when unlocked. To do this I specify both paths in the text box, one path per line :

Notice that I did not have to write the ">" part of the "Body", "Hands", "> Left" or "> Right" folder names, because the RLV works on a partial-match basis. "Body/Hands/Left/Casual" is the same thing as "> Body/> Hands/> Left/Casual". In fact, even "bo/han/l/cas" works, if I'm lazy.
Those paths I showed you are absolute ones, i.e. they start at the root (the "#RLV" folder itself). But you can also specify relative paths, as in, relative to where the Highbinder is (because chances are you are going to move it to your #RLV folder as well).
I recommend you create a folder inside the one where your Highbinder is, name it "alpha", and move the alpha layer in it. Or the Maitreya auto-hide object, if you are a Maitreya user like me. Or both. Then specify "./alpha" to the AutoAlpha plugin and you're set.

Recommended folder structure for your RR Highbinder
That way it works the same whether you are wearing a mesh body or not.
In that case, you don't want to write "Restraints/Leather/Highbinder/alpha" in the text box, for you might want to move the Highbinder elsewhere later and that would break the link. So instead, you can just write "./alpha" and it will work just fine. The "./" prefix means (like in any standard filesystem) "the folder we are currently in", and would be replaced at run-time by "Restraints/Leather/Highbinder/" (or whatever folder the Highbinder is in at that time). The "../" prefix means "the parent folder", and that works as well, but I can't think of an example where it could be useful here. Maybe in your own inventory it could help you, who knows. It's there, at least.
The "Hide" and "Show" buttons allow you to simulate a lock and an unlock respectively, to check that your folders are correctly set. The "Active" button simply lets you activate and deactivate the plugin. You can also check that it has detected your RLV. You don't really need to care about the number, if there is one, that means it is detected. At the time of this writing, the version of the latest RLV is 2.9.12, which shows as "2091200". Yay, more geek stuff.
To recap and to show you more examples, my own configuration is the following :
Alpha : "./alpha"
Detach : "body/hands"
Attach : "body/hands/left/casual, body/hands/right/casual"
One last thing : the Maitreya mesh body allows for an auto-hide but not an auto-show, due to how it is scripted. This means that when unlocked, you'll have to show your arms manually if you're a Maitreya user. Hopefully a future version of the Maitreya body will address this. I am not aware of any other body that handles auto-hide, but I'll gladly include an object for it in a future version when possible. I think the Abar eBody will eventually. Also, don't be surprised if the auto-hide object detaches itself from your screen after 2 seconds, it simply sends its command to the Maitreya body and detaches itself, as it is no longer needed until next time, so you don't have to do anything.
You can find the RealRestraint Highbinder in any of the RealRestraint vendors in-world, it is Modify, No-copy and Transfer, and costs L$700 :

The box includes :
Highbinder (right shoulder) (r upper arm)
Front x straps (chest)
Belly strap (right pec)
RR Highbinder alpha
RR Highbinder - Maitreya Auto Hide
RR Highbinder stitches DIF
RR Highbinder stitches NOR
RR Highbinder stitches SPE
RR Highbinder laces DIF
RR Anim HUD
README_Highbinder
Landmark to my shop
One location where to find a RR vendor is in Pak :
http://maps.secondlife.com/secondlife/Pak/76/61/105
Have fun !
Marine
Thank you to :
Angelina Sinclair
Danna Pearl
Keiyra Aeon
Atmu Evans
Sindrey Trellis
for your precious help, ideas, feedback and cheers !
PS : You may have noticed the bizarre name of the main object : "Highbinder (right shoulder) (r upper arm)". Does it attach on the right shoulder or on the right upper arm ? It attaches on the right upper arm, but since it needs to be controlled by any RR Anim HUD, including the already existing ones, and that they control only restraints worn on the right forearm and on the right shoulder, I had to keep the "right shoulder" part within the name of the Highbinder object. It is only for compatibility purposes. The other option was to make a fourth attachment containing all the main scripts, and to wear it on the right shoulder or the right forearm. It would have cost an additional attachment point, though, and more scripts to make it function.
PPS : For the fashionistas out there, the shorts I'm wearing in these pictures come from Blueberry ("Cossy" shorts), the bra is the one coming with the Maitreya mesh body, and the sandals are "Sierra" by KC Couture.






 Posts
Posts

